> For the complete documentation index, see [llms.txt](https://docs.toomuchmedia.com/llms.txt). Markdown versions of documentation pages are available by appending `.md` to page URLs; this page is available as [Markdown](https://docs.toomuchmedia.com/getting-started/onboarding/an-overview-of-nats.md).
# An Overview of NATS
## Main Affiliate Screen
Affiliates see the main affiliate screen when they log in to NATS. Like all NATS pages, you can completely customize its layout.
The links on this page take you to the pages described below. The graphs show the affiliate's promotional progress.
## Affiliate Stats
The affiliate statistics page gives affiliates all the statistical tools they need to analyze and improve their promotions.
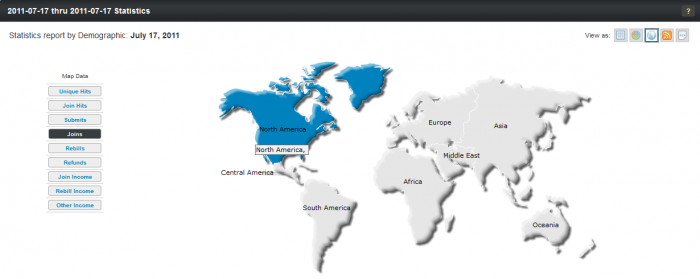
The report lets affiliates get detailed statistical information in an easy-to-use interface. It groups traffic into a dozen different views. For example, the demographics view (illustrated below) lets affiliates view statistics on a continental, regional, or national basis, and the affiliate can compare traffic from several countries side-by-side.
\
Similarly, the Statistics report also allows affiliates to "break down" performance data by date, site, program, campaign, traffic tag, ad tool, and referring URL.
Affiliates can customize their default view to include whatever statistical reports they find most useful. The right side of the default view shows summaries of the affiliate's site, program, campaign, and ad tool activity.
### Affiliate Referral Program
Affiliate referral programs, also known as *Webmaster Referral Programs,* let affiliates refer other affiliates to your program. The referring affiliate gets paid a percentage for all of the referred affiliate's sales.
For Example: Affiliate Alice signs up Affiliate Bob; Alice earns 10% of Bob's sales. Affiliate Bob signs up Affiliate Conrad; Bob earns 10% of Conrad's sales and Alice earns 2% of Conrad's sales. In this setup, Bob is Alice's first tier, and Conrad is Alice's second tier. You can have up to eight tiers and you can pay a different percentage for each tier.
### What's a Campaign?
Campaigns let each individual affiliate track their traffic in their own way. Affiliates tag their referrals by assigning a campaign to their referral links. NATS records the incoming campaign tag and lets affiliates break down their campaign statistics on the Affiliate Statistics page.
For Example: an affiliate creates two campaigns -- one for each of their sites. Now the affiliate can compare the performance of those two sites.
## Affiliate Ad Tools
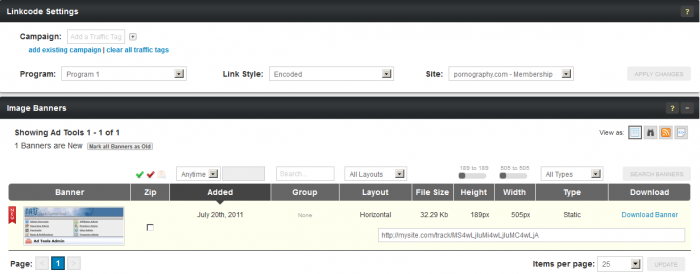
The Affiliate Ad Tools page lets affiliates get linkcodes and Ad Tools for promoting your sites. You can access the Affiliate Ad Tools section by clicking the "Tools" link at the top of the page. Its simple tab-based navigation lets affiliates quickly find the type and style of Ad Tool they want and then choose from a list of matching Ad Tools.
The "Linkcode Settings" section lets affiliates choose which site and program to get ad tools for. You can also select whether you want your NATS linkcodes to be encoded, un-encoded, or if you want them to display shortnames.
The ad tools page comes set up for the most common ad tool types, but you can add your own custom types, for example: page peels, very easily.
### What's a Linkcode?
Linkcodes are referral URLs tracked by NATS, Linkcodes can be used directly by affiliates or NATS can embed the linkcode in an adtool for the affiliate.
### What are Downloadable Ad Tools?
Affiliates download your downloadable ad tools and put them on their websites. For example, you can turn a video into a downloadable ad tool.
## Affiliate My Account
The Affiliate My Account page lets the affiliate change their account information, preferences, and send and receive messages. The eight in the "Navigation" box let the affiliate navigate between their settings.
* The Account Detail tab lets the affiliate change their account information
* The Settings tab lets the affiliate customize his default layout, as well as edit e-mail and notification settings
* The Account Change Log tab provides a detailed history of changes you have made to your account
* The Login History tab provides a detailed history of login activity to your account
* The Messages tab shows all sent/received messages and notifications
* The Manage Quick Links tab allows you to remove or change the order of the quick links that appear on the Dashboard
* The [Campaigns ](/affiliate-area/affiliate-area/my-account/affiliate-campaigns.md)tab lets the affiliate create or edit campaigns
* The Payment History tab shows a detailed report of payments that are owed to the affiliate, the payment method, and whether or not the payment has been stored/paid yet
Using the account settings tab, the affiliate can prevent anyone from changing their payment information with the affiliate confirming the change through email.
### Overriding Affiliates
You can change an affiliate's settings by overriding that affiliate. When you override an affiliate, you temporarily become that user; you can get their linkcodes, view their statistics, or adjust their account.
To override an affiliate, go to the [Affiliates Admin](/nats-admin/affiliates.md), find an affiliate, and click the Override Affiliate icon. Overriding is explain in more detail in the Affiliates Admin section below.
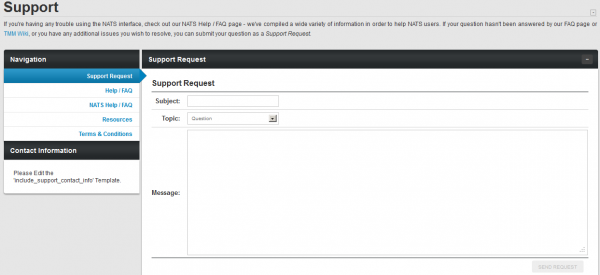
## Affiliate Support
We made the support page easy for you to customize so that you can give your contact information and support links to affiliates. Customizing this page is easy in the Skins and Templates Admin.
### Using Account Reps
Account Representatives help you manage your affiliates so that you can manage your business. Account representatives get to see statistics for the affiliates they manage. They can send news and notifications to their affiliates and receive support requests. You can even pay account representatives a percentage of their affiliate's income.
## Skins and Templates Admin
You can customize the look and feel of your affiliate program using the Skins and Templates admin. A Skin is a set of templates that work together to provide your affiliates with a consistent user interface. NATS comes with the default skin you see in the affiliate area and you can create as many of your own skins as you want.
You will not be able to edit the default NATS skin. This is a failsafe measure, as you will always be able to revert to the default skin if you lose your other code. You can create a new skin by pressing the *Create New Skin* icon next to an existing skin. A new skin inherits the properties of the skin above it with less indenting -- the parent skin -- and each template in the skin retains its parent's properties until you customize the child's template the first time. Click the edit button to change the skin's name, description, and who can use this skin.
Click the "Edit Templates" action icon to see a list of your skin's templates. The templates follow a specific naming scheme:
* The admin\_ templates display administrative areas
* The affiliate\_ templates display the affiliate areas
* The external\_ templates display the public areas that don't require a login
* The function\_ templates support the other templates
* The includes\_ templates work with the Includes Admin
* The mail\_ templates generate email bodies
To edit a template for the first time, press the Customize icon; clicking this icon separates the child template from its parent. Several other icons also let you work with the template:
* The Revert icon throws away your changes and restores the child template to a duplicate of its parent
* The Edit icon lets you edit a template after you customize it
* The Duplicate icon lets you duplicate a template
* The View icon previews the template for you.
{% hint style="info" %}
**Please Note:** This preview won't contain any dynamic information the template expects, so a correctly coded template may display incorrectly
{% endhint %}
* The Delete icon deletes the template. You cannot recover a template after you delete it
Back on the main Skins page, there are Import and Export tabs that let you add a template from your computer or save a template to your computer. You can also change the default skin for the different user types. You can also flush the template cache; click this button if your templates are not displaying correctly.
### Other Templates
You can find most of NATS's templates in the Skins and Templates Admin, but certain templates are found elsewhere in the NATS admin.
* The **Site Templates** are specific to each tour. They include the most customized template in NATS: the Join Template. You can edit the Site Templates in the Sites Admin.
* The **Mailer Templates** let you send mass mailings to your affiliates and members. You can write mailer templates in the Mailing Admin.
* The **PayVia Templates** change the format of your payment output. You can edit PayVia templates in the Payments Admin.
### Template Functions
NATS includes over 50 custom Smarty template functions that let you customize the layout of your site. For example, here are some of the most popular template functions:
* The nats\_encode function creates a linkcode
* The nats\_decode function gets information from a linkcode
* The nats\_list\_linkcodes function gets lists of customized linkcodes
* The nats\_list\_tours function creates a the list of all tours offered by a particular program
* The nats\_list\_campaigns function obtains a list of available campaigns for an affiliate
For a complete list of template functions, please see the Template Functions article.
## Billers Admin
The Billers Admin is where you add and modify the settings for your payment processors.
* Stop cascade: when the visitor gets to this step, NATS shows them the denial template
* Switch cascade: when the visitor gets to this step, NATS sends them to the top a different cascade you choose. You can use this rule to send them to a hidden cascade. You can also use this to switch biller payment methods (ex. if a surfer's credit card gets rejected, send them to a check payment processor)
* Show template: when the visitor reaches this step, NATS sends them to a template you choose
* Redirect: when the visitor reaches this step, NATS sends them to any URL you choose
When adding a biller to a cascade, there are a few special options:
The custom cascade rules let you choose when to show this cascade to visitors. The first matching rule takes precedence over all over rules.
* Cascade weight: how often should NATS choose this cascade over other cascades with the same name?
* Automatic cascades: should NATS send the visitor straight to the first biller in this cascade without trying to collect any information beforehand?
* Hide cascade: don't let visitors choose this cascade; you can manually choose hidden cascades for visitors.
* Target/excluded: let or forbid visitors from these countries from accessing this cascade
NATS keeps sending the visitor to new billers until there are no more billers in the cascade. You can edit the cascade to find the following options:
1. A visitor visits your tour page
2. They decide to join and fill out your pre-join form
3. NATS sends them to the first biller in the cascade
4. If the biller approves them, NATS makes them a member
5. If the biller doesn't approve, NATS sends them to the next biller in the cascade
After you add a biller, a cascade is automatically created. Cascades increase the probability that a visitor will sign-up by adding an extra step to the sign-up process:
To add a new biller, pick a biller from the drop-down, enter your account information, click the biller charges tab and enter this biller's charges, and choose when to deduct this biller's charges. (For a more thorough description, please see the Billers Admin article).
### Biller Setup Instructions
Since each biller has different settings you must configure and optional settings you may have configured, we have separated the biller instructions into a different article for each biller. For example, we have an article each for CCBill, Epoch, and Netbilling.
You can find the complete list of instructions in the right-side menu of the Billers Admin entitled *Biller Instructions*.
### Working with a Shopping Cart
NATS lets you credit affiliates for sales made through your shopping cart. For example, an affiliate refers a consumer to your landing page; the consumer picks a product, buys it through your shopping cart, NATS tracks the sale and pays the affiliate for the referral. For more information about shopping cart sales in NATS, please see the [Shopping Cart Sales](/using-nats/one-off-articles/shopping-cart-sales.md) article.
## Programs Admin
NATS uses programs to define how affiliates get compensated for referrals, such as page hits, member joins, and rebills.
Programs can be created as Enabled Programs or Disabled Programs. A newly created enabled program will automatically enroll all new affiliates in the program, but not current affiliates. A newly created disabled program will need affiliates to be manually added to that program. Affiliates will not be able to choose which program they will be enrolled in.
{% hint style="info" %}
**Please Note:** If you want to create a new program that will have all current and new affiliates enrolled, you must create a new disabled program, enroll your current affiliates in it, and then manually enable the program.
{% endhint %}
A new program requires a name, shortname, and type. The name is displayed to affiliates, the shortname is used by NATS as an internal identifier, and the program type defines how affiliates get paid.
* A Standard Program promotes membership sites
* A Third Party Program promotes other sites that pay your affiliates for you
* A Cross Sale Program promotes [cross sales](/additional-resources/common-terms.md#cross-sell) between your program and other programs
* A CCBill-Paid Program bills your customers using CCBill and pays your affiliates using CCBill
* An Affiliate Referral Program pays your affiliates for referring other affiliates (up to two tiers)
* An Affiliate Referral 8 Tiers Program pays your affiliates for referring other affiliates (up to eight tiers)
* An Account Rep Program lets you pay account representatives for managing affiliates
* An Extended Program lets you pay affiliates for events that aren't tracked by NATS. For more information, please see the [Extended Sales](/using-nats/one-off-articles/extended-sales.md) article
The extended payout description is for [Extended Sales](/using-nats/one-off-articles/extended-sales.md).
After you create a standard program, several new options appear. You can deduct credits, chargebacks, voices, and insufficient funds from affiliate payouts; in a revenue share program, these are removed even if you don't check them as they reduce revenue.
You can use the Tours in This Program section to choose which tours are promoted by this program. Set the program's default payouts in the Default Payouts section; the options in the Default Payouts section change depending on what type of program you're using.
On the main Program Admin page, each program has several action icons.
* The Enable Program or Disable Program changes the program's state. For details, please see [Enabling and Disabling Programs](/nats-admin/programs/programs-management.md#switching-to-manual-automatic-enrollment) section of the Programs Admin.
* The Edit Payout Changes icon takes you to this program's Commissions
* The List and Modify Enabled Affiliates icon lets you change which affiliates are in this program
* The Disable Program and Remove Affiliates remove the program from view.
Click the Commissions tab to see a list of each program's default payouts. Click the Edit Default Payouts icon to change the default payouts. Programs listed in red have custom payouts. Click the Setup Payout Changes icon to create or edit custom payouts. You can create standard permanent payout changes, temporary payout changes, tiered payout changes that pay affiliates for sending more than a specific amount of traffic, or recurring payout changes that happen on a schedule. For more information, see the [Payout Changes](/nats-admin/programs/further-reading/payout-changes.md) article.
### Build Your Own Anything
The Build Your Own Anything (BYOA) module lets your NATS affiliates build their own tours and advertising tools for inclusion in your affiliate program. They can create site tours, banners, hosted galleries, and full and half page ads for any of your sites. You can pay the affiliate who created the ad tool or tour a [commission](/additional-resources/common-terms.md#commission) on all sales that tool generates. For example, you can pay a bonus of $1 for each sale generated by a tour they created.
### Shortname Rules
NATS keeps track of programs, sites, and many other things using shortnames. Each shortname must be unique within the NATS program and may not contain spaces or special characters.
**Example of Good Shortnames**
* my\_program
* program1
**Example of Bad Shortnames**
* my program
* program#1
## Sites Admin
The Sites Admin allows you to set up and configure a site in NATS for each website you want to promote
Click the Add a Site tab to add a site. There are several different types of sites:
* A Membership site sells subscriptions
* A Token site lets visitors buy tokens to use features on the site
* A Store site sells products through a shopping cart. For more information, please see the [Shopping Cart Sales](/using-nats/one-off-articles/shopping-cart-sales.md) article
* A Third Party site lets visitors by a membership to a third-party site
* An Affiliate site lets affiliates refer other affiliates
Next to each site on the main Sites Admin page is a drop-down list of tours and an Edit button. Choose a tour and click Edit to see the tour specific settings.
* The URL is where visitors start the tour
* The Linkdomain is the domain linkcodes point at
* The Default Program is the program that tracks visitors who arrive without an affiliate's program
* The SPARTA URL only applies to customers that use the discontinued SPARTA software
* The Language and GeoIP Targeting settings let you send visitors from specific countries to alternative URLs
* The Email settings let you email members for specific events. Enter a subject to activate the email; click Edit Template to edit the body of the email. Emails will not be sent without setting a subject in the Sites Admin.
* The Approval, Denial, Upgrade and Postback fields determine where visitors are sent after they're approved, denied, or upgraded
* The Postback URLs let you send transaction information to your own scripts
* The User Management URL lets you manage users using your own script. For more information, please see NATS Site User Management
* The BYOA Details are used by the NATS Build Your Own Anything Module.
Activate the billers for this tour by entering their tour-specific settings, such as merchant ID, passwords, etc. in the Biller Details section. These settings must be obtained from the biller themselves.
You add join options by clicking Setup Additional Options for this Site. There are three checkboxes:
* The Free Pre-Initial checkbox lets you add a join option that starts with a free trial
* The Disallow for Old Members checkbox lets you forbid previous members from using the free trial again
* The Active for All Tours puts this option on all of this site's tours
Enter the join option's prices and join form text and then enter the join option-specific settings in the Biller Codes section.
After you create a join option, you can edit it on the same page. You can also edit its templates -- including the very important template, the join form -- and you can change the Join Option Rules. These rules determine when the join option is shown to visitors.
On the main page of the Sites Admin, each site has several icons.
* The Edit Site Details icon edits the site's details. For more information, see the [Creating a new Site in NATS](/nats-admin/sites/common-questions/creating-a-new-site-in-nats.md) article.
* The Add New Tour icon adds a new tour
* The Set Join Options icon lets you add or remove join options for all tours on this site.
* The Set Active Programs icon changes which programs this site belongs to
* The Edit Site Partners icon lets you add site partners to this site. For more information, see the [Site Partner](/nats-admin/sites/site-management/site-overview/site-partners.md) article.
* The Edit Site Templates icon lets you modify the site templates. For more information, see [The Sites Admin Templates article](/nats-admin/sites/site-templates.md).
* The Redirects icon lets you take traffic to an old tour or program and redirect it to a new tour or program
* The Delete Site icon removes a site from your Active Sites list.
* Click the "Click Here to Show Deleted Sites/Tours" link to display your deleted sites and tours
### What's a Site Partner?
Site Partners share in a specific site's revenue. Often site partners are affiliates with a special interest in a site; for example, a site devoted to an actress may have that actress as a site partner. NATS also gives site partners statistics about all of the site's activity.
You make affiliate site partners in the Affiliates Admin and you tell NATS which sites they're partners of in the Sites Admin. For more information about Site Partners, please see the [Site Partner](/nats-admin/sites/site-management/site-overview/site-partners.md) page.
## Payments Admin
The **Open Payments** section lists [Pay Via Methods](/nats-admin/payments/pay-via-methods.md) and the total amount you owe all affiliates using each PayVia type. The total includes affiliates whose payout is below the minimum you set. The **Stored Payments** section lists payments that are ready to be sent out to affiliates. The **Sent Payments** section lists how much you paid affiliates on specific dates.
In the stored section, you can view, edit, or pay a payment. Click the View Payment Dump icon to view the payment in dump form. While viewing the payment, you can copy and paste the output into a payment processor. You can also edit payments, remove payments, and mark them as paid.
The Pay Via Types, Dump Formats, and Auto Payments tabs let you configure how to pay affiliates.
Click the Pay Via Types tab to change the payment types available to affiliates. Each list item describes a payment method offered by NATS. The Edit Icon lets you change the options displayed in the list and the Edit Pay Via Setup icon lets you configure the form that collects affiliate account information.
Click the Dump Formats tab to change the payment output format you download and submit to the payment processor. Choose an output format and click the View Dump Format icon. Instructions for editing the output format are in the Creating and Editing [Pay Via Options ](/nats-admin/payments/common-questions/adding-a-new-pay-via-method.md)and [Dump Formats ](/nats-admin/payments/common-questions/how-to-add-a-dump-format.md)article.
NATS lets your affiliates get instant payments using the integrated automatic payment systems. You may individually specify which affiliates may use instant payments.
Instant payment only works for full days of sales, but an affiliate can get an instant payment for any full day of sales even if they don't reach the minimum payout amount. At the end of the period, NATS sets up payments normally.
## NATS Program Overview
The NATS Admin Overview shows you attractive charts and useful summaries of your program's recent activity.
The top of the page contains several tabs that allow you to change what periods you want to view your stats for (i.e., Today, Yesterday, This Week, This Year, etc.).
A list of newer members appears beside the list of newest affiliates.
You can use the action icons next to each affiliate and member to modify that person's account.
## Affiliate Admin
Manage your affiliates in the Affiliates Admin
The top search box lets you find specific affiliates. After you find affiliates, the Affiliates list shows information about each matching affiliate. Left of each Affiliate is a checkbox and an Icon. Mark the checkbox for several affiliates, scroll to the bottom of the page and use the Perform Action drop-down to manage each marked affiliate at the same time. Click the icon to edit the affiliate's account access permissions.
The Account Type drop-down on this page has six options ordered from least access to most access:
* An Affiliate is a common affiliate.
* An Account Rep manages affiliates. For more information, see the [Account Representatives ](/nats-admin/affiliates/further-reading/account-representative.md)article.
* A Site Partner shares site revenues and gets extra statistics. For more information, see the [Site Partner](/nats-admin/sites/site-management/site-overview/site-partners.md) article.
* A Subadmin has limited administrative access.
* A TMMAdmin has full administrative access, but can only log in from the IP addresses specified by the TMM\_ADMIN\_IPS configuration option. For more information, please see the Configuration Options section of the [Configuration Admin ](/nats-admin/configuration/configuration-overview.md#configuration-options)article.
* An Admin has full administrative access. For more information, see the [Account Types](/nats-admin/affiliates/affiliate-account-types.md) article.
You can customize the access permissions of users using the Permissions Exceptions check boxes. Enabling a Display checkbox lets the affiliate see that page. Enabling All Actions lets the affiliate perform any action on that page; you can further restrict their access by clicking the links in the Specific column.
On the main Affiliates Admin page, on the right of each affiliate are several action icons:
* The Affiliate Overview Icon shows the affiliate's account information
* The Override icon lets you override and take control of that affiliate's account.
* The Edit Affiliate Details icon lets you change the affiliate's account details page
* The Affiliate Statistics icon takes you to the affiliate's statistics page
* The Affiliate Documents icon lets you upload documents for affiliates.
* The Add Manual Sale icon adds a manual sale.
* The Add Manual Invoice icon adds a manual invoice. For more details, see the [Manual Invoice ](/nats-admin/affiliates/common-questions/how-to-add-a-manual-invoice.md)article.
* The Edit Affiliate Admin Settings icon lets you change several special settings.
* The Change Affiliate Password icon changes the affiliate's password
* The Change Affiliate Status icon lets you Disable or Ban affiliates.
* The Delete Affiliate icon deletes the affiliate's account
An override is an admin's ability to temporarily become an existing affiliate. Overriding as an affiliate doesn't affect the administration interface, but any changes made in the affiliate area change the affiliate's account.
To manually add a sale to an affiliate, go to the Affiliates Admin, find the affiliate, and click the Add Manual Sale icon. Enter the manual sale details and click Add Manual Sale. **Warning: you cannot remove a manual sale -- it's a real sale, and you must pay the affiliate for it.**
## Members Admin
Manage your members in the Members Admin
You can add a new member to your database by clicking the Add Member tab at the top of the screen.
The top search box lets you find specific members. After you find members, the Members list shows information about each matching member and includes several action icons:
* The View Member Details shows the member's details, including the member's referring affiliate and subscriptions
* The Edit Member Details lets you change the member's recorded personal details, including their password and account status
* The Delete Member icon lets you delete a member. This option isn't always available; for more information, please see our "[How to Delete a Member](/nats-admin/members/common-questions/how-to-delete-a-member.md)" page.
## Reporting Admin
Select the report you want to see using the View Report drop-down. There are a variety of reports to choose from:
1. The Profit and Loss report shows you program's profit and loss by day
2. The Retention report shows how long consumers stay subscribed to your sites
3. The Subscriptions report lists each of your consumer's purchases
4. The Transactions report lists each of your consumer's purchases
5. The Fraud report shows potential fraud by your affiliates
6. The Detailed Trial report lists all trial subscriptions, as well as details on them
7. The Cascade Activity report shows what steps a surfer takes once they reach the NATS pre-join form
8. The Account Reps report provides a list of account reps and relevant statistics
9. The Surfer Actions report lists what actions surfers have taken on your sites
10. The Affiliate Referral Tier Payouts report displays vital statistics for affiliate referral tiers
11. The Affiliate Referral Signup Payouts report displays how much you have paid affiliates who refer other affiliate.
## Ad Tools Admin
The Ad Tools Admin lets you setup and manage your Ad Tools, such as banners, hosted galleries, downloadable Ad Tools, and feeds
The Ad Tool Categories list shows information about each Ad Tool category. Right of each Ad Tool category are several action icons:
* The Move Category Down and Move Category Up icons changes the order each category is displayed on the Affiliate Ad Tools page
* The Edit Ad Tool Category icon lets you change the category name and description
* The Disable Ad Tool Category deletes the Ad Tool category
Each Ad Tool category has one or more Ad Tool types. Right of each Ad Tool type are several action icons:
* The View Ad Tools icon lets you add or edit Ad Tools. For more information, see the Adding and Editing Ad Tools section below
* The Move Type Down and Move Type Up icons change the order each category is displayed on the Affiliate Ad Tools page
* The Edit Ad Tool Type icon lets you change the Ad Tool type's description, template, and fields
* The Duplicate Ad Tool Type icon duplicates an Ad Tool type. For more information, see the Duplicating Ad Tools section of the [New Downloadable Content Ad Tool Type ](/nats-admin/ad-tools/further-reading/new-downloadable-content-ad-tool-type.md#duplicating-your-adtool)article.
* The Delete Adtool Type icon deletes the Ad Tool type. You can see deleted ad tool types by clicking the Show Deleted Types link
Click the View Ad Tools icon to view all Ad Tools in this type. Left of each Ad Tool is a thumbnail (if applicable). Right of each Ad Tool are several action icons:
* The Edit Adtool icon lets you change this Ad Tool.
* The Edit Groups icon lets you assign this Ad Tool to groups.
* The Add a New Rule icon lets you specify where and when this Ad Tool is available to affiliates. For more information, see the [Rules ](/using-nats/nats-admin-features/rules.md)article.
* The Delete Adtools icon deletes this Ad Tool. You can see deleted Ad Tools by click the Show Deleted Ad Tools link.
An Ad Tool group lets you manage groups of Ad Tools by something besides category or type. For example, you can create an Ad Tool group dedicated to a specific product. Click the Groups tab to manage Ad Tool groups.
## Third Parties Admin
The Third Parties Admin works similarly to the Billers Admin described above
To add a new third-party, pick a third-party from the drop-down and click Add. Click "Edit Account Info" and enter your account information, then click the biller charges tab and enter this biller's charges, and choose when to deduct this third-party's charges. You can also view poll details by clicking the "View Poll Details" icon.
After you add a third-party, you must setup a third-party site in the Sites Admin. Go to [Sites Admin](/nats-admin/sites.md), create a new site, choose a Third Party Site, and choose the third-party to use.
## Cross/Up Sales Admin
The Upsells Admin displays and lets you edit your upsells and cross-sells. A cross sale gets sent to a biller when a surfer submits your pre-join page and the biller displays the option for another site on their join page. An upsell is an option the member can select after they join your site
You must add a biller that supports cross-sales in your [Billers Admin ](/nats-admin/billers.md)first. To add an incoming or outgoing cross-sale, please see the [Cross/Up Sales Admin](/nats-admin/cross-up-sales.md).
## Mailing Admin
The Mailing Admin is a section of NATS that allows you to send automated emails to your affiliates and members
The Active Mailings list shows information about each uncompleted mailing. Right of each mailing are several action icons:
* The View Mail icon previews both the plain text and HTML versions of the email
* The Edit Mail icon lets you edit both the plain text and HTML versions of the email
* The Send Mail Rules icon let you customize which members or affiliates get this email, as well as conditions on which the email is sent
* The Send Test Mail to Myself icon sends a test mail to your email account
* The Send Mail Now sends the email to listed members or affiliates now
* The Delete Mailing icon deletes this email
The Completed Mailings list show information about each completed mailing. Right of each mailing are several action icons:
* The View Mail icon previews both the plain text and HTML versions of the email
* The Send Test Mail to Myself icon sends a test mail to you
* The Send Mail Now sends the email to listed members or affiliates no
You can prevent NATS from sending email to affiliates and members who don't want to receive your email. To do so, click the Remove Lists tab and enter affiliate or members names into the remove list boxes. No matter what display rules you set, none of these affiliates or members will receive a Mailing from NATS.
### Adding Linkcodes to Emails
NATS lets you automatically generate affiliate linkcodes when you send emails to affiliates using the [nats\_list\_linkcodes](/nats-admin/skins-and-templates/further-reading/template-functions/nats_list_linkcodes.md) template function. You can [list linkcodes in an email ](/nats-admin/skins-and-templates/further-reading/template-functions/nats_list_linkcodes.md)or [automatically append the natscode to an emailed tour link](/nats-admin/skins-and-templates/further-reading/template-functions/nats_list_linkcodes.md).
For more information, see the [nats\_list\_linkcodes ](/nats-admin/skins-and-templates/further-reading/template-functions/nats_list_linkcodes.md)article.
## Communications Admin
The NATS News and Notifications Admin lets you send news items to all of your affiliates or notifications to specific affiliates
All affiliates receive news; NATS displays the most recent news item at the top of their Affiliate Overview page. To create a new news item, go to the News & Notifications Admin, choose a section from the right-hand drop-down box, and click the Add News Item tab. Enter your news item and choose a display date. You may enter the date in any format PHP's strtotime() function will parse it.
Notifications act like emails. You can send a notification to specific affiliates or all affiliates, and affiliates can read the notification and then delete it. NATS displays the number of new notifications at the top-left of every affiliate page. Clicking on the number of new notifications or going to the Messages tab of My Account shows the affiliate their list of received and sent notification.
To send a new notification, go to the News & Notifications Admin, click the Send Notification tab, and enter the subject and body your notification. In the Send To field enter an affiliate's username or enter ALL to send the notification to all affiliates. To bold a notification in the affiliate's notification inbox, mark the Severe checkbox.
You can also search notifications, as well as seeing what notifications have been sent to you, and what notifications you have sent out to your members or affiliates, through the "Notifications" tab at the top of the page.
## Support & Maintenance Admin
The Cleanup Admin lets you remove old information from your NATS database and logs. As a failsafe measure, you cannot remove information vital to payments, payouts, or statistics. All database cleanings make a SQL-formatted backup of the data to be removed and place it in the nats/backups directory. Cleanup of a large amount of files can take a long time to run, so we recommend you regularly cleanup your logs
Tables that should be cleaned soon are colored blue. Clean a table by clicking on the Clean Table icon to its right or view information about the table by clicking on the View Table icon.
## Configuration Admin
The Configuration Admin lets you manage your NATS configuration settings. It is not necessary to set up this Admin, as the default settings provided by your NATS install should work with your site. You should be certain of what you are doing before you edit these settings, as it is possible to cause internal problems when changing some settings
The NATS configuration admin works in conjunction with the NATS configuration file. The configuration file is stored in the NATS directory on your server as includes/config.php.
Several tabs let you find configuration options:
* The Home options are the primary NATS settings. Some options can't be edited; if you need these options changed, please [submit a ticket](http://clients.toomuchmedia.com/)
* The Security options configure who can access secure areas of your NATS program. Be careful editing these settings: you can easily lock yourself out
* The Fraud options allow you to configure your fraud detection settings
* The Billers options provides very specific options for further configuring your billers
* The Email options tell NATS when to send emails, as well as the subjects of the emails and what address to send them from. NATS only sends email if you enter a subject in any of the fields
* The Affiliates options let you set affiliate requirements, as well as what is displayed to them on the main Affiliates page
* The Currency options change the exchange rate or how currency is displayed. Currency exchange rates must be manually set up here.
* The Cronjobs options change how NATS does scheduled tasks
* The Logging options change what NATS logs
* The Display options affect what will be displayed in admin areas and reports
For a description of important options, please see the [Configuration Options article](/nats-admin/configuration/configuration-overview.md#configuration-options).