# Welcome
## What is NATS?
NATS, the Next-Generation Administration and Tracking System, is the adult industry's leading software for running your internet business. With a plethora of satisfied clients, NATS has been tested and trusted by the adult entertainment industry to provide the best in deliverables including business metrics, content management, affiliate management, and much more.
### 📈 Detailed Statistics and Reports
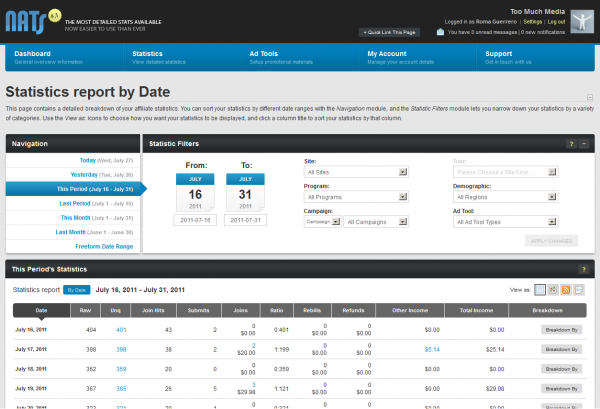
See a wide range of real-time statistics and reports through activity charts, interactive graphs, detailed comparisons, date-based trends, and demographic maps. NATS lets you break down your affiliate statistics reports by any statistic that is tracked, like date, site, campaigns, traffic tags, demographics, ad tools, and referring URLs.
### 📣 Built-in Advertising Tools
Increase the success of your affiliate promotions by providing them with a vast range of Ad Tool types. NATS includes custom-targeted modern ad tool types, such as interactive ad tools like Page Peels and IM Popups, and much more.
### ↕ Highly Scalable
NATS can handle any amount of affiliates and data, big or small so that we can grow alongside your affiliate program. Our database is structured so that we can easily accommodate your growing business, no matter how big your database gets.
### 🌎 Multiple Language Support
You can offer support for a wide range of affiliates located over the globe. NATS features built-in language files, which let you display your affiliate pages in a variety of languages with no additional customization needed.
### 🎨 CSS Theme Builder
Customize the look and feel of your affiliate skins and join templates quickly and efficiently with the CSS Theme Builder. This lets you change the color themes and header images for your skins and join templates with the easy-to-use color wheels and image upload fields.
### ☎ World Class Support & Comprehensive Training
Learn how to use NATS to its fullest potential with our support and training. Our support technicians will show you how to use the NATS software in comprehensive training sessions and will gladly assist you with any questions through our support ticket system.
## Ready to get started?
These areas may help!
{% content-ref url="/pages/QlTzNYdXQrlu9iziqKCX" %}
[Quick Start](/getting-started/quick-start)
{% endcontent-ref %}
{% content-ref url="/pages/UrTyuho44MpT8hz4KCjd" %}
[What is the CMS?](/getting-started/what-is-the-cms)
{% endcontent-ref %}
{% content-ref url="/pages/twKTGDWDSAGLJJ4RM8SX" %}
[Onboarding](/getting-started/onboarding)
{% endcontent-ref %}
{% content-ref url="/pages/44TKeQN16MmeVyHY4RZ7" %}
[Common Topics](/getting-started/common-topics)
{% endcontent-ref %}
{% content-ref url="/pages/DQnKmUxHmoAvLHJZS2hy" %}
[Maximizing your revenue with NATS](/getting-started/maximizing-your-revenue-with-nats)
{% endcontent-ref %}
{% content-ref url="/pages/SMxutLplMO4lWkZIMAwS" %}
[NATS Admin](/getting-started/common-topics/nats-admin)
{% endcontent-ref %}
{% content-ref url="/pages/bBpQzUG4RwDYyxdZsELi" %}
[Setup](/setup/setup)
{% endcontent-ref %}
# Plans & Pricing
NATS uses lease-based licensing, which provides a low start-up cost with an ongoing monthly license fee. Your license tier is based on the number of joins per month, and includes unlimited upgrades, world class support, and user accounts.
For the full breakdown of available plans and current pricing, please see:
[View NATS Plans & Pricing](https://toomuchmedia.com/pp_nats-pricing.htm)
# Quick Start
We've provided a list of guides to help you get familiar with NATS!
## The Setup Process
Learn what's involved in getting beginning your NATS journey so you can begin managing your business more efficiently.
## Get Your Site Up and Running
For a step-by-step breakdown on getting a site in NATS up and running!
{% content-ref url="/pages/KsmNSXK622FUUC5NaIUO" %}
[Setting up a Site in NATS](/nats-admin/sites/common-questions/setting-up-a-site-in-nats)
{% endcontent-ref %}
{% content-ref url="/pages/ON1yY9IwnUfuz9CG9fFG" %}
[Creating your first CMS Site](/getting-started/what-is-the-cms/creating-your-first-cms-site)
{% endcontent-ref %}
## What's Next?
Learn more about the most common topics related to NATS, how to maximize your revenue with NATS, biller integrations, and a brief walkthrough of NATS.
{% content-ref url="/pages/twKTGDWDSAGLJJ4RM8SX" %}
[Onboarding](/getting-started/onboarding)
{% endcontent-ref %}
{% content-ref url="/pages/44TKeQN16MmeVyHY4RZ7" %}
[Common Topics](/getting-started/common-topics)
{% endcontent-ref %}
{% content-ref url="/pages/DQnKmUxHmoAvLHJZS2hy" %}
[Maximizing your revenue with NATS](/getting-started/maximizing-your-revenue-with-nats)
{% endcontent-ref %}
# Getting started with Billers
*Article Topics:* [*Billers*](/getting-started/common-topics/billers)*,* [*Cascades*](/getting-started/common-topics/cascades)
Billers are third-party payment processors that handle all membership and merchandise purchases. Using Billers allows you to outsource the transaction liability to a third party rather than bear the liability directly.
## Determining the right Biller
You'll first need to determine the types of transactions you would like to accept. NATS supports a wide range of Billers that support multiple forms of payment.
## List of Supported Billers
A list of billers can be found below to determine which is best for your business.
{% content-ref url="/pages/GV2K3QS206WVoynLL4sG" %}
[Supported Billers](/getting-started/integrations/supported-billers)
{% endcontent-ref %}
## How to add a Biller to NATS
Once you've determined the best biller for your business, they will need to be added to your NATS install.
{% content-ref url="/pages/Z2oaZO2fhpJDy4taEQ6v" %}
[Setting up a Biller in NATS](/nats-admin/billers/common-questions/setting-up-a-biller-in-nats)
{% endcontent-ref %}
## Using Biller Steps
Due to the individual nature of Billers, NATS includes the Cascade feature, allowing you as the Site Operator the ability to provide visitors additional opportunities to complete a sale. This is done by sending them through a series of biller different billers whenever their transaction is denied. Cascades send potential customers through multiple billers to increase sign-up probability.
{% content-ref url="/pages/yUBBYeOWvCpcBWBwhY5G" %}
[Creating and Displaying Cascades](/nats-admin/sites/common-questions/creating-and-displaying-cascades)
{% endcontent-ref %}
## What's Next?
Learn everything you need to know about billers on the Biller's Common Topics page.
{% content-ref url="/pages/DTheWMeCdGXrqZlPXFk6" %}
[Billers](/getting-started/common-topics/billers)
{% endcontent-ref %}
# Working with Affiliates
Affiliates form an important part of any business and serve as partners for your site by making referrals to one or more sites.
## Affiliates and NATS
Affiliates interact with NATS primarily through the Affiliate Area where they can gain a general overview of their performance on the dashboard, view in-depth analysis and statistics, receive promotional materials, or manage their account details.
{% content-ref url="/pages/omvB75YcnPMridmxEDG5" %}
[Affiliate Area](/affiliate-area/affiliate-area)
{% endcontent-ref %}
## Advertising
Provide your affiliates with material for advertising all over the web. Using Ad Tools, affiliates can access Ads in your Possession to attract visitors to your sites. All of this is tracked so you can properly compensate your affiliates.
{% content-ref url="/pages/c03OcvP1a5IWBeEkrTT3" %}
[Ad Tools](/nats-admin/ad-tools)
{% endcontent-ref %}
## Different responsibilities for different Affiliates
Managing your affiliates can be as easy as deligating them to different Account Types. From standard Affiliates with no additional permissions to Admins with full administrative access in NATS or Account Reps that manage affiliates for you, Account Types can make managing your business that much easier.
{% content-ref url="/pages/aKTuzCzbBjGtoBpNtJIW" %}
[Affiliate Account Types](/nats-admin/affiliates/affiliate-account-types)
{% endcontent-ref %}
## Keep Track of your Business
For Site Owners, NATS provides a powerful tool for measuring your business metrics while being flexible enough to only show data that is relevant to you
{% content-ref url="/pages/0YDsNoUc3OXQ2hy323He" %}
[Reporting](/nats-admin/reporting)
{% endcontent-ref %}
## What's Next?
Learn everything you need to know about billers on the Biller's Common Topics page.
{% content-ref url="/pages/9u9uj9g1oT6IP84y0Fk9" %}
[Affiliates](/getting-started/common-topics/affiliates)
{% endcontent-ref %}
# Your First Site
*Article Topics:* [*Sites*](/getting-started/common-topics/sites)*,* [*Tours*](/getting-started/common-topics/tours)*,* [*Join Options*](/getting-started/common-topics/join-options)*,* [*Templates*](/getting-started/common-topics/templates)
Sites serve as one of the most central parts of your NATS program. The Site Admin lets you manage all your individual sites as well as tours, from join options to the look and feel of it.
## Creating a new Site in NATS
Start off by learning how to create a new site in NATS.
{% content-ref url="/pages/6zF6BnRmXqk094hmH6aU" %}
[Creating a New Site in NATS](/nats-admin/sites/common-questions/creating-a-new-site-in-nats)
{% endcontent-ref %}
## Setting up a Tour page
Tours serve as a pre-join form and thus are the first page visitors are introduced to when navigating to your site. Below are some useful pages to get you started on setting up your own Tour.
{% content-ref url="/pages/iaOQ50PbIFJUx0UzLbzp" %}
[How to Add a New Tour](/nats-admin/sites/common-questions/how-to-add-a-new-tour)
{% endcontent-ref %}
## Giving Options to Visitors
Once you've set up your Tour, it's time to give visitors Options!
Join Options are a feature in NATS providing visitors with various ways of purchasing memberships to your sites. Learn more about creating them below.
{% content-ref url="/pages/LUTms9dYTeYoM4SKqdfj" %}
[How to Create a new Join Option](/nats-admin/sites/common-questions/how-to-create-a-new-join-option)
{% endcontent-ref %}
## Customizing your Sites
Apart from creating unique Join Options, NATS provides you with the tools to customize the look and feel of your sites using Site Templates. View the link below for the best way to customize your Tour and Sites.
{% content-ref url="/pages/P6Rq90iqCmCZhtmnUiDD" %}
[Site Templates](/nats-admin/sites/site-templates)
{% endcontent-ref %}
{% content-ref url="/pages/Re5VgnlvWvWStron3wGY" %}
[Customizing your Join Form](/nats-admin/sites/common-questions/customizing-your-join-form)
{% endcontent-ref %}
## Setting Up Member Authentication
NATS uses MySQL Authentication to authenticate members against an external database. You can learn more about setting this up on the following page.
{% content-ref url="/pages/3aeewpcrRkbpi3kt7WU2" %}
[Member Authentication](/nats-admin/members/further-reading/member-authentication)
{% endcontent-ref %}
## What's Next?
Learn everything you need to know about sites and more related topics.
{% content-ref url="/pages/StZUUl2w5Ra8wZLATqwC" %}
[Sites](/nats-admin/sites)
{% endcontent-ref %}
{% content-ref url="/pages/KsmNSXK622FUUC5NaIUO" %}
[Setting up a Site in NATS](/nats-admin/sites/common-questions/setting-up-a-site-in-nats)
{% endcontent-ref %}
# Programs and Payment
## Affiliates and Programs
An affiliate's primary means of receiving, this is handled by Programs. Programs in NATS determine the method by which affiliates get paid, as well as how much they get paid. As a program owner, you can offer different programs based on affiliate performance such as member joins, rebills, unique hits, raw hits, etc.
{% content-ref url="/pages/nM7xSrVcTuZxpnnqVfDB" %}
[How to Enable Affiliates to Programs](/nats-admin/programs/common-questions/how-to-enable-affiliates-to-programs)
{% endcontent-ref %}
{% content-ref url="/pages/IiQzZ6Qg48AR09qpUBOC" %}
[How to Add Programs to your Site](/nats-admin/programs/common-questions/how-to-add-programs-to-your-site)
{% endcontent-ref %}
## Paying your Affiliates
Payments to affiliates can be managed using the Payment Admin, which provides a single area for you to view, search, configure, and schedule payments to your affiliates.
{% content-ref url="/pages/uR462j6HGjqFCEvzeX8D" %}
[Payments](/nats-admin/payments)
{% endcontent-ref %}
## What's Next?
Learn everything you need to know about billers on the Biller's Common Topics page.
{% content-ref url="/pages/pnlhWv6supvBpuyactPI" %}
[Programs](/getting-started/common-topics/programs)
{% endcontent-ref %}
# What is the CMS?
The NATS CMS (Content Management System) provides you with a suite of tools to help you organize, publish, and manage your content across public-facing tour pages and private membership areas.
Whether you are an experienced web developer looking to take advantage of an intuitive workflow, or a designer looking to build visually appealing pages, the CMS makes it easy to create and manage a well-designed pay site experience.
With over 20 years of experience in the industry, our CMS was built specifically to cater to the needs of adult content pay sites, with features that simplify video publishing, the building of tour pages, the management of membership, and the organization of large libraries of content.
The CMS publishes Sets through Channels, which you assign to Tours and Member Areas. Channels, together with Content Rules, determine who sees what: Tours deliver the content designated in Channels for previews and thumbnails, while Member Areas show full content from the Channels a member is authorized to access.
***
## :construction\_site: Block-Based Page Builder
Use the **Block Builder** to design flexible, professional pages without the need for any code. With a simple drag and drop, all the blocks included with the CMS can be used to make building a site easy and intuitive. Save your favorite custom blocks and reuse them across your **Theme**. Some Blocks source content from the Theme's default Channel, and can be overridden per block, including a list of multiple Channels.
{% content-ref url="/pages/7lUwaSI9yImefB8h0Fa6" %}
[Using the Page Builder](/content-management/member-areas-and-tours/customizing-your-theme/using-the-page-builder)
{% endcontent-ref %}
## :projector: Set Management
All content is organized and managed by Sets, containing videos, photos, descriptions, and more. Sets can be uploaded through the browser or FTPed, edited, tagged, published, and even scheduled for release. Adding metadata to sets creates a way for admins to manage content and visitors to find what they're looking for, while SFW Set Previews allows you to adhere to laws in required states. All sets are published to one or more Channels, and can be scheduled or republished on different Channels as needed.
{% content-ref url="/pages/8JHrht7sWFVmYzPwItfL" %}
[Managing Sets](/content-management/sets/managing-sets)
{% endcontent-ref %}
## :package: Channels
Channels are the primary organization and delivery method for Sets. All sets are published to Channels, and you can assign Channels as defaults to specific Tours and Member Areas. Creating a Member Area creates an associated Default Channel.
{% content-ref url="/pages/rrRu481KvrAcpNCOF1Qs" %}
[Channels](/content-management/channels)
{% endcontent-ref %}
## :adult: Member Areas & User Access
Visitors browse through the tours you create for a taste of your Member's Area. Once satisfied, they can sign up through NATS. After signing up, members gain access to the Member Areas they have access to, where you can determine which sets show up for download or viewing, what pages are visible, and how additional content is unlocked.
{% content-ref url="/pages/G1ayp3FB8FRyOfJvPiAp" %}
[Member Areas and Tours](/content-management/member-areas-and-tours)
{% endcontent-ref %}
## :art: Themes & Customization
Themes allow you to control the look and layout of your site. Design and build pages, menus for navigation, and content moderation settings to emphasize your specific brand. With the ability to easily copy, modify, preview, and switch themes, the CMS provides ample room for experimentation and promotional flair.
{% content-ref url="/pages/2WBaOGctsVmCNSqY6yfm" %}
[Themes](/content-management/member-areas-and-tours/themes)
{% endcontent-ref %}
{% content-ref url="/pages/vLjui31B0zD3wR6LMs6z" %}
[Customizing Your Theme](/content-management/member-areas-and-tours/customizing-your-theme)
{% endcontent-ref %}
## :link: Metadata Flexibility
Take advantage of Metadata Types like Models, Tags, Locations, or add your own to bring structure and organization to your content, making it easy for visitors to filter sets and admins to build dynamic lists of content.
{% content-ref url="/pages/1uzBuWsDBEUtbOlMpGA2" %}
[Metadata](/content-management/metadata)
{% endcontent-ref %}
## :closed\_lock\_with\_key: Age Verification
Ensure your site upholds any Age Verification requirements with built-in integration.
{% content-ref url="/pages/Hm5g4Bz1EByvgyQxZ0Eq" %}
[Age Verification](/getting-started/integrations/age-verification)
{% endcontent-ref %}
## :cloud: Content Servers, Transcoding, and the Cloud
The CMS supports content delivery through S3 buckets and other custom content servers. You can also transcode videos directly through the CMS using the provided worker, alleviating workload for you and your team. Upload content to a single spot, and publish to multiple places.
{% content-ref url="/pages/JJi8zVbN1AcZbhBFVIA9" %}
[Content Servers](/content-management/content-servers)
{% endcontent-ref %}
{% content-ref url="/pages/0htlPGe8O0DP1GqvzTbv" %}
[Processing](/content-management/processing)
{% endcontent-ref %}
## Learn More
Ready to get started? Check out some of the articles below to see how each part of the CMS works.
{% content-ref url="/pages/ON1yY9IwnUfuz9CG9fFG" %}
[Creating your first CMS Site](/getting-started/what-is-the-cms/creating-your-first-cms-site)
{% endcontent-ref %}
{% content-ref url="/pages/44TKeQN16MmeVyHY4RZ7" %}
[Common Topics](/getting-started/common-topics)
{% endcontent-ref %}
# Activating the CMS
## Activation
The **Activation** page is where you enable the NATS Content Management System. This process sets up the essential components needed for the CMS to function, ensuring you can begin building and managing your site right away.
Once complete, you'll be able to access all CMS features.
## What Activation Does
When you click **Activate**, the system will automatically configure the following:
### **Local Content Server**
{% hint style="warning" %}
**Important:** TMM recommends using an Object Storage + CDN solution to store your content on a separate storage system, rather than on your NATS server, to prevent any performance hits to NATS.
{% endhint %}
Creates a Local Content Server to store and serve your content from the same location as NATS. In addition to creating the Content Server, this step configures a directory where content will be stored on your NATS server at the following path:
```
/nats/www/cms_images/cms_data/
```
### **API-Only User(*****natscmsworker*****)**
Creates and configures an affiliate account titled "*natscmsworker"* with the account type set to API Account to process CMS requests. This limits the actions the account takes to the following:
* **transcode-take** - Reserves a transcoding job from the queue.
* **transcode-complete** - Reports a finished transcoding job to the queue.
* **transcode-release** - Abandon a transcoding job to the queue.
* **transcode-update** - Set the transcoding job progress.
### **Default Worker Script**
Configures a default worker script to use the *natscmsworker* account to process content.
### **API Access from Your Server**
Sets the "[Admin API Allowed IPs](/nats-admin/configuration/configuration-overview/security#apis)" configuration to your NATS server IP to allow the CMS to send API requests from your server.
## Next Steps
After activating the CMS, you may want to:
* [Learn about Themes](/content-management/member-areas-and-tours/themes)
* [Explore Blocks](/content-management/member-areas-and-tours/themes/block-types)
* [Understand Channels](/content-management/channels)
* [Create a site using the CMS](/getting-started/what-is-the-cms/creating-your-first-cms-site)
# Creating your first CMS Site
## Installing NATS
To start using the CMS, first ensure you have installed the latest version of [NATS](https://docs.toomuchmedia.com/getting-started/getting-started). Once NATS has been installed, contact a TMM tech to activate the CMS.
## Create a Members Area
Once you have activated the CMS, you'll need to create a Members Area for Members to view full-length content. Once a Members Area has been created, a Default Channel will automatically be made with the associated Content Rules.
{% content-ref url="/pages/GzekTL0MZumlAOld1Qlx" %}
[Creating a Member's Area](/content-management/member-areas-and-tours/creating-a-members-area)
{% endcontent-ref %}
{% content-ref url="/pages/gsrjt1ryRKjV7FMdca9s" %}
[Configuring Channels](/content-management/channels/configuring-channels)
{% endcontent-ref %}
## Create a Tour
Once a Member Area has been created, you will need to create a Tour for visitors to preview the content they will get once they sign up. The tour also contains sign-up links, as well as links for Members to log into the Area they have purchased access to.
{% content-ref url="/pages/hnWLQPnznrLbKqHwqVrY" %}
[Creating a CMS Tour](/content-management/member-areas-and-tours/creating-a-cms-tour)
{% endcontent-ref %}
## Create a set, upload content, and publish to Channels
Finally, you can begin uploading content to your CMS, either by uploading videos and/or photos through the browser or FTPing the files directly to the Content Server. Once a set has content uploaded to it, you can begin publishing to Channels.
{% content-ref url="/pages/8JHrht7sWFVmYzPwItfL" %}
[Managing Sets](/content-management/sets/managing-sets)
{% endcontent-ref %}
# Onboarding
## How does NATS work?
NATS is used to track visitors as they navigate through your site. NATS tracks their navigation via a NATS linkcode which is appended to the link of your tour's landing page. A NATS linkcode is an identifier for various NATS elements in a particular order; the affiliate, the program, the site, the tour, the campaign, the ad tool, and two (2) optional values identified as subid1 and subid2.
### Types of Linkcodes
There are three (3) types of NATS linkcodes, all of which contain the same information; encoded (common), un-encoded (rare) and shortname (rare).
Most implementations of NATS linkcodes are encoded. The encoded linkcode uses the numeric ID for all values and generates a seemingly random assortment of characters to represent that information. The un-encoded linkcode comma separates the required information using the affiliates username, instead of the affiliate ID, and the numeric IDs of the rest of the values. The un-encoded (shortname) linkcode comma separates the required information using the affiliate username, program shortname, site shortname, tour shortname, and the numeric ID of the rest of the values.
### Tracking Visitors
A visitor clicks a link via an ad tool with a specified NATS linkcode which directs the visitor through a tracking script. This script writes a cookie on the surfer's browser that identifies the affiliate that should be credited with any future action from said the visitor. Once completed, the specified tour's landing page, also known as the pre-join page, will be displayed to the visitor. The tour landing page will have a join button that directs the surfer to your tour's join page. On the join page, the surfer will, in most implementations, have payment options which will be specified by the billing cascade. Once the join page is successfully processed, the surfer is converted to a member, earning you and your affiliates revenue.
By default, NATS uses 301 (permanent) redirects for all track links. This means that when a visitor clicks a tracking link they are redirected to the destination tour URL with an HTTP Status Code 301, and search engines will more likely index the **landing pages** over the tracking URL. This will help with SEO performance since the pages will retain any link equity.
Learn more on the [Permanent vs Temporary Track Redirect Links](/using-nats/nats-admin-features/linkcodes/permanent-vs-temporary-track-redirect-links) article.
The NATS Onboarding process will cover all the NATS Admins as well as the Affiliate Area.
## An Overview of NATS
{% content-ref url="/pages/O4WRjJFr5rk4WQbLQUCH" %}
[An Overview of NATS](/getting-started/onboarding/an-overview-of-nats)
{% endcontent-ref %}
# An Overview of NATS
## Main Affiliate Screen
Affiliates see the main affiliate screen when they log in to NATS. Like all NATS pages, you can completely customize its layout.
The links on this page take you to the pages described below. The graphs show the affiliate's promotional progress.
## Affiliate Stats
The affiliate statistics page gives affiliates all the statistical tools they need to analyze and improve their promotions.
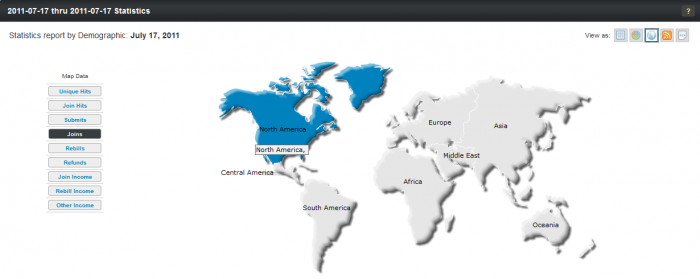
The report lets affiliates get detailed statistical information in an easy-to-use interface. It groups traffic into a dozen different views. For example, the demographics view (illustrated below) lets affiliates view statistics on a continental, regional, or national basis, and the affiliate can compare traffic from several countries side-by-side.
\
Similarly, the Statistics report also allows affiliates to "break down" performance data by date, site, program, campaign, traffic tag, ad tool, and referring URL.
Affiliates can customize their default view to include whatever statistical reports they find most useful. The right side of the default view shows summaries of the affiliate's site, program, campaign, and ad tool activity.
### Affiliate Referral Program
Affiliate referral programs, also known as *Webmaster Referral Programs,* let affiliates refer other affiliates to your program. The referring affiliate gets paid a percentage for all of the referred affiliate's sales.
For Example: Affiliate Alice signs up Affiliate Bob; Alice earns 10% of Bob's sales. Affiliate Bob signs up Affiliate Conrad; Bob earns 10% of Conrad's sales and Alice earns 2% of Conrad's sales. In this setup, Bob is Alice's first tier, and Conrad is Alice's second tier. You can have up to eight tiers and you can pay a different percentage for each tier.
### What's a Campaign?
Campaigns let each individual affiliate track their traffic in their own way. Affiliates tag their referrals by assigning a campaign to their referral links. NATS records the incoming campaign tag and lets affiliates break down their campaign statistics on the Affiliate Statistics page.
For Example: an affiliate creates two campaigns -- one for each of their sites. Now the affiliate can compare the performance of those two sites.
## Affiliate Ad Tools
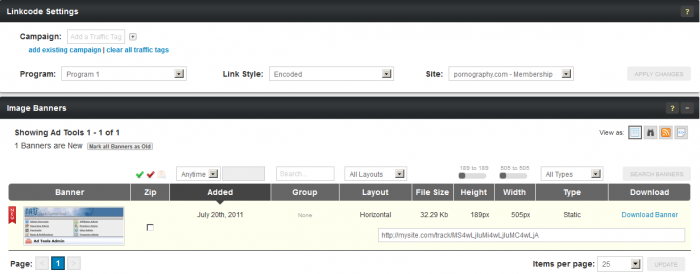
The Affiliate Ad Tools page lets affiliates get linkcodes and Ad Tools for promoting your sites. You can access the Affiliate Ad Tools section by clicking the "Tools" link at the top of the page. Its simple tab-based navigation lets affiliates quickly find the type and style of Ad Tool they want and then choose from a list of matching Ad Tools.
The "Linkcode Settings" section lets affiliates choose which site and program to get ad tools for. You can also select whether you want your NATS linkcodes to be encoded, un-encoded, or if you want them to display shortnames.
The ad tools page comes set up for the most common ad tool types, but you can add your own custom types, for example: page peels, very easily.
### What's a Linkcode?
Linkcodes are referral URLs tracked by NATS, Linkcodes can be used directly by affiliates or NATS can embed the linkcode in an adtool for the affiliate.
### What are Downloadable Ad Tools?
Affiliates download your downloadable ad tools and put them on their websites. For example, you can turn a video into a downloadable ad tool.
## Affiliate My Account
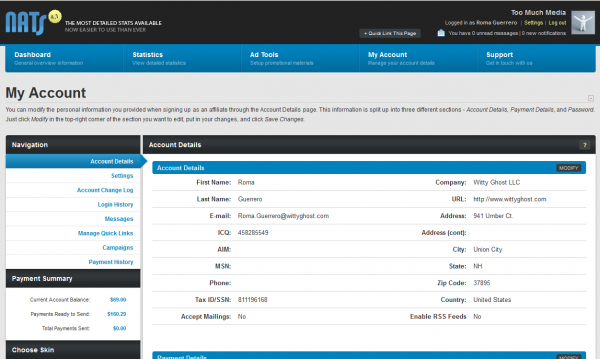
The Affiliate My Account page lets the affiliate change their account information, preferences, and send and receive messages. The eight in the "Navigation" box let the affiliate navigate between their settings.
* The Account Detail tab lets the affiliate change their account information
* The Settings tab lets the affiliate customize his default layout, as well as edit e-mail and notification settings
* The Account Change Log tab provides a detailed history of changes you have made to your account
* The Login History tab provides a detailed history of login activity to your account
* The Messages tab shows all sent/received messages and notifications
* The Manage Quick Links tab allows you to remove or change the order of the quick links that appear on the Dashboard
* The [Campaigns ](/affiliate-area/affiliate-area/my-account/affiliate-campaigns)tab lets the affiliate create or edit campaigns
* The Payment History tab shows a detailed report of payments that are owed to the affiliate, the payment method, and whether or not the payment has been stored/paid yet
Using the account settings tab, the affiliate can prevent anyone from changing their payment information with the affiliate confirming the change through email.
### Overriding Affiliates
You can change an affiliate's settings by overriding that affiliate. When you override an affiliate, you temporarily become that user; you can get their linkcodes, view their statistics, or adjust their account.
To override an affiliate, go to the [Affiliates Admin](/nats-admin/affiliates), find an affiliate, and click the Override Affiliate icon. Overriding is explain in more detail in the Affiliates Admin section below.
## Affiliate Support
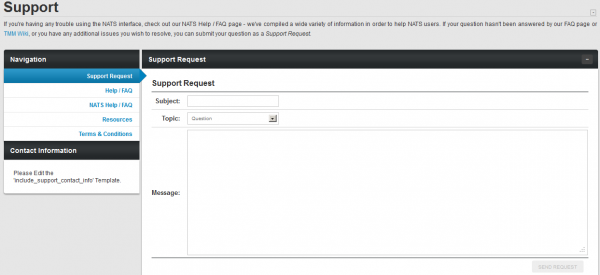
We made the support page easy for you to customize so that you can give your contact information and support links to affiliates. Customizing this page is easy in the Skins and Templates Admin.
### Using Account Reps
Account Representatives help you manage your affiliates so that you can manage your business. Account representatives get to see statistics for the affiliates they manage. They can send news and notifications to their affiliates and receive support requests. You can even pay account representatives a percentage of their affiliate's income.
## Skins and Templates Admin
You can customize the look and feel of your affiliate program using the Skins and Templates admin. A Skin is a set of templates that work together to provide your affiliates with a consistent user interface. NATS comes with the default skin you see in the affiliate area and you can create as many of your own skins as you want.
You will not be able to edit the default NATS skin. This is a failsafe measure, as you will always be able to revert to the default skin if you lose your other code. You can create a new skin by pressing the *Create New Skin* icon next to an existing skin. A new skin inherits the properties of the skin above it with less indenting -- the parent skin -- and each template in the skin retains its parent's properties until you customize the child's template the first time. Click the edit button to change the skin's name, description, and who can use this skin.
Click the "Edit Templates" action icon to see a list of your skin's templates. The templates follow a specific naming scheme:
* The admin\_ templates display administrative areas
* The affiliate\_ templates display the affiliate areas
* The external\_ templates display the public areas that don't require a login
* The function\_ templates support the other templates
* The includes\_ templates work with the Includes Admin
* The mail\_ templates generate email bodies
To edit a template for the first time, press the Customize icon; clicking this icon separates the child template from its parent. Several other icons also let you work with the template:
* The Revert icon throws away your changes and restores the child template to a duplicate of its parent
* The Edit icon lets you edit a template after you customize it
* The Duplicate icon lets you duplicate a template
* The View icon previews the template for you.
{% hint style="info" %}
**Please Note:** This preview won't contain any dynamic information the template expects, so a correctly coded template may display incorrectly
{% endhint %}
* The Delete icon deletes the template. You cannot recover a template after you delete it
Back on the main Skins page, there are Import and Export tabs that let you add a template from your computer or save a template to your computer. You can also change the default skin for the different user types. You can also flush the template cache; click this button if your templates are not displaying correctly.
### Other Templates
You can find most of NATS's templates in the Skins and Templates Admin, but certain templates are found elsewhere in the NATS admin.
* The **Site Templates** are specific to each tour. They include the most customized template in NATS: the Join Template. You can edit the Site Templates in the Sites Admin.
* The **Mailer Templates** let you send mass mailings to your affiliates and members. You can write mailer templates in the Mailing Admin.
* The **PayVia Templates** change the format of your payment output. You can edit PayVia templates in the Payments Admin.
### Template Functions
NATS includes over 50 custom Smarty template functions that let you customize the layout of your site. For example, here are some of the most popular template functions:
* The nats\_encode function creates a linkcode
* The nats\_decode function gets information from a linkcode
* The nats\_list\_linkcodes function gets lists of customized linkcodes
* The nats\_list\_tours function creates a the list of all tours offered by a particular program
* The nats\_list\_campaigns function obtains a list of available campaigns for an affiliate
For a complete list of template functions, please see the Template Functions article.
## Billers Admin
The Billers Admin is where you add and modify the settings for your payment processors.
* Stop cascade: when the visitor gets to this step, NATS shows them the denial template
* Switch cascade: when the visitor gets to this step, NATS sends them to the top a different cascade you choose. You can use this rule to send them to a hidden cascade. You can also use this to switch biller payment methods (ex. if a surfer's credit card gets rejected, send them to a check payment processor)
* Show template: when the visitor reaches this step, NATS sends them to a template you choose
* Redirect: when the visitor reaches this step, NATS sends them to any URL you choose
When adding a biller to a cascade, there are a few special options:
The custom cascade rules let you choose when to show this cascade to visitors. The first matching rule takes precedence over all over rules.
* Cascade weight: how often should NATS choose this cascade over other cascades with the same name?
* Automatic cascades: should NATS send the visitor straight to the first biller in this cascade without trying to collect any information beforehand?
* Hide cascade: don't let visitors choose this cascade; you can manually choose hidden cascades for visitors.
* Target/excluded: let or forbid visitors from these countries from accessing this cascade
NATS keeps sending the visitor to new billers until there are no more billers in the cascade. You can edit the cascade to find the following options:
1. A visitor visits your tour page
2. They decide to join and fill out your pre-join form
3. NATS sends them to the first biller in the cascade
4. If the biller approves them, NATS makes them a member
5. If the biller doesn't approve, NATS sends them to the next biller in the cascade
After you add a biller, a cascade is automatically created. Cascades increase the probability that a visitor will sign-up by adding an extra step to the sign-up process:
To add a new biller, pick a biller from the drop-down, enter your account information, click the biller charges tab and enter this biller's charges, and choose when to deduct this biller's charges. (For a more thorough description, please see the Billers Admin article).
### Biller Setup Instructions
Since each biller has different settings you must configure and optional settings you may have configured, we have separated the biller instructions into a different article for each biller. For example, we have an article each for CCBill, Epoch, and Netbilling.
You can find the complete list of instructions in the right-side menu of the Billers Admin entitled *Biller Instructions*.
### Working with a Shopping Cart
NATS lets you credit affiliates for sales made through your shopping cart. For example, an affiliate refers a consumer to your landing page; the consumer picks a product, buys it through your shopping cart, NATS tracks the sale and pays the affiliate for the referral. For more information about shopping cart sales in NATS, please see the [Shopping Cart Sales](/using-nats/one-off-articles/shopping-cart-sales) article.
## Programs Admin
NATS uses programs to define how affiliates get compensated for referrals, such as page hits, member joins, and rebills.
Programs can be created as Enabled Programs or Disabled Programs. A newly created enabled program will automatically enroll all new affiliates in the program, but not current affiliates. A newly created disabled program will need affiliates to be manually added to that program. Affiliates will not be able to choose which program they will be enrolled in.
{% hint style="info" %}
**Please Note:** If you want to create a new program that will have all current and new affiliates enrolled, you must create a new disabled program, enroll your current affiliates in it, and then manually enable the program.
{% endhint %}
A new program requires a name, shortname, and type. The name is displayed to affiliates, the shortname is used by NATS as an internal identifier, and the program type defines how affiliates get paid.
* A Standard Program promotes membership sites
* A Third Party Program promotes other sites that pay your affiliates for you
* A Cross Sale Program promotes [cross sales](/additional-resources/common-terms#cross-sell) between your program and other programs
* A CCBill-Paid Program bills your customers using CCBill and pays your affiliates using CCBill
* An Affiliate Referral Program pays your affiliates for referring other affiliates (up to two tiers)
* An Affiliate Referral 8 Tiers Program pays your affiliates for referring other affiliates (up to eight tiers)
* An Account Rep Program lets you pay account representatives for managing affiliates
* An Extended Program lets you pay affiliates for events that aren't tracked by NATS. For more information, please see the [Extended Sales](/using-nats/one-off-articles/extended-sales) article
The extended payout description is for [Extended Sales](/using-nats/one-off-articles/extended-sales).
After you create a standard program, several new options appear. You can deduct credits, chargebacks, voices, and insufficient funds from affiliate payouts; in a revenue share program, these are removed even if you don't check them as they reduce revenue.
You can use the Tours in This Program section to choose which tours are promoted by this program. Set the program's default payouts in the Default Payouts section; the options in the Default Payouts section change depending on what type of program you're using.
On the main Program Admin page, each program has several action icons.
* The Enable Program or Disable Program changes the program's state. For details, please see [Enabling and Disabling Programs](/nats-admin/programs/programs-management#switching-to-manual-automatic-enrollment) section of the Programs Admin.
* The Edit Payout Changes icon takes you to this program's Commissions
* The List and Modify Enabled Affiliates icon lets you change which affiliates are in this program
* The Disable Program and Remove Affiliates remove the program from view.
Click the Commissions tab to see a list of each program's default payouts. Click the Edit Default Payouts icon to change the default payouts. Programs listed in red have custom payouts. Click the Setup Payout Changes icon to create or edit custom payouts. You can create standard permanent payout changes, temporary payout changes, tiered payout changes that pay affiliates for sending more than a specific amount of traffic, or recurring payout changes that happen on a schedule. For more information, see the [Payout Changes](/nats-admin/programs/further-reading/payout-changes) article.
### Build Your Own Anything
The Build Your Own Anything (BYOA) module lets your NATS affiliates build their own tours and advertising tools for inclusion in your affiliate program. They can create site tours, banners, hosted galleries, and full and half page ads for any of your sites. You can pay the affiliate who created the ad tool or tour a [commission](/additional-resources/common-terms#commission) on all sales that tool generates. For example, you can pay a bonus of $1 for each sale generated by a tour they created.
### Shortname Rules
NATS keeps track of programs, sites, and many other things using shortnames. Each shortname must be unique within the NATS program and may not contain spaces or special characters.
**Example of Good Shortnames**
* my\_program
* program1
**Example of Bad Shortnames**
* my program
* program#1
## Sites Admin
The Sites Admin allows you to set up and configure a site in NATS for each website you want to promote
Click the Add a Site tab to add a site. There are several different types of sites:
* A Membership site sells subscriptions
* A Token site lets visitors buy tokens to use features on the site
* A Store site sells products through a shopping cart. For more information, please see the [Shopping Cart Sales](/using-nats/one-off-articles/shopping-cart-sales) article
* A Third Party site lets visitors by a membership to a third-party site
* An Affiliate site lets affiliates refer other affiliates
Next to each site on the main Sites Admin page is a drop-down list of tours and an Edit button. Choose a tour and click Edit to see the tour specific settings.
* The URL is where visitors start the tour
* The Linkdomain is the domain linkcodes point at
* The Default Program is the program that tracks visitors who arrive without an affiliate's program
* The SPARTA URL only applies to customers that use the discontinued SPARTA software
* The Language and GeoIP Targeting settings let you send visitors from specific countries to alternative URLs
* The Email settings let you email members for specific events. Enter a subject to activate the email; click Edit Template to edit the body of the email. Emails will not be sent without setting a subject in the Sites Admin.
* The Approval, Denial, Upgrade and Postback fields determine where visitors are sent after they're approved, denied, or upgraded
* The Postback URLs let you send transaction information to your own scripts
* The User Management URL lets you manage users using your own script. For more information, please see NATS Site User Management
* The BYOA Details are used by the NATS Build Your Own Anything Module.
Activate the billers for this tour by entering their tour-specific settings, such as merchant ID, passwords, etc. in the Biller Details section. These settings must be obtained from the biller themselves.
You add join options by clicking Setup Additional Options for this Site. There are three checkboxes:
* The Free Pre-Initial checkbox lets you add a join option that starts with a free trial
* The Disallow for Old Members checkbox lets you forbid previous members from using the free trial again
* The Active for All Tours puts this option on all of this site's tours
Enter the join option's prices and join form text and then enter the join option-specific settings in the Biller Codes section.
After you create a join option, you can edit it on the same page. You can also edit its templates -- including the very important template, the join form -- and you can change the Join Option Rules. These rules determine when the join option is shown to visitors.
On the main page of the Sites Admin, each site has several icons.
* The Edit Site Details icon edits the site's details. For more information, see the [Creating a new Site in NATS](/nats-admin/sites/common-questions/creating-a-new-site-in-nats) article.
* The Add New Tour icon adds a new tour
* The Set Join Options icon lets you add or remove join options for all tours on this site.
* The Set Active Programs icon changes which programs this site belongs to
* The Edit Site Partners icon lets you add site partners to this site. For more information, see the [Site Partner](/nats-admin/sites/site-management/site-overview/site-partners) article.
* The Edit Site Templates icon lets you modify the site templates. For more information, see [The Sites Admin Templates article](/nats-admin/sites/site-templates).
* The Redirects icon lets you take traffic to an old tour or program and redirect it to a new tour or program
* The Delete Site icon removes a site from your Active Sites list.
* Click the "Click Here to Show Deleted Sites/Tours" link to display your deleted sites and tours
### What's a Site Partner?
Site Partners share in a specific site's revenue. Often site partners are affiliates with a special interest in a site; for example, a site devoted to an actress may have that actress as a site partner. NATS also gives site partners statistics about all of the site's activity.
You make affiliate site partners in the Affiliates Admin and you tell NATS which sites they're partners of in the Sites Admin. For more information about Site Partners, please see the [Site Partner](/nats-admin/sites/site-management/site-overview/site-partners) page.
## Payments Admin
The **Open Payments** section lists [Pay Via Methods](/nats-admin/payments/pay-via-methods) and the total amount you owe all affiliates using each PayVia type. The total includes affiliates whose payout is below the minimum you set. The **Stored Payments** section lists payments that are ready to be sent out to affiliates. The **Sent Payments** section lists how much you paid affiliates on specific dates.
In the stored section, you can view, edit, or pay a payment. Click the View Payment Dump icon to view the payment in dump form. While viewing the payment, you can copy and paste the output into a payment processor. You can also edit payments, remove payments, and mark them as paid.
The Pay Via Types, Dump Formats, and Auto Payments tabs let you configure how to pay affiliates.
Click the Pay Via Types tab to change the payment types available to affiliates. Each list item describes a payment method offered by NATS. The Edit Icon lets you change the options displayed in the list and the Edit Pay Via Setup icon lets you configure the form that collects affiliate account information.
Click the Dump Formats tab to change the payment output format you download and submit to the payment processor. Choose an output format and click the View Dump Format icon. Instructions for editing the output format are in the Creating and Editing [Pay Via Options ](/nats-admin/payments/common-questions/adding-a-new-pay-via-method)and [Dump Formats ](/nats-admin/payments/common-questions/how-to-add-a-dump-format)article.
NATS lets your affiliates get instant payments using the integrated automatic payment systems. You may individually specify which affiliates may use instant payments.
Instant payment only works for full days of sales, but an affiliate can get an instant payment for any full day of sales even if they don't reach the minimum payout amount. At the end of the period, NATS sets up payments normally.
## NATS Program Overview
The NATS Admin Overview shows you attractive charts and useful summaries of your program's recent activity.
The top of the page contains several tabs that allow you to change what periods you want to view your stats for (i.e., Today, Yesterday, This Week, This Year, etc.).
A list of newer members appears beside the list of newest affiliates.
You can use the action icons next to each affiliate and member to modify that person's account.
## Affiliate Admin
Manage your affiliates in the Affiliates Admin
The top search box lets you find specific affiliates. After you find affiliates, the Affiliates list shows information about each matching affiliate. Left of each Affiliate is a checkbox and an Icon. Mark the checkbox for several affiliates, scroll to the bottom of the page and use the Perform Action drop-down to manage each marked affiliate at the same time. Click the icon to edit the affiliate's account access permissions.
The Account Type drop-down on this page has six options ordered from least access to most access:
* An Affiliate is a common affiliate.
* An Account Rep manages affiliates. For more information, see the [Account Representatives ](/nats-admin/affiliates/further-reading/account-representative)article.
* A Site Partner shares site revenues and gets extra statistics. For more information, see the [Site Partner](/nats-admin/sites/site-management/site-overview/site-partners) article.
* A Subadmin has limited administrative access.
* A TMMAdmin has full administrative access, but can only log in from the IP addresses specified by the TMM\_ADMIN\_IPS configuration option. For more information, please see the Configuration Options section of the [Configuration Admin ](/nats-admin/configuration/configuration-overview#configuration-options)article.
* An Admin has full administrative access. For more information, see the [Account Types](/nats-admin/affiliates/affiliate-account-types) article.
You can customize the access permissions of users using the Permissions Exceptions check boxes. Enabling a Display checkbox lets the affiliate see that page. Enabling All Actions lets the affiliate perform any action on that page; you can further restrict their access by clicking the links in the Specific column.
On the main Affiliates Admin page, on the right of each affiliate are several action icons:
* The Affiliate Overview Icon shows the affiliate's account information
* The Override icon lets you override and take control of that affiliate's account.
* The Edit Affiliate Details icon lets you change the affiliate's account details page
* The Affiliate Statistics icon takes you to the affiliate's statistics page
* The Affiliate Documents icon lets you upload documents for affiliates.
* The Add Manual Sale icon adds a manual sale.
* The Add Manual Invoice icon adds a manual invoice. For more details, see the [Manual Invoice ](/nats-admin/affiliates/common-questions/how-to-add-a-manual-invoice)article.
* The Edit Affiliate Admin Settings icon lets you change several special settings.
* The Change Affiliate Password icon changes the affiliate's password
* The Change Affiliate Status icon lets you Disable or Ban affiliates.
* The Delete Affiliate icon deletes the affiliate's account
An override is an admin's ability to temporarily become an existing affiliate. Overriding as an affiliate doesn't affect the administration interface, but any changes made in the affiliate area change the affiliate's account.
To manually add a sale to an affiliate, go to the Affiliates Admin, find the affiliate, and click the Add Manual Sale icon. Enter the manual sale details and click Add Manual Sale. **Warning: you cannot remove a manual sale -- it's a real sale, and you must pay the affiliate for it.**
## Members Admin
Manage your members in the Members Admin
You can add a new member to your database by clicking the Add Member tab at the top of the screen.
The top search box lets you find specific members. After you find members, the Members list shows information about each matching member and includes several action icons:
* The View Member Details shows the member's details, including the member's referring affiliate and subscriptions
* The Edit Member Details lets you change the member's recorded personal details, including their password and account status
* The Delete Member icon lets you delete a member. This option isn't always available; for more information, please see our "[How to Delete a Member](/nats-admin/members/common-questions/how-to-delete-a-member)" page.
## Reporting Admin
Select the report you want to see using the View Report drop-down. There are a variety of reports to choose from:
1. The Profit and Loss report shows you program's profit and loss by day
2. The Retention report shows how long consumers stay subscribed to your sites
3. The Subscriptions report lists each of your consumer's purchases
4. The Transactions report lists each of your consumer's purchases
5. The Fraud report shows potential fraud by your affiliates
6. The Detailed Trial report lists all trial subscriptions, as well as details on them
7. The Cascade Activity report shows what steps a surfer takes once they reach the NATS pre-join form
8. The Account Reps report provides a list of account reps and relevant statistics
9. The Surfer Actions report lists what actions surfers have taken on your sites
10. The Affiliate Referral Tier Payouts report displays vital statistics for affiliate referral tiers
11. The Affiliate Referral Signup Payouts report displays how much you have paid affiliates who refer other affiliate.
## Ad Tools Admin
The Ad Tools Admin lets you setup and manage your Ad Tools, such as banners, hosted galleries, downloadable Ad Tools, and feeds
The Ad Tool Categories list shows information about each Ad Tool category. Right of each Ad Tool category are several action icons:
* The Move Category Down and Move Category Up icons changes the order each category is displayed on the Affiliate Ad Tools page
* The Edit Ad Tool Category icon lets you change the category name and description
* The Disable Ad Tool Category deletes the Ad Tool category
Each Ad Tool category has one or more Ad Tool types. Right of each Ad Tool type are several action icons:
* The View Ad Tools icon lets you add or edit Ad Tools. For more information, see the Adding and Editing Ad Tools section below
* The Move Type Down and Move Type Up icons change the order each category is displayed on the Affiliate Ad Tools page
* The Edit Ad Tool Type icon lets you change the Ad Tool type's description, template, and fields
* The Duplicate Ad Tool Type icon duplicates an Ad Tool type. For more information, see the Duplicating Ad Tools section of the [New Downloadable Content Ad Tool Type ](/nats-admin/ad-tools/further-reading/new-downloadable-content-ad-tool-type#duplicating-your-adtool)article.
* The Delete Adtool Type icon deletes the Ad Tool type. You can see deleted ad tool types by clicking the Show Deleted Types link
Click the View Ad Tools icon to view all Ad Tools in this type. Left of each Ad Tool is a thumbnail (if applicable). Right of each Ad Tool are several action icons:
* The Edit Adtool icon lets you change this Ad Tool.
* The Edit Groups icon lets you assign this Ad Tool to groups.
* The Add a New Rule icon lets you specify where and when this Ad Tool is available to affiliates. For more information, see the [Rules ](/using-nats/nats-admin-features/rules)article.
* The Delete Adtools icon deletes this Ad Tool. You can see deleted Ad Tools by click the Show Deleted Ad Tools link.
An Ad Tool group lets you manage groups of Ad Tools by something besides category or type. For example, you can create an Ad Tool group dedicated to a specific product. Click the Groups tab to manage Ad Tool groups.
## Third Parties Admin
The Third Parties Admin works similarly to the Billers Admin described above
To add a new third-party, pick a third-party from the drop-down and click Add. Click "Edit Account Info" and enter your account information, then click the biller charges tab and enter this biller's charges, and choose when to deduct this third-party's charges. You can also view poll details by clicking the "View Poll Details" icon.
After you add a third-party, you must setup a third-party site in the Sites Admin. Go to [Sites Admin](/nats-admin/sites), create a new site, choose a Third Party Site, and choose the third-party to use.
## Cross/Up Sales Admin
The Upsells Admin displays and lets you edit your upsells and cross-sells. A cross sale gets sent to a biller when a surfer submits your pre-join page and the biller displays the option for another site on their join page. An upsell is an option the member can select after they join your site
You must add a biller that supports cross-sales in your [Billers Admin ](/nats-admin/billers)first. To add an incoming or outgoing cross-sale, please see the [Cross/Up Sales Admin](/nats-admin/cross-up-sales).
## Mailing Admin
The Mailing Admin is a section of NATS that allows you to send automated emails to your affiliates and members
The Active Mailings list shows information about each uncompleted mailing. Right of each mailing are several action icons:
* The View Mail icon previews both the plain text and HTML versions of the email
* The Edit Mail icon lets you edit both the plain text and HTML versions of the email
* The Send Mail Rules icon let you customize which members or affiliates get this email, as well as conditions on which the email is sent
* The Send Test Mail to Myself icon sends a test mail to your email account
* The Send Mail Now sends the email to listed members or affiliates now
* The Delete Mailing icon deletes this email
The Completed Mailings list show information about each completed mailing. Right of each mailing are several action icons:
* The View Mail icon previews both the plain text and HTML versions of the email
* The Send Test Mail to Myself icon sends a test mail to you
* The Send Mail Now sends the email to listed members or affiliates no
You can prevent NATS from sending email to affiliates and members who don't want to receive your email. To do so, click the Remove Lists tab and enter affiliate or members names into the remove list boxes. No matter what display rules you set, none of these affiliates or members will receive a Mailing from NATS.
### Adding Linkcodes to Emails
NATS lets you automatically generate affiliate linkcodes when you send emails to affiliates using the [nats\_list\_linkcodes](/nats-admin/skins-and-templates/further-reading/template-functions/nats_list_linkcodes) template function. You can [list linkcodes in an email ](/nats-admin/skins-and-templates/further-reading/template-functions/nats_list_linkcodes)or [automatically append the natscode to an emailed tour link](/nats-admin/skins-and-templates/further-reading/template-functions/nats_list_linkcodes).
For more information, see the [nats\_list\_linkcodes ](/nats-admin/skins-and-templates/further-reading/template-functions/nats_list_linkcodes)article.
## Communications Admin
The NATS News and Notifications Admin lets you send news items to all of your affiliates or notifications to specific affiliates
All affiliates receive news; NATS displays the most recent news item at the top of their Affiliate Overview page. To create a new news item, go to the News & Notifications Admin, choose a section from the right-hand drop-down box, and click the Add News Item tab. Enter your news item and choose a display date. You may enter the date in any format PHP's strtotime() function will parse it.
Notifications act like emails. You can send a notification to specific affiliates or all affiliates, and affiliates can read the notification and then delete it. NATS displays the number of new notifications at the top-left of every affiliate page. Clicking on the number of new notifications or going to the Messages tab of My Account shows the affiliate their list of received and sent notification.
To send a new notification, go to the News & Notifications Admin, click the Send Notification tab, and enter the subject and body your notification. In the Send To field enter an affiliate's username or enter ALL to send the notification to all affiliates. To bold a notification in the affiliate's notification inbox, mark the Severe checkbox.
You can also search notifications, as well as seeing what notifications have been sent to you, and what notifications you have sent out to your members or affiliates, through the "Notifications" tab at the top of the page.
## Support & Maintenance Admin
The Cleanup Admin lets you remove old information from your NATS database and logs. As a failsafe measure, you cannot remove information vital to payments, payouts, or statistics. All database cleanings make a SQL-formatted backup of the data to be removed and place it in the nats/backups directory. Cleanup of a large amount of files can take a long time to run, so we recommend you regularly cleanup your logs
Tables that should be cleaned soon are colored blue. Clean a table by clicking on the Clean Table icon to its right or view information about the table by clicking on the View Table icon.
## Configuration Admin
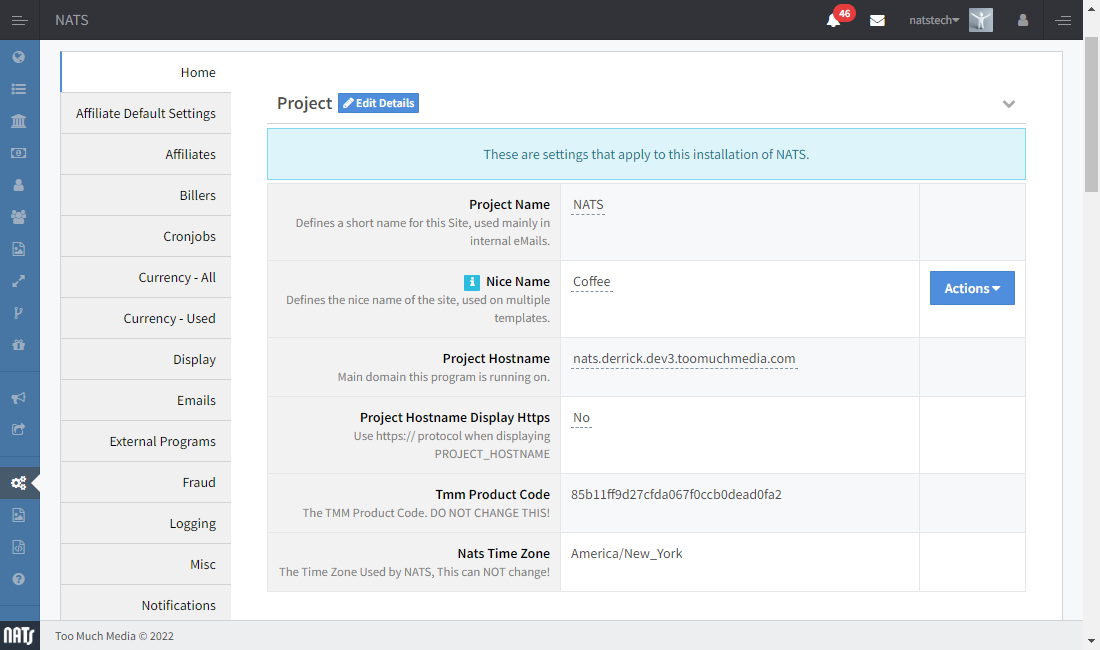
The Configuration Admin lets you manage your NATS configuration settings. It is not necessary to set up this Admin, as the default settings provided by your NATS install should work with your site. You should be certain of what you are doing before you edit these settings, as it is possible to cause internal problems when changing some settings
The NATS configuration admin works in conjunction with the NATS configuration file. The configuration file is stored in the NATS directory on your server as includes/config.php.
Several tabs let you find configuration options:
* The Home options are the primary NATS settings. Some options can't be edited; if you need these options changed, please [submit a ticket](http://clients.toomuchmedia.com/)
* The Security options configure who can access secure areas of your NATS program. Be careful editing these settings: you can easily lock yourself out
* The Fraud options allow you to configure your fraud detection settings
* The Billers options provides very specific options for further configuring your billers
* The Email options tell NATS when to send emails, as well as the subjects of the emails and what address to send them from. NATS only sends email if you enter a subject in any of the fields
* The Affiliates options let you set affiliate requirements, as well as what is displayed to them on the main Affiliates page
* The Currency options change the exchange rate or how currency is displayed. Currency exchange rates must be manually set up here.
* The Cronjobs options change how NATS does scheduled tasks
* The Logging options change what NATS logs
* The Display options affect what will be displayed in admin areas and reports
For a description of important options, please see the [Configuration Options article](/nats-admin/configuration/configuration-overview#configuration-options).
# Common Topics
# Ad Tools
Ad Tools in NATS are any advertisements that NATS tracks. Using Ad Tools, affiliates can access Ads in your possession to attract members to your sites.
## Common Questions
{% content-ref url="/pages/8TOt6tthggulfNOkdkYE" %}
[Adding and Editing Ad Tools](/nats-admin/ad-tools/common-questions/adding-and-editing-ad-tools)
{% endcontent-ref %}
{% content-ref url="/pages/vvUC1tPKtbQJ0np0QVNj" %}
[How to add new Ad Tool Types](/nats-admin/ad-tools/common-questions/how-to-add-new-ad-tool-types)
{% endcontent-ref %}
{% content-ref url="/pages/y6uW6kEUwuWSif5Hq9P9" %}
[How to add new Ad Tool Category](/nats-admin/ad-tools/common-questions/how-to-add-new-ad-tool-category)
{% endcontent-ref %}
## NATS Administration
{% content-ref url="/pages/Wo0t0GjuXALSAZRGtZ8K" %}
[Ad Tool Management](/nats-admin/ad-tools/ad-tool-management)
{% endcontent-ref %}
{% content-ref url="/pages/92TniMDnNpwPT286WONd" %}
[Ad Tool Assets](/nats-admin/ad-tools/ad-tool-assets)
{% endcontent-ref %}
{% content-ref url="/pages/a3FiEScFwfJ3bStJcZKa" %}
[Ad Tool Type](/nats-admin/ad-tools/ad-tool-type)
{% endcontent-ref %}
{% content-ref url="/pages/YnKEfBCcyENY2CXpm0dC" %}
[Ad Tool Groups](/nats-admin/ad-tools/ad-tool-groups)
{% endcontent-ref %}
## Further Reading
* [Get Hosted Galleries](/nats-admin/ad-tools/further-reading/get-hosted-galleries)
* [Ad Tool Templates](/nats-admin/ad-tools/further-reading/ad-tool-templates)
* [New Downloadable Content Ad Tool Type](/nats-admin/ad-tools/further-reading/new-downloadable-content-ad-tool-type)
* [Default Ad Tool Categories](/nats-admin/ad-tools/further-reading/default-ad-tool-categories)
* [Bulk Importing Ad Tools](/nats-admin/ad-tools/further-reading/bulk-importing-ad-tools)
# Affiliates
An affiliate in NATS is a person who makes referrals to one or more sites.
## Common Questions
{% content-ref url="/pages/nM7xSrVcTuZxpnnqVfDB" %}
[How to Enable Affiliates to Programs](/nats-admin/programs/common-questions/how-to-enable-affiliates-to-programs)
{% endcontent-ref %}
{% content-ref url="/pages/fiGjReVYk5Z6fMCa04eN" %}
[Creating Admin Accounts](/nats-admin/affiliates/common-questions/creating-admin-accounts)
{% endcontent-ref %}
{% content-ref url="/pages/4t0Z289PbQDrLOq9uMWZ" %}
[How to Add a Manual Invoice](/nats-admin/affiliates/common-questions/how-to-add-a-manual-invoice)
{% endcontent-ref %}
{% content-ref url="/pages/CegV31BYGdZyrCN7TSqP" %}
[How to Add a Manual Sale](/nats-admin/affiliates/common-questions/how-to-add-a-manual-sale)
{% endcontent-ref %}
{% content-ref url="/pages/fwjsOhNymh02sfqxh7Ee" %}
[How to Add an Account Type](/nats-admin/affiliates/common-questions/how-to-add-an-account-type)
{% endcontent-ref %}
{% content-ref url="/pages/CegV31BYGdZyrCN7TSqP" %}
[How to Add a Manual Sale](/nats-admin/affiliates/common-questions/how-to-add-a-manual-sale)
{% endcontent-ref %}
## NATS Admin
{% content-ref url="/pages/8VHJBcYLCqZnEJT0UfQY" %}
[Affiliate Management](/nats-admin/affiliates/affiliate-management)
{% endcontent-ref %}
{% content-ref url="/pages/2euvgLrZUbmAu0kDajQy" %}
[Affiliate Overview](/nats-admin/affiliates/affiliate-overview)
{% endcontent-ref %}
{% content-ref url="/pages/pexbAKhdZNJjZd53hbXl" %}
[Affiliate Override](/nats-admin/affiliates/further-reading/affiliate-override)
{% endcontent-ref %}
{% content-ref url="/pages/v7DvMGvYSapWS4jcIoLN" %}
[Account Changes](/nats-admin/affiliates/account-changes)
{% endcontent-ref %}
{% content-ref url="/pages/aKTuzCzbBjGtoBpNtJIW" %}
[Affiliate Account Types](/nats-admin/affiliates/affiliate-account-types)
{% endcontent-ref %}
{% content-ref url="/pages/qv039UVCki5Kd78kzC3E" %}
[Affiliate Groups](/nats-admin/affiliates/affiliate-groups)
{% endcontent-ref %}
{% content-ref url="/pages/D3OQf70yYPx0fV7MnEg7" %}
[Site Partners](/nats-admin/sites/site-management/site-overview/site-partners)
{% endcontent-ref %}
## Affiliate Area
{% content-ref url="/pages/PyFBULk0hMWnjdIC5yat" %}
[Dashboard](/affiliate-area/affiliate-area/dashboard)
{% endcontent-ref %}
{% content-ref url="/pages/3tnnoBCz12KxN1JKiz87" %}
[Statistics](/affiliate-area/affiliate-area/statistics)
{% endcontent-ref %}
{% content-ref url="/pages/3AssGd55BHVdPsfQI3vU" %}
[Ad Tools](/affiliate-area/affiliate-area/ad-tools)
{% endcontent-ref %}
{% content-ref url="/pages/oRgVYFWouZ1LnXuQo28m" %}
[My Account](/affiliate-area/affiliate-area/my-account)
{% endcontent-ref %}
{% content-ref url="/pages/lKbdlKzdjweWkidMltUO" %}
[Signup and Bonus Rewards](/affiliate-area/affiliate-area/signup-and-bonus-rewards)
{% endcontent-ref %}
## Further Reading
* [Change Affiliate Status](/nats-admin/affiliates/further-reading/change-affiliate-status)
* [Affiliate Documents](/nats-admin/affiliates/further-reading/affiliate-documents)
* [Affiliate-Specific Join Options and Payouts](/nats-admin/affiliates/further-reading/affiliate-specific-join-options-and-payouts)
* [In House Accounts](/nats-admin/affiliates/further-reading/in-house-accounts)
* [Affiliate Activation](/nats-admin/affiliates/further-reading/affiliate-activation)
* [Affiliate Referrals](/nats-admin/affiliates/further-reading/affiliate-referrals)
* [Affiliate Override](/nats-admin/affiliates/further-reading/affiliate-override)
* [Account Representative](/nats-admin/affiliates/further-reading/account-representative)
* [Affiliate Access Permissions](/nats-admin/affiliates/further-reading/affiliate-access-permissions)
* [Affiliate Admin Settings](/nats-admin/affiliates/further-reading/affiliate-admin-settings)
# Age Verification
With legislation being enforced throughout the world, NATS provides a way for you to verify your Affiliate and Member's Ages through our integration with various Age Verification systems.
{% content-ref url="/pages/GwvZP77wrh62hZWxUmeU" %}
[Age Verification](/getting-started/common-topics/age-verification)
{% endcontent-ref %}
## List of Supported Age Verification Systems
{% content-ref url="/pages/kJwAc22PO4cxfcH7x2X4" %}
[BlueCheck](/getting-started/integrations/age-verification/bluecheck)
{% endcontent-ref %}
{% content-ref url="/pages/uTgYoBB1EMGDsTOaOyqC" %}
[Yoti](/getting-started/integrations/age-verification/yoti)
{% endcontent-ref %}
# Billers
Billers are third-party payment processors that handle all membership and merchandise purchases. Using Billers allows you to outsource the transaction liability to a third party rather than bear the liability directly.
## List of supported Billers
{% content-ref url="/pages/GV2K3QS206WVoynLL4sG" %}
[Supported Billers](/getting-started/integrations/supported-billers)
{% endcontent-ref %}
## Common Questions
{% content-ref url="/pages/Z2oaZO2fhpJDy4taEQ6v" %}
[Setting up a Biller in NATS](/nats-admin/billers/common-questions/setting-up-a-biller-in-nats)
{% endcontent-ref %}
{% content-ref url="/pages/g0CIlj5iO31fSupeTsLI" %}
[How to Add a Biller to a Cascade](/nats-admin/billers/common-questions/how-to-add-a-biller-to-a-cascade)
{% endcontent-ref %}
{% content-ref url="/pages/93wMnRrYLm1y8qgwyWD2" %}
[Adding a New Tax](/nats-admin/billers/common-questions/adding-a-new-tax)
{% endcontent-ref %}
{% content-ref url="/pages/GgrYUpOyEehuQtNB5r7a" %}
[How to Add, Hide, Disable and Restore a Cascade](/nats-admin/billers/common-questions/how-to-add-hide-disable-and-restore-a-cascade)
{% endcontent-ref %}
{% content-ref url="/pages/ed9esE4UKpF7iUupSbia" %}
[How to add Transaction Charges and Deduction Fees](/nats-admin/billers/common-questions/how-to-add-transaction-charges-and-deduction-fees)
{% endcontent-ref %}
{% content-ref url="/pages/GgrYUpOyEehuQtNB5r7a" %}
[How to Add, Hide, Disable and Restore a Cascade](/nats-admin/billers/common-questions/how-to-add-hide-disable-and-restore-a-cascade)
{% endcontent-ref %}
{% content-ref url="/pages/GV2K3QS206WVoynLL4sG" %}
[Supported Billers](/getting-started/integrations/supported-billers)
{% endcontent-ref %}
## NATS Admin
{% content-ref url="/pages/aEJeAC1mub0s7bjtGZx6" %}
[Biller Management](/nats-admin/billers/biller-management)
{% endcontent-ref %}
{% content-ref url="/pages/SmNOTbJTtz4ls3wwq9H8" %}
[Biller Overview](/nats-admin/billers/biller-overview)
{% endcontent-ref %}
{% content-ref url="/pages/EM4AXTEA69LAWpjwJEW4" %}
[Cascades](/nats-admin/billers/cascades)
{% endcontent-ref %}
{% content-ref url="/pages/rp7HSvWeb6GlvazvIGGf" %}
[Taxes](/nats-admin/billers/taxes)
{% endcontent-ref %}
## Further Reading
* [Cascade Weights and Types](/nats-admin/billers/further-reading/cascade-weights-and-types)
* [Extra Biller Fields](/nats-admin/billers/further-reading/extra-biller-fields)
* [HTTPS Gateways](/nats-admin/billers/further-reading/https-gateways)
* [Biller Fees](/nats-admin/billers/further-reading/biller-fees)
* [Geo-Targeting Cascades](/nats-admin/billers/further-reading/geo-targeting-cascades)
* [Send Information to Special Billers](/nats-admin/billers/further-reading/send-information-to-special-billers)
* [Post-Biller Templates](/nats-admin/billers/further-reading/post-biller-templates)
# Blocks
Blocks are the building-blocks of every page in the CMS. Each Block serves a function, whether that is the Set List block to display a list of Sets, the Model View block to display a Model's information, or more.
Blocks can be drag and dropped onto a page and customized through block specific settings.
## Useful Articles
{% content-ref url="/pages/VDTUA2jp9jucvjAKUUPN" %}
[Replacement Variables for Blocks](/content-management/member-areas-and-tours/customizing-your-theme/replacement-variables/replacement-variables-for-blocks)
{% endcontent-ref %}
{% content-ref url="/pages/iPo5gGW43EUHsnhQNSIl" %}
[Replacement Variables for the HTML Block](/content-management/member-areas-and-tours/customizing-your-theme/replacement-variables/replacement-variables-for-the-html-block)
{% endcontent-ref %}
{% content-ref url="/pages/7lUwaSI9yImefB8h0Fa6" %}
[Using the Page Builder](/content-management/member-areas-and-tours/customizing-your-theme/using-the-page-builder)
{% endcontent-ref %}
{% content-ref url="/pages/ZwgIXqVz04qGjsNvOqMs" %}
[Broken mention](broken://pages/ZwgIXqVz04qGjsNvOqMs)
{% endcontent-ref %}
{% content-ref url="/pages/twbaE2hW9n9rWvAYu2Ny" %}
[Managing Sets with both Videos and Photos](/content-management/sets/managing-sets/managing-sets-with-both-videos-and-photos)
{% endcontent-ref %}
{% content-ref url="/pages/ANR4YD12cWE06hgKc9xz" %}
[Sharing Blocks across Pages](/content-management/member-areas-and-tours/customizing-your-theme/sharing-blocks-across-pages)
{% endcontent-ref %}
## Blocks
{% content-ref url="/pages/J6Pe6MmfmWL8KMam8usM" %}
[Block Types](/content-management/member-areas-and-tours/themes/block-types)
{% endcontent-ref %}
# Cascades
A cascade sends surfers through multiple billers based on their payment options in order to encourage more customers to sign-up. Cascades are primarily used for targeting processing types to the purchaser's location, splitting between several processes for diversification, utilizing different processors depending on various factors putting the purchaser through all available billing options.
## Common Questions
{% content-ref url="/pages/GgrYUpOyEehuQtNB5r7a" %}
[How to Add, Hide, Disable and Restore a Cascade](/nats-admin/billers/common-questions/how-to-add-hide-disable-and-restore-a-cascade)
{% endcontent-ref %}
{% content-ref url="/pages/yUBBYeOWvCpcBWBwhY5G" %}
[Creating and Displaying Cascades](/nats-admin/sites/common-questions/creating-and-displaying-cascades)
{% endcontent-ref %}
## NATS Administration
{% content-ref url="/pages/EM4AXTEA69LAWpjwJEW4" %}
[Cascades](/nats-admin/billers/cascades)
{% endcontent-ref %}
{% content-ref url="/pages/oObRq3d8Ad1bQX6SOIFS" %}
[Cascade Overview](/nats-admin/billers/cascade-overview)
{% endcontent-ref %}
## Further Reading
* [Cascade Weights and Types](/nats-admin/billers/further-reading/cascade-weights-and-types)
* [Geo-Targeting Cascades](/nats-admin/billers/further-reading/geo-targeting-cascades)
# CDN
# Channels
Channels give you the flexibility to organize different sites different ways. Your setup can be as simple or complex as your use case requires. When you create a new members area, a default channel will automatically be created for it.
## NATS Admin
{% content-ref url="/pages/rrRu481KvrAcpNCOF1Qs" %}
[Channels](/content-management/channels)
{% endcontent-ref %}
{% content-ref url="/pages/84OKOGVfyHcuRl5a5cMH" %}
[Managing Channels](/content-management/channels/managing-channels)
{% endcontent-ref %}
{% content-ref url="/pages/CToVZLPD2frIMBYaVo45" %}
[Channel Details & Settings](/content-management/channels/channel-details-and-settings)
{% endcontent-ref %}
{% content-ref url="/pages/gsrjt1ryRKjV7FMdca9s" %}
[Configuring Channels](/content-management/channels/configuring-channels)
{% endcontent-ref %}
## Further Reading
* [Publishing Sets to your Site](/content-management/sets/managing-sets/publishing-sets)
* [Member Area and Tour Details](/content-management/member-areas-and-tours/member-area-and-tour-details#themes)
* [Block Defaults](/content-management/member-areas-and-tours/themes/block-defaults#channel)
# CMS Tours
The Tour serves as the location visitors can get previews of your content, making the tour a promotional site for the Member Area. It also serves as the location your Members can log in from.
## Useful Articles
{% content-ref url="/pages/G1ayp3FB8FRyOfJvPiAp" %}
[Member Areas and Tours](/content-management/member-areas-and-tours)
{% endcontent-ref %}
{% content-ref url="/pages/hnWLQPnznrLbKqHwqVrY" %}
[Creating a CMS Tour](/content-management/member-areas-and-tours/creating-a-cms-tour)
{% endcontent-ref %}
{% content-ref url="/pages/s0WHAVYsCLst36g6JXaZ" %}
[Broken mention](broken://pages/s0WHAVYsCLst36g6JXaZ)
{% endcontent-ref %}
{% content-ref url="/pages/GdRXSOg33BCti9DITjdb" %}
[Member Area and Tour Details](/content-management/member-areas-and-tours/member-area-and-tour-details)
{% endcontent-ref %}
{% content-ref url="/pages/2WBaOGctsVmCNSqY6yfm" %}
[Themes](/content-management/member-areas-and-tours/themes)
{% endcontent-ref %}
## Blocks
{% content-ref url="/pages/bBMlEpuRDXvCfXY33OKL" %}
[Login Form Block](/content-management/member-areas-and-tours/themes/block-types/login-form-block)
{% endcontent-ref %}
{% content-ref url="/pages/XVIhIzcIkbGlXF7NRc68" %}
[Media Block](/content-management/member-areas-and-tours/themes/block-types/media-block)
{% endcontent-ref %}
# Comments, Ratings & Likes
Logged-in Members can leave Comments, Ratings, Likes, and even Favorite any set or model displayed in the Member Area.
Within the admin, we refer to all of these settings as User Interaction when setting up themes and blocks, viewing a Set or Model in the admin, or when viewing what your members have done directly.
## Useful Links
{% content-ref url="/pages/3Dz6KtH4qiUmcgKMZYJI" %}
[Comment Block](/content-management/member-areas-and-tours/themes/block-types/comment-block)
{% endcontent-ref %}
{% content-ref url="/pages/7lV62bDjBqunv1IPSx0K" %}
[User Interaction](/content-management/user-interaction)
{% endcontent-ref %}
{% content-ref url="/pages/DFzQmUWo1Q48P4Ambo9P" %}
[Comments](/content-management/user-interaction/comments)
{% endcontent-ref %}
{% content-ref url="/pages/iAubHWs8D8u8zXEw9xGq" %}
[Ratings](/content-management/user-interaction/ratings)
{% endcontent-ref %}
{% content-ref url="/pages/WFpOYecsqsRnIykWdgz5" %}
[Favorites](/content-management/user-interaction/favorites)
{% endcontent-ref %}
# Communications
The Communications Admin section of NATS allows you to send news items, such as updates, to all of your affiliates or notifications to specific affiliates. It also uses notifications to send you automatic notifications about any problems that may arise.
## Common Questions
{% content-ref url="/pages/OrXyoD1wq9e9BEqYy1Ue" %}
[How to Add and Delete News Item Sections](/nats-admin/communications/common-questions/how-to-add-and-delete-news-item-sections)
{% endcontent-ref %}
{% content-ref url="/pages/yroWiR12n4Op7Vuu8RJB" %}
[How to Add and Delete News Items](/nats-admin/communications/common-questions/how-to-add-and-delete-news-items)
{% endcontent-ref %}
## NATS Administration
{% content-ref url="/pages/iUQq8xYMtOddZNZJfztb" %}
[Messages](/nats-admin/communications/messages)
{% endcontent-ref %}
{% content-ref url="/pages/OT0mcd5J47QooC579pgm" %}
[News Items](/nats-admin/communications/news-items)
{% endcontent-ref %}
{% content-ref url="/pages/ft7ObhaxhvdBd59NPY04" %}
[Notifications](/nats-admin/communications/notifications)
{% endcontent-ref %}
# Content
Content refers to the actual media (videos, photos, or both) that visitors can view. The content you upload to your CMS is contained within Sets, and thus a Set can contain multiple forms of content including trailers, photos and videos.
## Useful Links
{% content-ref url="/pages/pn4OKr8ayYi7lURNkQBp" %}
[Uploading Content to Sets](/content-management/sets/managing-sets/uploading-content-to-sets)
{% endcontent-ref %}
{% content-ref url="/pages/tgvYsMoOtxZHIkVdz1o1" %}
[Formats](/content-management/formats)
{% endcontent-ref %}
{% content-ref url="/pages/twbaE2hW9n9rWvAYu2Ny" %}
[Managing Sets with both Videos and Photos](/content-management/sets/managing-sets/managing-sets-with-both-videos-and-photos)
{% endcontent-ref %}
# Cross Sales
Cross Sales are additional sales that occur along an additional membership transaction. Cross sales allow you as the program owner to make a sale to multiple sites all at the same time, driving revenue to each of your pay-sites at once.
## Common Questions
{% content-ref url="/pages/LYsANKKMIySngUedZuK2" %}
[How to Add and Delete a Cross or Up Sale](/nats-admin/cross-up-sales/common-questions/how-to-add-and-delete-a-cross-or-up-sale)
{% endcontent-ref %}
## NATS Admin
{% content-ref url="/pages/ymskW2PRSIAq2PFc5LBS" %}
[Cross/Up Sale Overview](/nats-admin/cross-up-sales/cross-up-sale-overview)
{% endcontent-ref %}
{% content-ref url="/pages/sGGgcbZgam7MV6g8mB5P" %}
[Cross Sales](/nats-admin/cross-up-sales/cross-sales)
{% endcontent-ref %}
## Further Reading
* [Processing Gateway Cross Sales outside NATS](/nats-admin/cross-up-sales/further-reading/processing-gateway-cross-sales-outside-nats)
* [Cross Sale Supported Billers](/nats-admin/cross-up-sales/further-reading/cross-sale-supported-billers)
# Customers
The Customer's Admin in NATS provides a centralized way to group multiple member accounts, subscriptions, and set sale transactions under a single unified customer profile. Rather than managing repeating memberships independently, admins can view a customer's total purchase history, emails, and active credentials in one place.
## NATS Admin
{% content-ref url="/pages/gu65w4UxyhI7n6eGVixD" %}
[Customer Overview](/nats-admin/customers/customer-overview)
{% endcontent-ref %}
# Customization
NATS provides a suite of customization tools for multiple areas of NATS including Tours, Reports, and Admin pages themselves.
## Common Questions
{% content-ref url="/pages/Re5VgnlvWvWStron3wGY" %}
[Customizing your Join Form](/nats-admin/sites/common-questions/customizing-your-join-form)
{% endcontent-ref %}
{% content-ref url="/pages/yUBBYeOWvCpcBWBwhY5G" %}
[Creating and Displaying Cascades](/nats-admin/sites/common-questions/creating-and-displaying-cascades)
{% endcontent-ref %}
{% content-ref url="/pages/x71txqDuv5sPaDNkjpOp" %}
[How to Customize an Admin Report](/nats-admin/reporting/common-questions/how-to-customize-an-admin-report)
{% endcontent-ref %}
## NATS Admin
{% content-ref url="/pages/IUHBvD0GL0BTZMuEbjfb" %}
[Configuration](/nats-admin/configuration)
{% endcontent-ref %}
{% content-ref url="/pages/vO3aBurNycsaafTNkDMo" %}
[Tour Overview](/nats-admin/sites/site-management/tour-overview)
{% endcontent-ref %}
{% content-ref url="/pages/P6Rq90iqCmCZhtmnUiDD" %}
[Site Templates](/nats-admin/sites/site-templates)
{% endcontent-ref %}
{% content-ref url="/pages/19KJpY34OjHSgMfImyLn" %}
[Skins & Templates](/nats-admin/skins-and-templates)
{% endcontent-ref %}
{% content-ref url="/pages/DyexLUz12Y1F7WXcccHc" %}
[Smarty](/using-nats/one-off-articles/smarty)
{% endcontent-ref %}
## Further Reading
* [Language Files](/nats-admin/skins-and-templates/further-reading/language-files)
* [Skins](/nats-admin/skins-and-templates/further-reading/skins)
* [Templates](/nats-admin/skins-and-templates/further-reading/templates)
* [Template Function Parameters](/nats-admin/skins-and-templates/further-reading/template-function-parameters)
* [Template Functions](/nats-admin/skins-and-templates/further-reading/template-functions)
# Design
The design of your Tour and Member Area is controlled by settings you have configured within the Theme for that area.
## Useful Links
{% content-ref url="/pages/2WBaOGctsVmCNSqY6yfm" %}
[Themes](/content-management/member-areas-and-tours/themes)
{% endcontent-ref %}
{% content-ref url="/pages/vLjui31B0zD3wR6LMs6z" %}
[Customizing Your Theme](/content-management/member-areas-and-tours/customizing-your-theme)
{% endcontent-ref %}
# Documents
Easily upload documents to specific types of assets within NATS.
## NATS Admin
{% content-ref url="/pages/fOqDC87FxBsCX8dDpZ9A" %}
[Affiliate Documents](/nats-admin/affiliates/further-reading/affiliate-documents)
{% endcontent-ref %}
## CMS
{% content-ref url="/pages/3Y4ma8zbKykPjob4xyY4" %}
[Documents for Sets and Metadata](/using-nats/one-off-articles/documents-for-sets-and-metadata)
{% endcontent-ref %}
# Emails
Emails in NATS can be sent to Affiliates or Members as a way to communicate with the people that help you succeed in your business. Emails can be managed and sent in the Mass Mailer admin where can you write emails, set up rules to specify who is able to view your mail, create test emails before sending them out and more.
## Common Questions
{% content-ref url="/pages/FAchgJIRjogmcGXYlgfo" %}
[Setting Up an External Mail Server (SMTP/Gmail)](/nats-admin/mass-mailing/common-question/setting-up-an-external-mail-server-smtp-gmail)
{% endcontent-ref %}
{% content-ref url="/pages/2uwxEQvoxWpsJwNldrGQ" %}
[How to Add a New Mail](/nats-admin/mass-mailing/common-question/how-to-add-a-new-mail)
{% endcontent-ref %}
## NATS Configuration
{% content-ref url="/pages/5gBM7HeAubM8pSYEim41" %}
[Emails](/nats-admin/configuration/configuration-overview/emails)
{% endcontent-ref %}
## NATS Admin
{% content-ref url="/pages/VA2NOubfUbORCVG5KzYr" %}
[Mass Mailing](/nats-admin/mass-mailing)
{% endcontent-ref %}
{% content-ref url="/pages/eMDHRXiddWiyCiuytsYa" %}
[Mailing Management](/nats-admin/mass-mailing/mailing-management)
{% endcontent-ref %}
{% content-ref url="/pages/iIjQIW0c1F3dMN0Vwjfk" %}
[Mailing Overview](/nats-admin/mass-mailing/mailing-overview)
{% endcontent-ref %}
{% content-ref url="/pages/C3Nn1ly7Bnb2O38wxSPH" %}
[Remove Lists](/nats-admin/mass-mailing/remove-lists)
{% endcontent-ref %}
{% content-ref url="/pages/t7XMyMknY8EMRQocOOxJ" %}
[Mailing Queue](/nats-admin/mass-mailing/mailing-queue)
{% endcontent-ref %}
## Further Reading
* [Reminder Emails](/nats-admin/mass-mailing/further-reading/reminder-emails)
* [Mailing Expired Members](/nats-admin/mass-mailing/further-reading/mailing-expired-members)
* [Mailing Never Join Members](/nats-admin/mass-mailing/further-reading/mailing-never-join-members)
* [Common Mailer Examples](/nats-admin/mass-mailing/further-reading/common-mailer-examples)
* [Mass Mailer Template Variables](/nats-admin/mass-mailing/further-reading/mass-mailer-template-variables)
* [Welcome Back Offers](/nats-admin/mass-mailing/further-reading/welcome-back-offers)
# Formats
# Join Options
## Common Questions
{% content-ref url="/pages/LUTms9dYTeYoM4SKqdfj" %}
[How to Create a new Join Option](/nats-admin/sites/common-questions/how-to-create-a-new-join-option)
{% endcontent-ref %}
## NATS Admin
{% content-ref url="/pages/DZtHCi7P0SHASsP8yWUf" %}
[Site Management](/nats-admin/sites/site-management)
{% endcontent-ref %}
{% content-ref url="/pages/aEJeAC1mub0s7bjtGZx6" %}
[Biller Management](/nats-admin/billers/biller-management)
{% endcontent-ref %}
{% content-ref url="/pages/4TdJgQdke0HYfdLZk4V0" %}
[Join Option Overview](/nats-admin/sites/site-management/join-option-overview)
{% endcontent-ref %}
## Further Reading
* [Geo-Target Join Options](/nats-admin/sites/further-reading/geo-target-join-options)
* [No Cost Registration](/nats-admin/sites/further-reading/no-cost-registration)
# Linkcodes
Linkcodes are referral URLs tracked by NATS that tie surfers to specific affiliates, programs, campaigns, sites, tours, and ad tools. NATS supports encoded, unencoded, and shortname linkcodes, which can be used directly or embedded in promotional ad tools.
## NATS Admin
{% content-ref url="/pages/uQooIYFSesigosWG0NLv" %}
[Linkcodes](/using-nats/nats-admin-features/linkcodes)
{% endcontent-ref %}
{% content-ref url="/pages/nIjkyWDJBgMvGDV0SKqR" %}
[Site Linkcodes](/nats-admin/sites/site-management/site-overview/site-linkcodes)
{% endcontent-ref %}
{% content-ref url="/pages/y5oyYFW1vJeEm1czMPBu" %}
[Generate Linkcode](/nats-admin/tools/generate-linkcode)
{% endcontent-ref %}
{% content-ref url="/pages/3XhkVQQAzC25zmkoF7qm" %}
[Decode Linkcode](/nats-admin/tools/decode-linkcode)
{% endcontent-ref %}
## Affiliate Area
{% content-ref url="/pages/pffeE1U5nDaS7G0PejNX" %}
[Affiliate Linkcodes](/affiliate-area/affiliate-area/ad-tools/affiliate-linkcodes)
{% endcontent-ref %}
{% content-ref url="/pages/npkNku53kXBoylPjK5DH" %}
[Affiliate Linkcode Settings](/affiliate-area/affiliate-area/ad-tools/affiliate-linkcode-settings)
{% endcontent-ref %}
## API Endpoint
{% content-ref url="/pages/06368a0f106ffb7f87d06960cb21d2b59424dcf6" %}
[/api/codes/linkcodes](/api/api-endpoints/codes/api-codes-linkcodes)
{% endcontent-ref %}
## Further Reading
* [Affiliate Linkcodes in Emails](/nats-admin/mass-mailing/further-reading/affiliate-linkcodes-in-emails)
* [Tour Overview: Linkcodes Tab](/nats-admin/sites/site-management/tour-overview#linkcodes)
* [Affiliate Display Settings: Default Linkcode Settings](/affiliate-area/affiliate-area/ad-tools/affiliate-linkcodes#affiliate-linkcode-display-settings)
* [Linkcode Template Functions](/nats-admin/skins-and-templates/further-reading/template-functions/nats_list_linkcodes)
# Members
Members in NATS are users who have paid for a subscription on your Site whether they were directed through an Affiliate or a Type-In. A Member's details can be viewed and managed through the Member section of NATS.
## Common Questions
{% content-ref url="/pages/eTbczPqb6gHyBz90KCf6" %}
[How to Add a Member](/nats-admin/members/common-questions/how-to-add-a-member)
{% endcontent-ref %}
{% content-ref url="/pages/x1TCdgShYvTw5twRuPRp" %}
[How to Delete a Member](/nats-admin/members/common-questions/how-to-delete-a-member)
{% endcontent-ref %}
{% content-ref url="/pages/PPOSQyvW3I3NJmL8d4tA" %}
[How to Expire a Member](/nats-admin/members/common-questions/how-to-expire-a-member)
{% endcontent-ref %}
{% content-ref url="/pages/uFIP3cMYNyt0xRDIjofA" %}
[How to Dump Member Details](/nats-admin/members/common-questions/how-to-dump-member-details)
{% endcontent-ref %}
{% content-ref url="/pages/x1TCdgShYvTw5twRuPRp" %}
[How to Delete a Member](/nats-admin/members/common-questions/how-to-delete-a-member)
{% endcontent-ref %}
{% content-ref url="/pages/cf2AE694qNCY8hCGXO4K" %}
[How to add a New Restricted Value](/nats-admin/members/common-questions/how-to-add-a-new-restricted-value)
{% endcontent-ref %}
{% content-ref url="/pages/7iVt8JWAOa2j5yK57svX" %}
[How to allow Members to retrieve or reset their Password](/nats-admin/members/common-questions/how-to-allow-members-to-retrieve-or-reset-their-password)
{% endcontent-ref %}
## NATS Admin Pages
{% content-ref url="/pages/btL1SEC1Ky1YveJMrsyv" %}
[Member Management](/nats-admin/members/member-management)
{% endcontent-ref %}
{% content-ref url="/pages/dkxu26EhpOuktINDGcuc" %}
[Member Overview](/nats-admin/members/member-overview)
{% endcontent-ref %}
{% content-ref url="/pages/LWMb19DdyxoZL6gMCJuG" %}
[Restricted Values](/nats-admin/members/restricted-values)
{% endcontent-ref %}
{% content-ref url="/pages/28xKeqIjx7BYaXC7Bffm" %}
[Search at Biller](/nats-admin/members/search-at-biller)
{% endcontent-ref %}
{% content-ref url="/pages/AYoXjX9qtkNnBqrBlNvW" %}
[Login Protection](/nats-admin/members/login-protection)
{% endcontent-ref %}
## Further Reading
* [mod\_auth\_openidc](/nats-admin/members/further-reading/mod_auth_openidc)
* [Member Expire Pad](/nats-admin/members/further-reading/member-expire-pad)
* [OpenID Connect](/nats-admin/members/further-reading/openid-connect)
* [Member Logging](/nats-admin/members/further-reading/member-logging)
* [Multisite Access](/nats-admin/members/further-reading/multisite-access)
* [Member Authentication](/nats-admin/members/further-reading/member-authentication)
* [Password Sharing Prevention](/nats-admin/members/login-protection/password-sharing-prevention)
# Member Area
The Member Area is the restricted section of your site available only to authenticated members. This area houses your full length content and member account profiles.
## Useful Articles
{% content-ref url="/pages/G1ayp3FB8FRyOfJvPiAp" %}
[Member Areas and Tours](/content-management/member-areas-and-tours)
{% endcontent-ref %}
{% content-ref url="/pages/sfmyuGk4EM5jJl67E0ke" %}
[Broken mention](broken://pages/sfmyuGk4EM5jJl67E0ke)
{% endcontent-ref %}
{% content-ref url="/pages/GzekTL0MZumlAOld1Qlx" %}
[Creating a Member's Area](/content-management/member-areas-and-tours/creating-a-members-area)
{% endcontent-ref %}
{% content-ref url="/pages/a9MNqMPOPMinr8vMDUTT" %}
[CMS Member Authentication](/content-management/member-areas-and-tours/creating-a-members-area/cms-member-authentication)
{% endcontent-ref %}
## Blocks
{% content-ref url="/pages/gehTCyVHVkIuH3vDzzAw" %}
[Member Account Block](/content-management/member-areas-and-tours/themes/block-types/member-account-block)
{% endcontent-ref %}
# Metadata
Metadata are additional details that will help you organize your content.
Models and Metadata act in a similar matter, with only minor differences. Each model has a details field that allows you to distinguish your model further. Model details can be viewed on Model Pages, which you can create in the Theme’s Pages tab. Models also have a dedicated section on the left-hand navigation that individual Metadata does not have. Instead, the collection of Metadata can be found in the Metadata section in the left-hand navigation.
Models are the individual actors that are showcased in your sets while Metadata can be added to your Sets to help organize them. Metadata contains various attributes while Models contain different attributes such as height, hair color, date of birth, and more.
In addition to Set details, each set contains a list of data to help you organize your content called Metadata Types. Metadata Types can be created to give as much flexibility for content as possible, allowing for the labeling and categorizing by **type**.
The only difference between Models and Metadata is how they are used and presented to your viewers.
## Useful Articles
{% content-ref url="/pages/1uzBuWsDBEUtbOlMpGA2" %}
[Metadata](/content-management/metadata)
{% endcontent-ref %}
{% content-ref url="/pages/jhidsc2tdmkVGbvOQg6K" %}
[Metadata Details & Settings](/content-management/metadata/metadata-details-and-settings)
{% endcontent-ref %}
{% content-ref url="/pages/dEVV3DVagbT5bvr21vZM" %}
[Managing Metadata Types](/content-management/metadata/managing-metadata-types)
{% endcontent-ref %}
{% content-ref url="/pages/mXgnA32U6EMM3mL0NtYk" %}
[Using Metadata with Sets](/content-management/metadata/using-metadata-with-sets)
{% endcontent-ref %}
{% content-ref url="/pages/2KvYnh8kaL9Rr9cqQVwQ" %}
[Adding Metadata](/content-management/metadata/adding-metadata)
{% endcontent-ref %}
{% content-ref url="/pages/3Y4ma8zbKykPjob4xyY4" %}
[Documents for Sets and Metadata](/using-nats/one-off-articles/documents-for-sets-and-metadata)
{% endcontent-ref %}
## Blocks
{% content-ref url="/pages/D4owpMjJKGawOfQaFVqF" %}
[Metadata List Block](/content-management/member-areas-and-tours/themes/block-types/metadata-list-block)
{% endcontent-ref %}
# Models
Models are the individuals featured in Sets. They are a special Metadata Type that have their own View Block, the Model View Block**,** which is a profile with a photo, banner, description and unique attributes such as measurements, social media links, and characteristics.
## Useful Articles
{% content-ref url="/pages/1uzBuWsDBEUtbOlMpGA2" %}
[Metadata](/content-management/metadata)
{% endcontent-ref %}
{% content-ref url="/pages/jhidsc2tdmkVGbvOQg6K" %}
[Metadata Details & Settings](/content-management/metadata/metadata-details-and-settings)
{% endcontent-ref %}
{% content-ref url="/pages/dEVV3DVagbT5bvr21vZM" %}
[Managing Metadata Types](/content-management/metadata/managing-metadata-types)
{% endcontent-ref %}
{% content-ref url="/pages/mXgnA32U6EMM3mL0NtYk" %}
[Using Metadata with Sets](/content-management/metadata/using-metadata-with-sets)
{% endcontent-ref %}
{% content-ref url="/pages/2KvYnh8kaL9Rr9cqQVwQ" %}
[Adding Metadata](/content-management/metadata/adding-metadata)
{% endcontent-ref %}
{% content-ref url="/pages/3Y4ma8zbKykPjob4xyY4" %}
[Documents for Sets and Metadata](/using-nats/one-off-articles/documents-for-sets-and-metadata)
{% endcontent-ref %}
## Blocks
{% content-ref url="/pages/9rDzAtObvdZezSmYfvKk" %}
[Model List Block](/content-management/member-areas-and-tours/themes/block-types/model-list-block)
{% endcontent-ref %}
{% content-ref url="/pages/SkwiQuoSFD2cmbAUFaGG" %}
[Model View Block](/content-management/member-areas-and-tours/themes/block-types/model-view-block)
{% endcontent-ref %}
# NATS Admin
NATS Admins are your main tool for interacting with the various parts of NATS.
## NATS Admin Pages
{% content-ref url="/pages/0YDsNoUc3OXQ2hy323He" %}
[Reporting](/nats-admin/reporting)
{% endcontent-ref %}
{% content-ref url="/pages/StZUUl2w5Ra8wZLATqwC" %}
[Sites](/nats-admin/sites)
{% endcontent-ref %}
{% content-ref url="/pages/cvFIwYFIGkI6ZizdMiU8" %}
[Programs](/nats-admin/programs)
{% endcontent-ref %}
{% content-ref url="/pages/Dmp4n8HpqW7PrX50BkpA" %}
[Billers](/nats-admin/billers)
{% endcontent-ref %}
{% content-ref url="/pages/uR462j6HGjqFCEvzeX8D" %}
[Payments](/nats-admin/payments)
{% endcontent-ref %}
{% content-ref url="/pages/eLE5KhKhYac4R1XMX5sp" %}
[Affiliates](/nats-admin/affiliates)
{% endcontent-ref %}
{% content-ref url="/pages/MLwujsZcWCjGB2W72IsY" %}
[Members](/nats-admin/members)
{% endcontent-ref %}
{% content-ref url="/pages/c03OcvP1a5IWBeEkrTT3" %}
[Ad Tools](/nats-admin/ad-tools)
{% endcontent-ref %}
{% content-ref url="/pages/2R7CB1B648EYnZLl5kjh" %}
[Cross/Up Sales](/nats-admin/cross-up-sales)
{% endcontent-ref %}
{% content-ref url="/pages/jADvucLDhGPt7CRNdQeH" %}
[Third Party](/nats-admin/third-party)
{% endcontent-ref %}
{% content-ref url="/pages/VaehZQj8UpnMB82lcnss" %}
[Communications](/nats-admin/communications)
{% endcontent-ref %}
{% content-ref url="/pages/VA2NOubfUbORCVG5KzYr" %}
[Mass Mailing](/nats-admin/mass-mailing)
{% endcontent-ref %}
{% content-ref url="/pages/IUHBvD0GL0BTZMuEbjfb" %}
[Configuration](/nats-admin/configuration)
{% endcontent-ref %}
{% content-ref url="/pages/7enwIJc5XZ9jfrCaXsgg" %}
[Tools](/nats-admin/tools)
{% endcontent-ref %}
{% content-ref url="/pages/19KJpY34OjHSgMfImyLn" %}
[Skins & Templates](/nats-admin/skins-and-templates)
{% endcontent-ref %}
{% content-ref url="/pages/4XJDuQMcJnQbhIFEsXmB" %}
[Support & Maintenance](/nats-admin/support-and-maintenance)
{% endcontent-ref %}
## Further Reading
* [ID Numbers](/using-nats/nats-admin-features/id-numbers)
* [Freeform Date](/using-nats/nats-admin-features/freeform-date)
* [Rules](/using-nats/nats-admin-features/rules)
* [Link Codes](/using-nats/nats-admin-features/linkcodes)
* [Link Domain](/using-nats/nats-admin-features/linkdomain)
* [Track](/using-nats/nats-admin-features/linkcodes/tracking)
* [NATS Code](/using-nats/nats-admin-features/linkcodes/nats-code)
* [Advanced Search Bar](/using-nats/nats-admin-features/advanced-search-bar)
# One Click Systems
## Feature Pages
{% content-ref url="/pages/AYNB2N2ytaMsb0XyOe5P" %}
[Package Plus](/using-nats/one-click-systems/package-plus)
{% endcontent-ref %}
{% content-ref url="/pages/8e11XMO5mjzUefF4jfIP" %}
[Token Plus](/using-nats/one-click-systems/token-plus)
{% endcontent-ref %}
{% content-ref url="/pages/r1j2upnMDxd57duFCz4P" %}
[Signup Plus](/using-nats/one-click-systems/signup-plus)
{% endcontent-ref %}
{% content-ref url="/pages/mOebDc705lVWfEYgOwRh" %}
[Upsell Plus](/using-nats/one-click-systems/upsell-plus)
{% endcontent-ref %}
{% content-ref url="/pages/KSDH1UV3m31w7bZnbbcf" %}
[Cancel Plus](/using-nats/one-click-systems/cancel-plus)
{% endcontent-ref %}
{% content-ref url="/pages/BkgQASKkMn5EvDYZbAQf" %}
[Upgrade Plus](/using-nats/one-click-systems/upgrade-plus)
{% endcontent-ref %}
## Further Reading
* [Package Plus Supported Billers](/using-nats/one-click-systems/package-plus/package-plus-supported-billers)
* [Token Plus Supported Billers](/using-nats/one-click-systems/token-plus/token-plus-supported-billers)
* [Throttling](/using-nats/one-off-articles/throttling)
# Pages
Pages are sections of your website comprised of Blocks within your Theme that present content to your users. Each page has a unique URL and is accessible through navigation or using the URL.
## Useful Articles
{% content-ref url="/pages/GnJOwUcaAslymas8XykU" %}
[Pages](/content-management/member-areas-and-tours/themes/pages)
{% endcontent-ref %}
{% content-ref url="/pages/5YcYafhLeRt7cFvSJ85a" %}
[Creating a new Page](/content-management/member-areas-and-tours/customizing-your-theme/creating-a-new-page)
{% endcontent-ref %}
{% content-ref url="/pages/7lUwaSI9yImefB8h0Fa6" %}
[Using the Page Builder](/content-management/member-areas-and-tours/customizing-your-theme/using-the-page-builder)
{% endcontent-ref %}
{% content-ref url="/pages/mNu7NSiyXa72s13bgcBr" %}
[Dynamic Pages](/content-management/member-areas-and-tours/customizing-your-theme/dynamic-pages)
{% endcontent-ref %}
{% content-ref url="/pages/TH0Pl5hefVn2RT98lDTu" %}
[Set a Page's Title Dynamically](/content-management/member-areas-and-tours/customizing-your-theme/replacement-variables/set-a-pages-title-dynamically)
{% endcontent-ref %}
{% content-ref url="/pages/bnsqEGRlx9ACR5tPTYHG" %}
[How to create a Categories page](/content-management/member-areas-and-tours/customizing-your-theme/how-to-create-a-categories-page)
{% endcontent-ref %}
{% content-ref url="/pages/ANR4YD12cWE06hgKc9xz" %}
[Sharing Blocks across Pages](/content-management/member-areas-and-tours/customizing-your-theme/sharing-blocks-across-pages)
{% endcontent-ref %}
## Blocks
{% content-ref url="/pages/J6Pe6MmfmWL8KMam8usM" %}
[Block Types](/content-management/member-areas-and-tours/themes/block-types)
{% endcontent-ref %}
# Page Path & Slugs
# Payments
The Payments section of NATS houses one of the most important parts of NATS as it deals with ensuring Affiliates are properly compensated for bringing traffic to your program.
## Common Questions
{% content-ref url="/pages/eL8LDfiwWXN12y2d8cgi" %}
[Using Bulk Invoice Imports](/nats-admin/payments/common-questions/using-bulk-invoice-imports)
{% endcontent-ref %}
{% content-ref url="/pages/x9CGGMTRvtotS1hDIxsq" %}
[How to add a Dump Format](/nats-admin/payments/common-questions/how-to-add-a-dump-format)
{% endcontent-ref %}
{% content-ref url="/pages/IjLtrFMuZJgWmAd2SDiV" %}
[Adding a New Pay Via Method](/nats-admin/payments/common-questions/adding-a-new-pay-via-method)
{% endcontent-ref %}
## NATS Admin
{% content-ref url="/pages/3bEmDoWt5Jvy41TJ6BwX" %}
[Bulk Payments](/nats-admin/payments/bulk-payments)
{% endcontent-ref %}
{% content-ref url="/pages/43wAcMD07RR2ks0lsOKU" %}
[Dump Formats](/nats-admin/payments/dump-formats)
{% endcontent-ref %}
{% content-ref url="/pages/7A669etAQAqxxe5Jt2hX" %}
[Payout Changes](/nats-admin/programs/further-reading/payout-changes)
{% endcontent-ref %}
{% content-ref url="/pages/TAAomDT2viU2HQOR23B4" %}
[Payments Due / Stored](/nats-admin/payments/payments-due-stored)
{% endcontent-ref %}
{% content-ref url="/pages/auQc6UBSgN2X0ZMZVabY" %}
[Payout Periods](/nats-admin/payments/payout-periods)
{% endcontent-ref %}
{% content-ref url="/pages/8FVbLPxoRQGoRsvunNSh" %}
[Payout Periods Overview](/nats-admin/payments/payout-periods-overview)
{% endcontent-ref %}
{% content-ref url="/pages/0lKTwMrhNp98rOrJxWzb" %}
[Payment Search](/nats-admin/payments/payment-search)
{% endcontent-ref %}
{% content-ref url="/pages/2r9qaBFyDoA0Dbys0MAb" %}
[Pay Via Methods](/nats-admin/payments/pay-via-methods)
{% endcontent-ref %}
## Further Reading
* [Payment Dump Entry Numbers](/nats-admin/payments/further-reading/payment-dump-entry-numbers)
* [Payment Dump Variables](/nats-admin/payments/further-reading/payment-dump-variables)
* [Check Functions](/nats-admin/payments/further-reading/check-functions)
# Programs
Programs in NATS determine how Affiliates get paid, as well as how much they get paid. The Site Owner may offer several different Programs that may be based on member joins, rebills, unique hits, raw hits, etc.
## Common Questions
{% content-ref url="/pages/JGLrK1n0v7agZifownlr" %}
[How to Add a Payout Change](/nats-admin/programs/common-questions/how-to-add-a-payout-change)
{% endcontent-ref %}
{% content-ref url="/pages/oEMGGe9PObQRzShumkiq" %}
[How to Add and Remove Programs](/nats-admin/programs/common-questions/how-to-add-and-remove-programs)
{% endcontent-ref %}
{% content-ref url="/pages/IiQzZ6Qg48AR09qpUBOC" %}
[How to Add Programs to your Site](/nats-admin/programs/common-questions/how-to-add-programs-to-your-site)
{% endcontent-ref %}
{% content-ref url="/pages/nM7xSrVcTuZxpnnqVfDB" %}
[How to Enable Affiliates to Programs](/nats-admin/programs/common-questions/how-to-enable-affiliates-to-programs)
{% endcontent-ref %}
## NATS Admin
{% content-ref url="/pages/UTahQsTeADBhDt35lYWB" %}
[Programs Management](/nats-admin/programs/programs-management)
{% endcontent-ref %}
{% content-ref url="/pages/xafH7pta3N3vIcKJOrrg" %}
[Program Overview](/nats-admin/programs/program-overview)
{% endcontent-ref %}
## Further Reading
* [Payout Changes](/nats-admin/programs/further-reading/payout-changes)
* [Special Pricing Options](/nats-admin/programs/further-reading/special-pricing-options)
# Replacement Variables
# Reports
The NATS Reporting Admin offers quick access to all the statistics within your program. There are multiple report types available that can be Customized and Saved to best suit your needs.
## Common Questions
{% content-ref url="/pages/DQ62WdnaTzbAJLFouGgV" %}
[How to create your own Reporting Group](/nats-admin/reporting/common-questions/how-to-create-your-own-reporting-group)
{% endcontent-ref %}
{% content-ref url="/pages/UzSxCqKTIECpCZxBBjmI" %}
[Adding, Editing and Duplicating a New Focus](/nats-admin/reporting/common-questions/adding-editing-and-duplicating-a-new-focus)
{% endcontent-ref %}
{% content-ref url="/pages/x71txqDuv5sPaDNkjpOp" %}
[How to Customize an Admin Report](/nats-admin/reporting/common-questions/how-to-customize-an-admin-report)
{% endcontent-ref %}
## NATS Admin
{% content-ref url="/pages/MUCJPcsM9RY3aDXFJO94" %}
[Reporting Features](/nats-admin/reporting/reporting-features)
{% endcontent-ref %}
{% content-ref url="/pages/jR2nitAqQTgaBcACQNIX" %}
[Report Types](/nats-admin/reporting/report-types)
{% endcontent-ref %}
# SEO
# Sets
Sets are the primary way your visitors and members engage with your Content by viewing, commenting, liking and rating them. Sets provide a way for you to organize and manage your content. Sets can contain Metadata, descriptions, preview trailers and more.
## Useful Articles
{% content-ref url="/pages/s11YttpQxBvqp3PhHFir" %}
[Sets](/content-management/sets)
{% endcontent-ref %}
{% content-ref url="/pages/8JHrht7sWFVmYzPwItfL" %}
[Managing Sets](/content-management/sets/managing-sets)
{% endcontent-ref %}
{% content-ref url="/pages/wCiObmdCRQgjKLki9Owg" %}
[Creating Sets](/content-management/sets/managing-sets/creating-sets)
{% endcontent-ref %}
{% content-ref url="/pages/vomwERcAC9Jx8etBXSPN" %}
[Set Details & Settings](/content-management/sets/set-details-and-settings)
{% endcontent-ref %}
{% content-ref url="/pages/4HUjyQKivoNCpOoCPOtH" %}
[Set Sales](/content-management/sets/set-sales)
{% endcontent-ref %}
{% content-ref url="/pages/pmJ7Mz6e0n7Yx3bKfrT9" %}
[Creating Sets from the Server](/content-management/sets/managing-sets/creating-sets-from-the-server)
{% endcontent-ref %}
{% content-ref url="/pages/q6qTSu9qX7hWcA6CJZ8w" %}
[Publishing Sets](/content-management/sets/managing-sets/publishing-sets)
{% endcontent-ref %}
{% content-ref url="/pages/mXgnA32U6EMM3mL0NtYk" %}
[Using Metadata with Sets](/content-management/metadata/using-metadata-with-sets)
{% endcontent-ref %}
{% content-ref url="/pages/3Y4ma8zbKykPjob4xyY4" %}
[Documents for Sets and Metadata](/using-nats/one-off-articles/documents-for-sets-and-metadata)
{% endcontent-ref %}
{% content-ref url="/pages/twbaE2hW9n9rWvAYu2Ny" %}
[Managing Sets with both Videos and Photos](/content-management/sets/managing-sets/managing-sets-with-both-videos-and-photos)
{% endcontent-ref %}
## Blocks
{% content-ref url="/pages/urnU6zhpVkCNfXHocNBW" %}
[Set List Block](/content-management/member-areas-and-tours/themes/block-types/set-list-block)
{% endcontent-ref %}
{% content-ref url="/pages/Fns3udit6BYx3GkOiHU4" %}
[Set View Block](/content-management/member-areas-and-tours/themes/block-types/set-view-block)
{% endcontent-ref %}
# Setup
Setup encompasses all things getting NATS up and running.
## NATS Setup
{% content-ref url="/pages/D5VS3A5s97jgVWqxR4cm" %}
[MySQL Auth](/setup/setup/server-setup/mysql-auth)
{% endcontent-ref %}
{% content-ref url="/pages/BDMoEXM2aH7XwIlWpt3S" %}
[Create Member Auth View](/setup/setup/server-setup/create-member-auth-view)
{% endcontent-ref %}
{% content-ref url="/pages/tbbBS9qjnPplqbKVR6JP" %}
[Setting Up Mod Security](/setup/setup/server-setup/setting-up-mod-security)
{% endcontent-ref %}
{% content-ref url="/pages/uDa5qyZhUJlSt2uPLphh" %}
[mod\_auth\_dbd](/setup/setup/server-setup/mod_auth_dbd)
{% endcontent-ref %}
{% content-ref url="/pages/iFDrTZlOZv2A1bSEQevu" %}
[Mod Security](/setup/setup/server-setup/mod-security)
{% endcontent-ref %}
{% content-ref url="/pages/w0d17HDxuGHHsZJLXZb1" %}
[GeoIP](/setup/setup/server-setup/geoip)
{% endcontent-ref %}
{% content-ref url="/pages/bUsDQiiz01LPLfosNslj" %}
[GeoIP2](/setup/setup/server-setup/geoip2)
{% endcontent-ref %}
{% content-ref url="/pages/UBJS1kvnJHeTCAzdg71B" %}
[Files and Directories](/setup/setup/nats-setup/files-and-directories)
{% endcontent-ref %}
{% content-ref url="/pages/CxhVZaDGGhxs39cHMWgs" %}
[Cookie Settings](/setup/setup/nats-setup/cookie-settings)
{% endcontent-ref %}
{% content-ref url="/pages/6BPpXeD3n5HScjc8KFfh" %}
[Moving NATS](/setup/setup/nats-setup/moving-nats)
{% endcontent-ref %}
{% content-ref url="/pages/i7T8XbqSTFtMmGdFSien" %}
[NATS Setup](/setup/setup/nats-setup)
{% endcontent-ref %}
{% content-ref url="/pages/RLXOdwarTiQgUsukP3PS" %}
[Apache Configuration](/setup/setup/nats-setup/apache-configuration)
{% endcontent-ref %}
{% content-ref url="/pages/IUHBvD0GL0BTZMuEbjfb" %}
[Configuration](/nats-admin/configuration)
{% endcontent-ref %}
{% content-ref url="/pages/GHyiHOP65KLUI0GVcYft" %}
[OpenID Connect](/nats-admin/members/further-reading/openid-connect)
{% endcontent-ref %}
{% content-ref url="/pages/jyqIuZJ8KgTKhTnkJMqp" %}
[Multiple Server Setup](/setup/setup/nats-setup/multiple-server-setup)
{% endcontent-ref %}
{% content-ref url="/pages/2cRnn9yt1yt8AEMV3PW2" %}
[mod\_auth\_openidc](/nats-admin/members/further-reading/mod_auth_openidc)
{% endcontent-ref %}
{% content-ref url="/pages/nFfW3i3AK9OmOcHv1QXK" %}
[Using Memcached For Caching](/setup/setup/nats-setup/using-memcached-for-caching)
{% endcontent-ref %}
{% content-ref url="/pages/tbbBS9qjnPplqbKVR6JP" %}
[Setting Up Mod Security](/setup/setup/server-setup/setting-up-mod-security)
{% endcontent-ref %}
{% content-ref url="/pages/6BPpXeD3n5HScjc8KFfh" %}
[Moving NATS](/setup/setup/nats-setup/moving-nats)
{% endcontent-ref %}
{% content-ref url="/pages/VX2aIowz69cEoYuNI8mt" %}
[MySQL Settings](/setup/setup/nats-setup/mysql-settings)
{% endcontent-ref %}
# Sites
A NATS site is a website promoted by a NATS affiliate program. Most site administration happens in Site Admin.
## Common Questions
{% content-ref url="/pages/iaOQ50PbIFJUx0UzLbzp" %}
[How to Add a New Tour](/nats-admin/sites/common-questions/how-to-add-a-new-tour)
{% endcontent-ref %}
{% content-ref url="/pages/Re5VgnlvWvWStron3wGY" %}
[Customizing your Join Form](/nats-admin/sites/common-questions/customizing-your-join-form)
{% endcontent-ref %}
{% content-ref url="/pages/LUTms9dYTeYoM4SKqdfj" %}
[How to Create a new Join Option](/nats-admin/sites/common-questions/how-to-create-a-new-join-option)
{% endcontent-ref %}
{% content-ref url="/pages/6zF6BnRmXqk094hmH6aU" %}
[Creating a New Site in NATS](/nats-admin/sites/common-questions/creating-a-new-site-in-nats)
{% endcontent-ref %}
{% content-ref url="/pages/KaDjooq2GaBJpgURymAA" %}
[Adding a new Coupon](/nats-admin/sites/common-questions/adding-a-new-coupon)
{% endcontent-ref %}
{% content-ref url="/pages/yUBBYeOWvCpcBWBwhY5G" %}
[Creating and Displaying Cascades](/nats-admin/sites/common-questions/creating-and-displaying-cascades)
{% endcontent-ref %}
## NATS Admin
{% content-ref url="/pages/DZtHCi7P0SHASsP8yWUf" %}
[Site Management](/nats-admin/sites/site-management)
{% endcontent-ref %}
{% content-ref url="/pages/89N4e3sp5nM9QQCPpvMm" %}
[Site Groups](/nats-admin/sites/site-groups)
{% endcontent-ref %}
{% content-ref url="/pages/pa121o4qWcvXOUwrOAy9" %}
[Site Coupons](/nats-admin/sites/site-coupons)
{% endcontent-ref %}
{% content-ref url="/pages/ikeVI3xyk9slnFufaUxI" %}
[Site Overview](/nats-admin/sites/site-management/site-overview)
{% endcontent-ref %}
{% content-ref url="/pages/vO3aBurNycsaafTNkDMo" %}
[Tour Overview](/nats-admin/sites/site-management/tour-overview)
{% endcontent-ref %}
{% content-ref url="/pages/4TdJgQdke0HYfdLZk4V0" %}
[Join Option Overview](/nats-admin/sites/site-management/join-option-overview)
{% endcontent-ref %}
{% content-ref url="/pages/P6Rq90iqCmCZhtmnUiDD" %}
[Site Templates](/nats-admin/sites/site-templates)
{% endcontent-ref %}
## Further Reading
* [Geo-Target Join Options](/nats-admin/sites/further-reading/geo-target-join-options)
* [Type-In Traffic](/nats-admin/sites/further-reading/type-in-traffic)
* [Language Skins](/nats-admin/sites/further-reading/language-skins)
* [Allowed Languages](/nats-admin/sites/further-reading/allowed-languages)
* [Split A/B Testing](/nats-admin/sites/further-reading/split-a-b-testing)
* [Form Validation](/nats-admin/sites/further-reading/form-validation)
* [Username Checking](/nats-admin/sites/further-reading/username-checking)
* [Approval/Upgrade/Denial Variables](/nats-admin/sites/further-reading/approval-upgrade-denial-variables)
* [Approval/Upgrade/Denial Template Variables](/nats-admin/sites/further-reading/approval-upgrade-denial-template-variables)
* [Postbacks and Post URLs](/nats-admin/sites/further-reading/postbacks-and-post-urls)
* [Site User Management](/nats-admin/sites/further-reading/site-user-management)
* [Mobile Tours](/nats-admin/sites/further-reading/mobile-tours)
* [Token Sites](/nats-admin/sites/further-reading/token-sites)
* [No Cost Registration](/nats-admin/sites/further-reading/no-cost-registration)
* [Member Usernames & Passwords](/nats-admin/sites/further-reading/member-usernames-and-passwords)
# Smarty
Smarty is a templating engine used by several Too Much Media products which allows for additional customization options for Program Owners.
## Feature Pages
{% content-ref url="/pages/DyexLUz12Y1F7WXcccHc" %}
[Smarty](/using-nats/one-off-articles/smarty)
{% endcontent-ref %}
{% content-ref url="/pages/KSR0XeaIDlax83Vd8p4t" %}
[Smarty Plugins](/using-nats/one-off-articles/smarty/smarty-plugins)
{% endcontent-ref %}
{% content-ref url="/pages/eeFeouDWY5NpdPGvV96e" %}
[Available Smarty Functions](/using-nats/one-off-articles/smarty/available-smarty-functions)
{% endcontent-ref %}
## Further Reading
* [Mailer Template Variables](/nats-admin/sites/site-templates/mailer-template-variables)
* [Skins](/nats-admin/skins-and-templates/further-reading/skins)
# Templates
## Common Questions
{% content-ref url="/pages/Re5VgnlvWvWStron3wGY" %}
[Customizing your Join Form](/nats-admin/sites/common-questions/customizing-your-join-form)
{% endcontent-ref %}
## NATS Admin
{% content-ref url="/pages/19KJpY34OjHSgMfImyLn" %}
[Skins & Templates](/nats-admin/skins-and-templates)
{% endcontent-ref %}
{% content-ref url="/pages/P6Rq90iqCmCZhtmnUiDD" %}
[Site Templates](/nats-admin/sites/site-templates)
{% endcontent-ref %}
## Further Reading
* [Throttling](/using-nats/one-off-articles/throttling)
* [Available Skins](/nats-admin/skins-and-templates/available-skins)
* [Global DPS](/getting-started/integrations/supported-billers/global-dps)
* [Member Usernames & Passwords](/nats-admin/sites/further-reading/member-usernames-and-passwords)
* [Form Validation](/nats-admin/sites/further-reading/form-validation)
# Themes
A Member Area and Tour can have a **Theme** which contains settings to globally set the look and feel of your site like colors, spacing, and using reusable page templates. You can maintain multiple Themes and swap between them.
## Useful Article
{% content-ref url="/pages/2WBaOGctsVmCNSqY6yfm" %}
[Themes](/content-management/member-areas-and-tours/themes)
{% endcontent-ref %}
{% content-ref url="/pages/GnJOwUcaAslymas8XykU" %}
[Pages](/content-management/member-areas-and-tours/themes/pages)
{% endcontent-ref %}
{% content-ref url="/pages/9scACyJUPoe7mgZuInvL" %}
[Menus & Navigation](/content-management/member-areas-and-tours/themes/menus-and-navigation)
{% endcontent-ref %}
{% content-ref url="/pages/vLjui31B0zD3wR6LMs6z" %}
[Customizing Your Theme](/content-management/member-areas-and-tours/customizing-your-theme)
{% endcontent-ref %}
{% content-ref url="/pages/YjZPuHgL3FtzzVfW5COL" %}
[Changing your Primary Theme](/content-management/member-areas-and-tours/customizing-your-theme/changing-your-primary-theme)
{% endcontent-ref %}
# Third Party Partner
## Common Questions
{% content-ref url="/pages/M2WZRfLIsgaN8qpgIxtf" %}
[Adding a Third Party Partner](/nats-admin/third-party/common-question/adding-a-third-party-partner)
{% endcontent-ref %}
## NATS Admin
{% content-ref url="/pages/rwI4N7kDaQBJ7v2fFoZN" %}
[Third Party Management](/nats-admin/third-party/third-party-management)
{% endcontent-ref %}
{% content-ref url="/pages/rpaCr87n7757rAAsTKFi" %}
[Third Party Overview](/nats-admin/third-party/third-party-overview)
{% endcontent-ref %}
## Further Reading
* [List of Supported Third Party Partners](/nats-admin/third-party/list-of-supported-third-party-partners)
# Tours
NATS allows you to use multiple tours and tour URLs in order to promote your site since NATS tracks affiliate stats through tours as opposed to whole sites., This allows you the flexibility to track individual Tour’s performances while giving it a different look for surfers.
## Common Questions
{% content-ref url="/pages/yUBBYeOWvCpcBWBwhY5G" %}
[Creating and Displaying Cascades](/nats-admin/sites/common-questions/creating-and-displaying-cascades)
{% endcontent-ref %}
## NATS Admin
{% content-ref url="/pages/vO3aBurNycsaafTNkDMo" %}
[Tour Overview](/nats-admin/sites/site-management/tour-overview)
{% endcontent-ref %}
{% content-ref url="/pages/WvaRy1047CG0zF9Xt2Gh" %}
[Site Tours](/nats-admin/sites/site-management/site-overview/site-tours)
{% endcontent-ref %}
## Further Reading
* [Geo-Target Join Options](/nats-admin/sites/further-reading/geo-target-join-options)
* [Mailing Members after a Cancellation](/nats-admin/sites/further-reading/mailing-members-after-a-cancellation)
* [Mailing Members after a Join](/nats-admin/sites/further-reading/mailing-members-after-a-join)
* [Limited-Time Offers](/nats-admin/sites/further-reading/limited-time-offers)
* [Type-In Traffic](/nats-admin/sites/further-reading/type-in-traffic)
* [Language Skins](/nats-admin/sites/further-reading/language-skins)
* [Allowed Languages](/nats-admin/sites/further-reading/allowed-languages)
* [Split A/B Testing](/nats-admin/sites/further-reading/split-a-b-testing)
* [Form Validation](/nats-admin/sites/further-reading/form-validation)
* [Username Checking](/nats-admin/sites/further-reading/username-checking)
* [Approval/Upgrade/Denial Variables](/nats-admin/sites/further-reading/approval-upgrade-denial-variables)
* [Approval/Upgrade/Denial Template Variables](/nats-admin/sites/further-reading/approval-upgrade-denial-template-variables)
* [Postbacks and Post URLs](/nats-admin/sites/further-reading/postbacks-and-post-urls)
* [Site User Management](/nats-admin/sites/further-reading/site-user-management)
* [Mobile Tours](/nats-admin/sites/further-reading/mobile-tours)
* [Token Sites](/nats-admin/sites/further-reading/token-sites)
* [No Cost Registration](/nats-admin/sites/further-reading/no-cost-registration)
* [Member Usernames & Passwords](/nats-admin/sites/further-reading/member-usernames-and-passwords)
# Tracking
## NATS Admin
{% content-ref url="/pages/y5oyYFW1vJeEm1czMPBu" %}
[Generate Linkcode](/nats-admin/tools/generate-linkcode)
{% endcontent-ref %}
{% content-ref url="/pages/3XhkVQQAzC25zmkoF7qm" %}
[Decode Linkcode](/nats-admin/tools/decode-linkcode)
{% endcontent-ref %}
{% content-ref url="/pages/n1PxlLHDyEiAE4fchAVc" %}
[Generate Gallery Links](/nats-admin/tools/generate-gallery-links)
{% endcontent-ref %}
{% content-ref url="/pages/g5m35vRdooVcxqwLLwvE" %}
[Generate Strack Links](/nats-admin/tools/generate-strack-links)
{% endcontent-ref %}
## Additional Resources
{% content-ref url="/pages/IUHBvD0GL0BTZMuEbjfb" %}
[Configuration](/nats-admin/configuration)
{% endcontent-ref %}
{% content-ref url="/pages/J3U83c6F7CLhfeBGKMSw" %}
[Tracking](/using-nats/nats-admin-features/linkcodes/tracking)
{% endcontent-ref %}
{% content-ref url="/pages/G1WrUCIBFm6cPLaZWiqQ" %}
[Clearing Tracking Sessions](/using-nats/nats-admin-features/linkcodes/clearing-tracking-sessions)
{% endcontent-ref %}
{% content-ref url="/pages/uQooIYFSesigosWG0NLv" %}
[Linkcodes](/using-nats/nats-admin-features/linkcodes)
{% endcontent-ref %}
{% content-ref url="/pages/hN86ugXxHgsecxtroEqI" %}
[Permanent vs Temporary Track Redirect Links](/using-nats/nats-admin-features/linkcodes/permanent-vs-temporary-track-redirect-links)
{% endcontent-ref %}
# Transcoding
# Up Sales
Up Sales, sometimes called upsells, are additional sales that can be offered to members after they have completed their initial membership transaction. Up sales allow you as the program owner to make a sale to multiple sites all at the same time, driving revenue to each of your pay sites at once.
## Common Questions
{% content-ref url="/pages/LYsANKKMIySngUedZuK2" %}
[How to Add and Delete a Cross or Up Sale](/nats-admin/cross-up-sales/common-questions/how-to-add-and-delete-a-cross-or-up-sale)
{% endcontent-ref %}
## NATS Admin
{% content-ref url="/pages/ymskW2PRSIAq2PFc5LBS" %}
[Cross/Up Sale Overview](/nats-admin/cross-up-sales/cross-up-sale-overview)
{% endcontent-ref %}
{% content-ref url="/pages/edg8f46PJbt7BUx5TdwN" %}
[Up Sales](/nats-admin/cross-up-sales/up-sales)
{% endcontent-ref %}
## Further Reading
* [Up Sale Supported Billers](/nats-admin/cross-up-sales/further-reading/up-sale-supported-billers)
# Worker
The Worker is the job processor that handles resource-intensive tasks likes video transcoding, image resizing, and more.
## Useful Articles
{% content-ref url="/pages/0htlPGe8O0DP1GqvzTbv" %}
[Processing](/content-management/processing)
{% endcontent-ref %}
{% content-ref url="/pages/dPNPRiO0BSqbJsbE22ZC" %}
[Setting up a Worker using MojoHost CDN](/content-management/processing/setting-up-a-worker-using-mojohost-cdn)
{% endcontent-ref %}
# Integrations
# Age Verification
*Article Topics:* [*Age Verification*](/getting-started/common-topics/age-verification)
## What is Age Verification?
NATS is integrated with various **Age Verification** systems to help you comply with any regulations mandating the use of Age Verification. Using some of the age verification systems integrated with NATS, you can ensure anyone under the appropriate age is unable to sign up for a membership to your site, adhering to any laws you might be privy to.
## When does the Age Verification process happen?
When the Age Verification process happens is determined by the service you choose for verification.
If using setting up Age Verification for members for example, the age verification process happens before a member has made a purchase to a subscription.
If setting up Age Verification for affiliates, they will be prompted for Age Verification when they log in for the first time.
## How do I setup Age Verification?
The following is a list of Age Verification Systems that are configurable through NATS, clicking the link will take you to an article to configure that Age Verification System.
## Age Verification Settings
General Age Verification settings can be found in the Surfer section of the Configuration Admin.
You can view a list of these settings and what they do on the [Age Verification Surfer](/nats-admin/configuration/configuration-overview/surfer#age-verification) section.
## How do I verify a Member has been Age Verified?
Once a Member has gone through the Age Verification process, their information in the [Member Admin](/nats-admin/members) will be updated to reflect their status.
Here, you'll see the The time of their last update, the status, and the company that has done the age verification.
## Turning on Affiliate Age Verification
You can require affiliates to go through the Age Verification process just as you would with members. By setting the **Affiliate Age Verification** config setting found in the [Affiliate section ](/nats-admin/configuration/configuration-overview/affiliates)of the Configuration Admin, you can ensure that all of the affiliates you do business with are of legal age, protecting you.
They will be prompted to verify their age upon their first time logging in.
## Related Articles
{% content-ref url="/pages/IUHBvD0GL0BTZMuEbjfb" %}
[Configuration](/nats-admin/configuration)
{% endcontent-ref %}
# BlueCheck
*Article Topics:* [*Age Verification*](/getting-started/common-topics/age-verification)
BlueCheck provides age verification by using a 3-tier cascading verification system that compares your visitor's details against up to 26 databases in fractions of a second.
The BlueCheck Age Verification will occur after a visitor submits the join form, sending them to verify their age before paying for their membership. Visitors will be sent to the age verification page which can be configured and customized to your liking in [Site Templates](/nats-admin/sites/site-templates).
You can learn more about BlueCheck on their [official website](https://www.bluecheck.me/).
This article will walk you through the integration process.
## Setting up at BlueCheck
To use BlueCheck with NATS, you must first create a BlueCheck API account and create an integration token. This can be done by [using this link](https://customer.bluecheck.me/register).
Once an account has been created, you will need to add a payment method before you can create an API token. To do so, click on Billing and add a payment method. Once this is complete, head over to the [integration](https://customer.bluecheck.me/login) section. Click the Create button in the top right to generate an API token.
{% hint style="info" %}
**Please Note:** Please **save the token** as you will need it in the following steps.
{% endhint %}
## Setting up in NATS
With your newly acquired BlueCheck API token, you can now navigate to the [Configuration Admin](/nats-admin/configuration/configuration-overview) in NATS and select the Surfer tab. Scrolling down to the Age Verification section will present you with various configurable settings.
### Age Verification Setting
To use BlueCheck, you will need to set the Age Verification method to BlueCheck. This is the only required setting in this section.
The remaining settings are optional and dependent on your verification preferences.
* **Age Verification Retry Count** - Sets the number of available retries before being denied.
* **List State Age Verify** - A comma-delimited list of states that will have Age Verification enabled.
* **List Countries Age Verify** - A comma-delimited list of countries that will have Age Verification enabled.
* **Age Verification Days** - Set the number of days before a member has to verify their age again.
* **Test Age Verification IPs** - A comma-delimited list of IPs that will be forced into age verification for testing purposes, disabling age verification for any other IP not listed.
* **Verify Unlocated Users** - If a users country or state can not be determined, treat it as a match to country / state lists
* **Age Verification Us State Only -** If checked, age verification will only be asked from the US states listed in the **List State Age Verify** config setting.
### BlueCheck Age Verification
To continue setting up BlueCheck in NATS, you will need to select the Phone option for the **BlueCheck All Sites Method**, which will perform age verification based on a US phone number on **ALL** of your NATS sites.
{% hint style="info" %}
**Please Note:** This coverage is for U.S.-issued phone numbers only.
{% endhint %}
Continue to the **BlueCheck Token** field and insert the token you received from BlueCheck in the [Setting Up at BlueCheck ](#setting-up-at-bluecheck)part of this page.
To add another layer of authentication, you can set the **BlueCheck Phone Verify** setting to "Yes." This will send an SMS code to the phone number that was entered to verify the user.
The remaining settings are optional and dependent on your verification preferences.
* **BlueCheck Pass On Match Not Found** - Determines whether you want the age verification process circumvented in the case where a phone number isn't found verifiable in the BlueCheck database.
* **BlueCheck Pass On Bad Response** - Determines whether you want the age verification process circumvented in the case BlueCheck returns a bad response.
# Yoti
*Article Topics:* [*Age Verification*](/getting-started/common-topics/age-verification)
Yoti is a global digital identity platform with products that can be integrated within NATS to verify a user's age. The Age Verification process will occur after a visitor submits the join page, sending them to the Yoti site for verification before sending them back to NATS for payment.
You can learn more about Yoti on their [official website](https://www.yoti.com/).
This article will walk you through the integration process.
## Setting up at Yoti
To use Yoti with NATS, you must first create an account to receive both a Yoti API Key and a Yoti Client SDK ID. This can be done by [using this link](https://hub.yoti.com/iam/create).
{% hint style="info" %}
**Please Note:** Please **save the token** and the **client sdk id** as you will need it in the following steps.
{% endhint %}
## Setting up in NATS
### Using HTTPS
Before beginning the setup for Yoti in NATS, ensure your tour has **HTTPS Use** enabled, as Yoti requires the return URL to be HTTPS. You can do this by navigating to the [Sites Admin](/nats-admin/sites), selecting the appropriate tour then changing the **HTTPS Use** field underneath the URL Settings section.
Once you've acquired your Yoti API key and Client SDK ID, you can now navigate to the [Configuration Admin](/nats-admin/configuration/configuration-overview) in NATS and select the Surfer tab. Scrolling down to the Age Verification section will present various configurable settings.
### MaxMind GeoIP2
{% hint style="info" %}
**Please Note:** To use Yoti, you must have MaxMind [GeoIP2](/setup/setup/server-setup/geoip2) Setup.
{% endhint %}
The [GeoIP2](/setup/setup/server-setup/geoip2) article explains how to add MaxMind country DB. To incorporate all Yoti functionality, you will also have to add the MaxMind city DB path.
If you want to limit age verification by state, you will have to enter each state's iso code into the 'List State Age Verify' field shown below.
[**US State ISO Codes**](https://www.iso.org/obp/ui/#iso:code:3166:US) **-** Enter the 2-character value not including 'US-'
[**UK Region ISO Codes**](https://www.iso.org/obp/ui/#iso:code:3166:GB) **-** Enter the 3-character value not including 'GB-'
### Age Verification Settings
Once you've acquired your Yoti API key and Client SDK ID, you can now navigate to the [Configuration Admin](/nats-admin/configuration/configuration-overview) in NATS and select the Surfer tab. Scrolling down to the Age Verification section will present various configurable settings.
### Yoti Age Verification Settings
To use Yoti, you will **need** to set the two following settings:
1. **Yoti API Key**
2. **Yoti Client SDK ID**
The remaining settings are dependent on your verification preferences. Several options are shared amongst many of the following settings.
* **Threshold** - Set the minimum age required to pass the verification process.
* **Level** - Determine the level of anti-spoofing for each age verification method where Passive enables a passive liveness test for age estimation.
* **Retry** - Set the number of times to retry the age verification process.
#### Yoti Types
Set between three types of age checks; Age, Over, and Under.
* Age - Returns the user's age.
* Over - Informs you if a user is over a defined age threshold to protect the user's details.
* Under - Informs you if a user is under a defined age threshold to protect the user's details.
#### Age Estimation
Takes a photo of the user while they look at the camera on their device. An algorithm analyses the image to determine the age based on facial features. This feature also uses Liveness Detection technology to ensure a real person is in front of the camera, not a photo or video recording.
* **Yoti Age Estimation** - Enable Age Estimation.
#### **Digital ID**
Using the mobile Digital ID app, users scan a QR code and share a verified age attribute such as 18+ or 21+. Digital ID requires a one-time onboarding process with an ID document and a selfie, verifying users for life.
* **Yoti Digital ID** - Enable Yoti Digital ID.
#### Identity Verification
Age verification requires a user to scan a photo ID documentation and take a selfie (optional) using the camera on their device. The user's ID can be analyzed to ensure it is genuine and that the photo matches the selfie.
* **Yoti Identity Verification** - Enable Identity Verification.
#### Credit Card
Uses credit card details to verify if a user is over 18. This method verifies customers by checking if they own a registered credit card, which in most countries can only be issued to people old enough to sign a credit agreement. Users will be asked to enter their card PAN number, expiry date, postcode, and CV2 number.
* **Yoti Credit Card** - Enable Yoti Credit Card Verification.
#### Mobile
Uses a mobile phone number that can be checked against contracts issued by mobile carriers or other data sources connected to the mobile number which can help ascertain a user's older 18 status.
* **Yoti Mobile** - Enable Mobile Age Verification.
#### LA Wallet
Uses the LA Wallet app to verify a user's age.
* **Yoti La Wallet** - Enable LA Wallet Verification.
# Supported Third Parties
*Article Topics:* [*Third Party Partner*](/getting-started/common-topics/third-party-partner)
NATS is integrated with various third party content providers for your convenience. Third Parties allow you to earn revenue by promoting content for other sites through NATS.
The following is a list of Third Party Content Providers that are configured through NATS:
* Adult Friend Finder
* Adult Friend Finder (API)
* Cams.com
* DatingGold
* Effex Media
* GameLink
* MallCom
* [Mr. Skin](/getting-started/integrations/supported-third-parties/mr.-skin)
* My Dirty Hobby
* SexGoesMobile (SGM)
* StreaMate
* Video Secrets
* WebCamClub
* WebCams
* XOnDemand
If you would like to use one of the above listed third party content providers but do not see it in your Third Party Admin, you may need to upgrade your NATS installation. If this is the case, please submit a support ticket, and one of our technicians will assist you as soon as possible.
## Related Articles
{% content-ref url="/pages/rwI4N7kDaQBJ7v2fFoZN" %}
[Third Party Management](/nats-admin/third-party/third-party-management)
{% endcontent-ref %}
# Mr. Skin
*Article Topics:* [*Third-Party Partners*](/getting-started/common-topics/third-party-partner)
As a Third Party Partner in NATS, Mr. Skin bills members and provides them with content on your behalf.
## Setting up at Mr. Skin
Before you begin configuring Mr. Skin as a Third Party in NATS, you must first register an account with them. This can be done on their website at .
## Setting Up Mr. Skin in NATS
To begin setting up Mr. Skin in NATS, go to the [Billers Admin](/nats-admin/billers) and click "Add a Biller." Select Mr. Skin from the drop-down menu and select Add.
In the Biller details for Mr. Skin enter your Mr. Skin affiliate username that is obtained from Mr. Skin in the "Affiliate Account Username" section.
Next, navigate to the [Sites Admin](/nats-admin/sites), select or [create ](/nats-admin/sites/common-questions/creating-a-new-site-in-nats)a new Site and navigate to the Tours Tab. Select or create a new Tour and navigate to the Billers Tab where you can select the Mr. Skin biller and fill in your Product ID, which can be obtained directly from Mr. Skin.
An Optional [NATS Code](/using-nats/nats-admin-features/linkcodes/nats-code) can also be filled in during this stage. The NATS Code is the part of a NATS tracking URL that is used to credit an Affiliate and record statistics. The NATS Code can be created by navigating to [Generate Linkcode](/nats-admin/tools/generate-linkcode) in the [Tools Admin](/nats-admin/tools).
## Exploring Two Cases
Due to the unique nature of Mr. Skin, there are multiple ways to integrate Mr. Skin into NATS.
### First Case:
The first case assumes you have a separate member area for the original membership site and the membership site that is taking sales from Mr. Skin.
In this case, you do not need to account for duplicate username clashes.
### Second Case:
The second case assumes that you are using the same member's area for both the original membership site and the membership site taking sales from Mr. Skin. In this case, you will need to account for duplicate username clashes.
# Supported Billers
*Article Topics:* [*Billers*](/getting-started/common-topics/billers)
NATS is integrated with plenty of Billers for your convenience. The following is a list of billers that are configured through NATS:
## Integrated Billers
* [2000Charge](/getting-started/integrations/supported-billers/2000charge)
* [2kcharge](/getting-started/integrations/supported-billers/2kcharge)
* [Aconti Payment Service](/getting-started/integrations/supported-billers/aconti-payment-service)
* [Allopass](/getting-started/integrations/supported-billers/allopass)
* [Billing Revolution](/getting-started/integrations/supported-billers/biller-revolution)
* [BitPay](/getting-started/integrations/supported-billers/bit-pay)
* [Boa Compra](/getting-started/integrations/supported-billers/boacompra)
* [CCBill](/getting-started/integrations/supported-billers/ccbill)
* [CCBILL FlexForms](/getting-started/integrations/supported-billers/ccbill-flexform)
* [CCBill Web900](/getting-started/integrations/supported-billers/ccbill-web900)
* [Centili](/getting-started/integrations/supported-billers/centili)
* [Centrobill](/getting-started/integrations/supported-billers/centrobill)
* [ClearCard](/getting-started/integrations/supported-billers/clearcard)
* [Click And Buy](/getting-started/integrations/supported-billers/click-and-buy)
* [CoinGate](/getting-started/integrations/supported-billers/coingate)
* [CoinPayments](/getting-started/integrations/supported-billers/coinpayments)
* [Commerce Gate](/getting-started/integrations/supported-billers/commercegate)
* [DIMOCO (secure mobile payment)](/getting-started/integrations/supported-billers/dimoco-mobile-payment)
* [eMPPay](/getting-started/integrations/supported-billers/emppay.com)
* [Epoch Systems](/getting-started/integrations/supported-billers/epoch)
* [Escalion](/getting-started/integrations/supported-billers/escalion)
* [EuroBill](/getting-started/integrations/supported-billers/eurobill)
* [EuroPay (EPGBill.com)](/getting-started/integrations/supported-billers/epgbill.com)
* [FXNative](/getting-started/integrations/supported-billers/fxbilling-native)
* [Gigadat](/getting-started/integrations/supported-billers/gigadat)
* [Global Access](/getting-started/integrations/supported-billers/global-access)
* [Global Charge](/getting-started/integrations/supported-billers/global-charge)
* [GoCoin](/getting-started/integrations/supported-billers/gocoin)
* [GTBill](/getting-started/integrations/supported-billers/gtbill)
* [ICN Ltd.](/getting-started/integrations/supported-billers/icn)
* [Itelebill](/getting-started/integrations/supported-billers/itelebill)
* [Jettis International](/getting-started/integrations/supported-billers/jettis-international)
* [MerlinBill](/getting-started/integrations/supported-billers/merlinbill)
* [NETbilling Native](/getting-started/integrations/supported-billers/netbilling-native)
* [NetCash](/getting-started/integrations/supported-billers/netcash)
* [OrbitalPay](/getting-started/integrations/supported-billers/orbitalpay)
* [PandaBlue](/getting-started/integrations/supported-billers/pandablue)
* [Password by Phone](broken://pages/20gLcdAF8iOYQDTDQfXr)
* [Pay4](/getting-started/integrations/supported-billers/pay4)
* [Pay900](/getting-started/integrations/supported-billers/pay900)
* [Paygarden](/getting-started/integrations/supported-billers/paygarden)
* [Payment Network](/getting-started/integrations/supported-billers/payment-network)
* [Paypal](/getting-started/integrations/supported-billers/paypal)
* [Paysite Cash](/getting-started/integrations/supported-billers/paysite-cash)
* [Payspace](/getting-started/integrations/supported-billers/payspace)
* [Probiller](/getting-started/integrations/supported-billers/probiller)
* [PumaPay](/getting-started/integrations/supported-billers/pumapay)
* [Rocketgate Native](/getting-started/integrations/supported-billers/rocketgate-native)
* [RSBilling Native](/getting-started/integrations/supported-billers/rsbilling-native)
* [SafeCharge Native](/getting-started/integrations/supported-billers/safecharge-native)
* [Secure Billing Worldwide](/getting-started/integrations/supported-billers/secure-billing-worldwide)
* [Secure Trading](/getting-started/integrations/supported-billers/secure-trading)
* [SegPay](/getting-started/integrations/supported-billers/segpay)
* [SOFORTdauerauftrag](/getting-started/integrations/supported-billers/sofortdauerauftrag)
* [Telecom](/getting-started/integrations/supported-billers/telecom)
* [Ukash](/getting-started/integrations/supported-billers/ukash)
* [Vendo Services](/getting-started/integrations/supported-billers/vendo-services)
* [Verotel Pro](/getting-started/integrations/supported-billers/verotel-pro)
* [Voxtel](/getting-started/integrations/supported-billers/voxtel)
* [VXSBill](/getting-started/integrations/supported-billers/vxsbill)
* [WebBilling](/getting-started/integrations/supported-billers/webbilling)
* [WisPay](/getting-started/integrations/supported-billers/wispay)
* [WTS](/getting-started/integrations/supported-billers/wts)
* [WTSeu](/getting-started/integrations/supported-billers/wtseu)
* [Zombaio](/getting-started/integrations/supported-billers/zombaio)
## Integrated Gateway Billers
* [2000Charge Gateway](/getting-started/integrations/supported-billers/2000charge-gateway)
* [A1Payments](/getting-started/integrations/supported-billers/a1payments)
* [Alto Billing](/getting-started/integrations/supported-billers/altobilling)
* [Argus](/getting-started/integrations/supported-billers/argus)
* [Authorize.Net (ARB)](/getting-started/integrations/supported-billers/authorize)
* [Bill1st Gateway](/getting-started/integrations/supported-billers/bill1st-gateway)
* [Billapay](/getting-started/integrations/supported-billers/billapay-gateway)
* [Braintree Payments](/getting-started/integrations/supported-billers/braintree)
* [C2Bill](/getting-started/integrations/supported-billers/c2bill)
* [Card Flex](/getting-started/integrations/supported-billers/cardflex)
* [Connect Billing](/getting-started/integrations/supported-billers/connectbilling)
* [CurePay](/getting-started/integrations/supported-billers/curepay)
* [EGatePay](/getting-started/integrations/supported-billers/egatepay)
* [EMerchantPay](/getting-started/integrations/supported-billers/emerchantpay-gateway)
* [Focal Payments](/getting-started/integrations/supported-billers/focal-payments)
* [FXBilling (formerly know as Paygea)](/getting-started/integrations/supported-billers/fxbilling)
* [Global DPS](/getting-started/integrations/supported-billers/global-dps)
* [Greta 11 Billing](/getting-started/integrations/supported-billers/greta-11)
* [GTBill Gateway](/getting-started/integrations/supported-billers/gtbill-gateway)
* [Jettis International Gateway](/getting-started/integrations/supported-billers/jettis-international-gateway)
* [MobiusPay](/getting-started/integrations/supported-billers/mobiuspay)
* [Net Mobile](/getting-started/integrations/supported-billers/net-mobile)
* [NETbilling](/getting-started/integrations/supported-billers/netbilling)
* [Netpay International](/getting-started/integrations/supported-billers/netpay-international)
* [Payspace Gateway](/getting-started/integrations/supported-billers/payspace-gateway)
* Payze
* [Plug'n Pay](/getting-started/integrations/supported-billers/plugn-pay)
* [Prime Orange](/getting-started/integrations/supported-billers/prime-orange)
* [RocketGate](/getting-started/integrations/supported-billers/rocketgate)
* [RSBilling](/getting-started/integrations/supported-billers/rsbilling)
* [SafeCharge](/getting-started/integrations/supported-billers/safecharge)
* [Secure Billing Worldwide Gateway](/getting-started/integrations/supported-billers/secure-billing-worldwide-gateway)
* [SecurionPay](/getting-started/integrations/supported-billers/securionpay)
* [SegPay Gateway](/getting-started/integrations/supported-billers/segpay-gateway)
* [Sonic Bill](/getting-started/integrations/supported-billers/sonic-bill)
* [Standard Bill](/getting-started/integrations/supported-billers/standardbill)
## Special Billers
These billers are not cascaded and require the surfer to click a special join button. Also, special join options need to be configured in NATS.
* [A1payments](/getting-started/integrations/supported-billers/a1payments)
* [Allopass](/getting-started/integrations/supported-billers/allopass)
* [AltpBilling](/getting-started/integrations/supported-billers/altobilling)
* [Bit-Pay](/getting-started/integrations/supported-billers/bit-pay)
* [C2Bill](/getting-started/integrations/supported-billers/c2bill)
* [CardFlex](/getting-started/integrations/supported-billers/cardflex)
* [CCBill Web900](/getting-started/integrations/supported-billers/ccbill-web900)
* [eGatePay](/getting-started/integrations/supported-billers/egatepay)
* [Greta 11 Billing](/getting-started/integrations/supported-billers/greta-11)
* [Global Access](/getting-started/integrations/supported-billers/global-access)
* [Global Charge](/getting-started/integrations/supported-billers/global-charge)
* [GoCoin](/getting-started/integrations/supported-billers/gocoin)
* [ICN](/getting-started/integrations/supported-billers/icn)
* [Itelebill](/getting-started/integrations/supported-billers/itelebill)
* [MerlinBill](/getting-started/integrations/supported-billers/merlinbill)
* [Netpay](/getting-started/integrations/supported-billers/netpay-international)
* [Pay900](/getting-started/integrations/supported-billers/pay900)
* [Paygarden](/getting-started/integrations/supported-billers/paygarden)
* [Password By Phone](broken://pages/20gLcdAF8iOYQDTDQfXr)
* [Telecom](/getting-started/integrations/supported-billers/telecom)
* [Voxtel](/getting-started/integrations/supported-billers/voxtel)
* [CoinsPayments](/getting-started/integrations/supported-billers/coinpayments)
* [CoinGate](/getting-started/integrations/supported-billers/coingate)
## Crypto Billers
* [Bit-Pay](/getting-started/integrations/supported-billers/bit-pay)
* [Centrobill](/getting-started/integrations/supported-billers/centrobill)
* [CoinGate](/getting-started/integrations/supported-billers/coingate) (Supported Countries: )
* [CoinPayments](/getting-started/integrations/supported-billers/coinpayments) (2022-07-19: stopped processing for US clients)
* [GoCoin](/getting-started/integrations/supported-billers/gocoin) (2020: stopped processing for adult clients)
* [PumaPay](/getting-started/integrations/supported-billers/pumapay)
## Additional Information
* If you would like to integrate a new payment processor, please see our [IPSP Integration](/using-nats/one-off-articles/ipsp-integration) article.
## Related Articles
{% content-ref url="/pages/lYb75dIlsYYdx1J1bs1H" %}
[Cross Sale Supported Billers](/nats-admin/cross-up-sales/further-reading/cross-sale-supported-billers)
{% endcontent-ref %}
{% content-ref url="/pages/GQQqNoUTSWXwHjg2xK3J" %}
[Up Sale Supported Billers](/nats-admin/cross-up-sales/further-reading/up-sale-supported-billers)
{% endcontent-ref %}
# 2000Charge
*Article Topics:* [*Billers*](/getting-started/common-topics/billers)
### Setting Up at 2000Charge
Before you can begin configuring 2000Charge as a biller in NATS, you must first register a merchant account with them. This can be done through their website at [https://www.2000charge.com/](http://www.2000charge.com/).
While registering with 2000Charge, make sure to take down the Client ID, Site ID, and Pricepoints that they provide to you. This information will be necessary for setting up 2000Charge in NATS. And, you will need to provide 2000Charge with the IP address of the NATS server.
2000Charge will request redirect and postback URL locations from you:
* Use the following URL for the Approval Redirect URL:
```
https://linkdomain/signup/returnurl_twocharge.php?ok=1&memberid=@@XField@@
```
* Use the following URL for the Decline Redirect URL:
```
https://linkdomain/signup/returnurl_twocharge.php?ok=0&memberid=@@XField@@
```
* Use the following URL for the Postback URL:
```
https://linkdomain/signup/process_twocharge.php
```
Replace *linkdomain* above with your site's linkdomain.
{% hint style="info" %}
**Please Note:** 2000charge will also request to know the IP address your NATS server will use for the NATS Poll. For load balanced clusters, you may have to provide multiple or an IP range.
{% endhint %}
## Setting Up 2000Charge in NATS
### Billers Admin
To begin setting up 2000Charge as a biller in NATS, go to the [Billers Admin](/nats-admin/billers). Scroll down to the "Setup New Biller" drop-down menu, select 2000Charge (in the T's), and click "Add."
When prompted, fill in the Client ID that was provided to you by 2000Charge under the "Account Info" section. If you were not provided with this information, please contact your biller to receive it. Save your changes once you have filled out the available fields here.
Please note: When setting up your cascades, if you do not see 17 options in the Processing Types drop down for 2000charge you need to put in a ticket to ask NATS to upgrade your '2000charge Native Integration'. There is no charge, and it is a quick upgrade.
### Sites Admin
To continue setting up your new biller, go to the [Sites Admin](/nats-admin/sites), and create or edit a tour. On the Edit Tour page, scroll down to the "Biller Details" section and locate the 2000Charge subsection, which will be labeled as **TWOCHARGE**. Here, you can enter your ID for the site, which must correspond to the information you have received from 2000Charge.
Next, scroll down to the Join Options for this Tour section and add a new join option, or edit a currently existing one. On the "Add New Join Option" page, you will see several additional payment processing options listed under **TWOCHARGE**. Each of these have a unique Pricepoint that must be provided by 2000Charge. Simply enter the Pricepoint numbers for the payment processing types you wish to use for this join option, and click Save.
Note that the same price point is used for all payment processing types for that membership option. For example, if you get the below price points from 2000charge:
* $10 for 30 no rebill: 10213100
* 90 days for $30: 10213102
You will set:
$10 for 30 no rebill
* TWOCHARGE (id:3) SEPA Pricepoint:(optional) 10213100
* TWOCHARGE (id:3) GiroPay Pricepoint:(optional) 10213100
* TWOCHARGE (id:3) PaySafe Card Pricepoint:(optional) 10213100
* (etc)
90 days for $30
* TWOCHARGE (id:3) SEPA Pricepoint:(optional) 10213102
* TWOCHARGE (id:3) GiroPay Pricepoint:(optional) 10213102
* TWOCHARGE (id:3) PaySafe Card Pricepoint:(optional) 10213102
**‘Combination’ Payment Option**
Combination is listed among the other payment options. This is a general purpose button that bypasses geotargeting of payment options and shows all payment options on the 2000Charge payment page. You enter the pricepoint in the combination field, and use a generic payment button link such as ‘join now’. When clicked, the user will be shown all available payment options for his region and allow him to choose, taking the decision away from you. While not commonly used, some programs prefer this option.
\
Once you have configured 2000Charge in your tour(s) and join option(s), you can add rules that allow this join option to show on a join page. You can do so by clicking the "Set Display Rules" icon next to a corresponding join option. You must have at least one rule configured for this join option to be functional!
### Localized Join Forms
The following instructions describe localizing your NATS pre-join form to only show available products for that region: [Geo-Target Join Options](/nats-admin/sites/further-reading/geo-target-join-options). By using the Geo-Target Join Options available in NATS, you can create different cascades for each product to use for each country that you process transactions from -- this allows you to limit the join options to only show when available for that region. For example, you can limit the GiroPay cascade to only show for German users. Note: The 2000Charge join page will geo-detect the user's location and present the payment form in the user's language.
{% hint style="info" %}
**Please Note:** Geo-targeting only works if your server has GeoIP enabled. You can create a test script using the sample code on our [GeoIP](/setup/setup/server-setup/geoip) article page. After you upload the script to a web-accessible location, visit it from your browser. It should say what country you are in. If it does not, please contact your host to ensure GeoIP and the apache module have been installed properly.
{% endhint %}
Payment processing types by country;
* Check - US and Canada
* EU Debit - Germany, Austria and Netherlands
* GiroPay - Germany
* Teleingreso - Spain
* Telepay - Mexico
* POLi (AU) - Australia
* POLi (NZ) - New Zealand
* EPS - Austria
* iDEAL - Netherlands
* YellowPay - Switzerland
* Przelewy24 - Poland
* AstroPayCard - Latin America
* DirectPay -
* Andorra, Austria, Belgium, Switzerland, Cyprus, Czech Republic, Germany, Denmark, Estonia, Spain, Finland, France, United Kingdom, Gibraltar, Greece, Croatia, Hungary, Ireland, Iceland, Italy, ithuania, Luxembourg, Latvia, Malta, Netherlands, Norway, Poland, Portugal, Romania, Sweden, Slovenia, Slovak Republic, Tunisia, Turkey, United States
* SEPA -
* Aland Islands - Austria - Azores - Belgium - Bulgaria - Canary Islands - Croatia - Cyprus - Czech Republic - Denmark - Estonia - Finland - France - French Guiana - Germany - Gibraltar - Greece - Guadeloupe - Hungary - Iceland - Ireland - Italy - Latvia - Liechtenstein - Lithuania - Luxembourg - Madeira - Malta - Martinique - Mayotte - Monaco - Netherlands - Norway - Poland - Portugal - Réunion - Romania - Saint Barthélemy - Saint Martin (French part) - Saint Pierre and Miquelon - Slovakia - Slovenia - Spain - Sweden - Switzerland - United Kingdom
* **Some merchants prefer to just exclude main countries such as US, China, Russia**
* PaySafecard - paysafecard operates in 37 countries worldwide, though an exact list is not available.
* **Since its a tangible card, some merchants prefer to just exclude main countries such as China, Russia**
### Alternate Method
While the Geo-Target Join Options instructions let you limit which products show to which regions, you may wish to display different translations of the same product based on region. For example, say you have only one join option of ‘$10 for 30 days’ and on the join page button text for the ‘EuroDebit’ payment option you want Germany to see ‘Lastschrift’, Spain to see ‘Cargo Bancarios’, the Netherlands ‘Automatische Inkasso’ and every one else ‘Direct Debit’.
Go to the Sites Admin, select a site, and add four join options. For each join option, choose 2000Charge, enter the join option settings, enter your Pricepoint for EuroDebit, and geo-target each setting to the area you want that translation to show to and enter the translation on the Join Form Text. You can also translate the ‘$10 for 30 days’ using this method as well.
Below is the translation for the 2000Charge product ‘EuroDebit
* English: Direct Debit or Euro Debit
* German: "Lastschrift"
* Spain: "Cargo Bancario"
* Netherlands: "Automatische Inkasso"
Note: When geo-targeting Europe, the ‘Europe’ setting in NATS only includes the undefined surrounding areas. You still will need to select the main cities or countries.
### Rebill Options
Not all 2000Charge payment options allow rebilling, as some options require the customer to initiate payment. For this reason, you will have to know which payment option to apply to which join options. You should not assign a non-recurring payment option to a recurring join option since the customer will not be able to be rebilled. Commissions and the user's add and remove login all will work fine, you just lose the opportunity to rebill them by letting them use a non-recurring option initially.
You may use this as a reference:
* Recurring: Credit Card, Check, EuroDebit, SEPA
* Non-Recurring: DirectPay, iDEAL, GiroPay, PaySafeCard, Teleingreso, Telepay, POLi (AU), POLi (NZ), EPS, YellowPay, Przelewy24
### 2000Charge Gateway
NATS currently has two implementations for 2000Charge. This page focuses on the Native Integration, however, for merchants who have their own merchant account, SSL and PCI compliance, a Gateway option is available. Using the gateway allows the NATS customer to fully brand the payment forms and remove any 2000Charge hosted forms. The gateway currently only supports credt card, ELV/Eudebit, however additional products can be added. Please contact 2000Charge for more information.
### Where to get help
Once you have finished configuring 2000Charge in NATS and confirmed they have received your Approval and Denial Redirect urls, as well as your Postback URL, you are ready to begin processing payments. If you have questions, you can reach you can reach 2000Charge in the following ways:
1. Open a ticket for merchant support: [https://helpdesk.2000charge.com](http://helpdesk.2000charge.com/)
2. Live chat on the helpdesk link: [https://helpdesk.2000charge.com](http://helpdesk.2000charge.com/)
3. By phone: (626) 768-0877 for technical support
4. By email:
If you have any further questions regarding the setup of 2000Charge in NATS, please [put in a support ticket](http://clients.toomuchmedia.com/).
# 2000Charge Gateway
Gateway Biller
*Article Topics:* [*Billers*](/getting-started/common-topics/billers)*,* [*Cross Sales*](/getting-started/common-topics/cross-sales)*,* [*One Click Systems*](/getting-started/common-topics/one-click-systems)
## Signing up at 2000Charge Gateway
Before you can begin configuring 2000Charge Gateway as a biller in NATS, you must first register a merchant account with them. This can be done through their website at [https://www.2000charge.com/](http://www.2000charge.com/).
## Setting up in Nats
### Billers Admin
Go to the [Billers Admin](/nats-admin/billers), select 2000Charge Gateway. from the drop-down, and click Add. Enter your Client ID that were provided by 2000Charge Gateway.
**Note:** *2000Charge Gateway will need to be added to a cascade before it can be used.*
When setting up 2000Charge Gateway in your cascades, you can choose the processing type to be used in the cascade step by selecting it from the drop-down menu. 2000Charge Gateway currently supports the following processing types:
* Credit Cards
* Euro Debit
### Sites Admin
2000Charge Gateway has no site-specific fields that need to be configured in NATS. However, there are optional settings you can set up for 2000Charge Gateway when configuring your join options.
### Join Option Setup
Next, Edit (or create) the option(s) you want to use with 2000Charge Gateway. You will see the following list of available option fields (all preceded by 2000Charge Gateway id:#):
* Price Point: - Price point for this join option.
* Currency: - the currency that this join option should be billed in.
This option setup may also require rules to be setup. You can do so with the purple arrows next to the option row.
### Cross Sales
Go to the [Cross/Up Sales Admin](/nats-admin/cross-up-sales), click incoming or outgoing cross sales from the navigation tabs (depending on whether you are sending or receiving the cross sale).
For Incoming Cross Sales/ Up Sales, go to the Incoming Cross sales/ Up Sales section. Add 2000Charge Gateway from the biller drop-down. Fill in the the following options for the cross sale:
* Initial Days
* Initial Dollar
* Recurring Days
* Recurring Dollar
* Currency
* Price Point
You will also want to select the site and program that you want to associate with this cross sale once you have entered in the "Data" fields.
\
For Outgoing Cross Sales, go to the Outgoing Cross Sales section. Add 2000Charge Gateway from the biller drop-down. Also in this section you will fill in the following: Title , Description, and Disclaimer for this cross sale. In the Biller Info you will fill out the data for the receiving end (the person you are doing cross sales with will provide this information for you). Fill in Ref Code, Domain and HTTPS Post.
There is also an option to choose 'Recalculate Ref Code'. This will cause NATS to attribute credit for the cross sell to the referring affiliate over the affiliate whose Ref Code was entered in the 'Ref Code' field. *In order for this to take effect, the referring affiliate must be enabled in a cross-sell program, which means that the cross sell must be coming from your own NATS installation.*
### Upgrade Plus
2000Charge Gateway supports Upgrade Plus: a feature that allows trial members to click a link in your member's area to shorten the duration of their trial membership and upgrade to a full member.
For more information, visit our "[Upgrade Plus](/using-nats/one-click-systems/upgrade-plus)" page.
### Expire Padding
You can configure NATS to allow for extra time for rebills to come in for 2000Charge Gateway members.
Further details can be found on our "[Member Expire Pad](/nats-admin/members/further-reading/member-expire-pad)" page.
### Editing Site Templates
2000Charge Gateway requires brand information (Visa/Mastercard/etc). Without retrieving brand information, this biller transaction will fail.
To avoid facing this issue, you need to insert the code on your gateway join page in order to retrieve this information. This can be done through the [Sites Admin](/nats-admin/sites). Simply edit the site templates for the join page you wish to change, and edit the subsequent *gateway\_join* template.
You can use the following code to display the drop-down menu. Please make sure this is found with the form tags (\) within the template.
```
<
```
If you have any further questions regarding the setup of in NATS, please put in a support ticket.
# 2KCHARGE
*Article Topics:* [*Billers*](/getting-started/common-topics/billers)
{% hint style="warning" %}
**Very Important:** 2KCharge is a different biller than [2000Charge](/getting-started/integrations/supported-billers/2000charge).
{% endhint %}
## Setting Up at 2KCharge
Before you can begin configuring 2KCharge as a biller in NATS, you must first register a merchant account with them. This can be done through their website at [https://www.2000charge.com](http://www.2000charge.com/).
While registering with 2KCharge, make sure to take down the Business Case ID and Secret Key for each sites that they provide to you. This information will be necessary for setting up 2KCharge in [NATS](https://tmmwiki.com/index.php/NATS). And, you will need to provide 2KCharge with the IP address of the NATS server.
2KCharge will request redirect and postback URL locations from you:
* Use the following URL for the Postback URL:
```
https://linkdomain/signup/process_2kcharge.php
```
Replace *linkdomain* above with your site's linkdomain.
2KCharge will also request to know the IP address your NATS server will use for the NATS Poll. For load balanced clusters, you may have to provide multiple or an IP range.
## Setting Up 2KCharge in NATS
### Billers Admin
To begin setting up 2KCharge as a biller in NATS, go to the [Billers Admin](/nats-admin/billers). Scroll down to the "Setup New Biller" drop-down menu, select 2KCharge, and click "Add."
When prompted, fill in the Business Case ID that was provided to you by 2KCharge under the "Account Info" section. If you were not provided with this information, please contact your biller to receive it. Save your changes once you have filled out the available fields here.
### Sites Admin
To continue setting up your new biller, go to the [Sites Admin](/nats-admin/sites), and create or edit a tour. On the Edit Tour page, scroll down to the "Biller Details" section and locate the 2KCharge subsection, which will be labeled as 2KCHARGE. Here, you can enter your Secret Key for the site, which must correspond to the information you have received from 2KCharge.
Next, scroll down to the Join Options for this Tour section and add a new join option, or edit a currently existing one. On the "Add New Join Option" page, you will need to enter "Currency" setting.
Once you have configured 2KCharge in your tour(s) and join option(s), you can add rules that allow this join option to show on a join page. You can do so by clicking the "Set Display Rules" icon next to a corresponding join option. You must have at least one rule configured for this join option to be functional!
Payment processing types by country;
#### Where to get help
Once you have finished configuring 2KCharge in NATS and confirmed they have Postback URL setup, you are ready to begin processing payments. If you have questions, you can reach you can reach 2KCharge in the following ways:
1. Open a ticket for merchant support: [https://www.2000charge.com](http://www.2000charge.com/)
2. Live chat on the helpdesk link: [https://www.2000charge.com](http://www.2000charge.com/)
3. By phone: (626) 768-0877 for technical support
4. By email:
If you have any further questions regarding the setup of 2KCharge in NATS, please [put in a support ticket](http://clients.toomuchmedia.com/).
## Additional Information
1. 2KCharge does not support recurring payments with NATS
2. 2KCHARGE does not support [One Click Systems](/using-nats/one-click-systems).
# A1Payments
*Article Topics:* [*Billers*](/getting-started/getting-started-with-billers)*,* [*Cross Sales*](/getting-started/common-topics/cross-sales)*,* [*One Click Systems*](/getting-started/common-topics/one-click-systems)
## Setting Up at A1 Payments
Before you can begin configuring A1Payments Gateway in NATS, you must first sign up for an account with them. To do so, go to their site at: [https://www.a1payments.com](https://www.a1payments.com/).
Record any essential information you receive during the signup process.
## Setting Up A1 Payments in NATS
### Billers Admin
To begin setting up A1 Payments in NATS, go to the [Billers Admin](/nats-admin/billers). Scroll down to the "Setup New Biller" drop-down menu and select "A1 Payments" from your list of choices. Click Add.
{% hint style="warning" %}
**Please Note:** If you don't see A1 Payments Gateway, [put in a support ticket](http://clients.toomuchmedia.com/), as you may need an updated version of NATS.
{% endhint %}
You will then be prompted for your Account ID, Username, Password, Report Username and Report Password. These will have been provided by A1 Payments when signing up for an account. If you were not given this information, please contact A1 Payments. When you are done configuring these options, click Save.
### Sites Admin
Next, go to the [Sites Admin](/nats-admin/sites), create or edit a tour, and scroll down to the "Join Options for this Tour" section. Create a join option that you wish to enable A1 Payments Gateway for, or click the "Edit Option Details for this tour" action icon next to an already existing join option.
On the next page, you will find various fields labeled " A1PAYMENTS" under the Biller Codes column. Fill in the requested Product Codes and Upgrade Codes; these must be obtained from A1 Payments. Once you have filled in the required fields, click Save.
Additionally, you must add rules in order for this join option to be displayed on your join page. You can do so by using the "Rules" action icon, marked with purple arrows. For more information on Rules in NATS, please see our NATS Rules wiki article.
### Cross Sales Admin
A1 Payments also supports cross sales in NATS. If you wish to use A1 Payments to process cross sales, you must first configure them on the A1 Payments website. Please contact A1 Payments for assistance with this.
To configure outgoing cross sales in NATS, go to the [Cross/Up Sales Admin](/nats-admin/cross-up-sales) and click on the "Outgoing Cross Sells" tab. Add A1 Payments from the Biller drop-down menu, and click Add New Option. On the next page, you will be prompted to fill in the Title, Description, and Disclaimer for your cross sell option.
You will then need to fill out the Biller Info for your cross sale, which will be provided by A1 Payments. Fill in your Order ID, Initial Amount, Initial Days, Recurring Amount, Recurring Days, Currency, Ref Code, and Domain. You can also choose if you want to send an HTTPS Post when a cross sale transaction occurs with A1 Payments Gateway, or if you want to recalculate your ref code. When you have finished configuring your option, click Save Changes.
If you wish to configure an incoming cross sale in NATS, go to the [Cross/Up Sales Admin](/nats-admin/cross-up-sales) and click on the "Incoming Cross Sells" tab. Add A1 Payments from the Biller drop-down menu, select the Site and Program you want your incoming cross sale to affect, and click "Add New Option".
You will then be prompted to input a title for your cross sale option, as well as the initial and recurring membership fees and lengths. Once you have filled these fields out, input the OrderID and Currency that you received from A1 Payments, and click Save Changes.
Before you can process cross-sales in NATS, you will need to allow the IP of the system sending the cross sale. You can do this in the [Configuration Admin](/nats-admin/configuration) in the "Billers" section. Scroll down to the Bill1st section, and add your desired IPs to the *XSELL\_A1PAYMENTS\_SECURE\_IPS* configuration option.
### Upgrade Plus
A1 Payments supports Upgrade Plus: a feature that allows trial members to click a link in your member's area to shorten the duration of their trial membership and upgrade to a full member.
For more information, visit our "[Upgrade Plus](/using-nats/one-click-systems/upgrade-plus)" page.
# Aebill
*Article Topics:* [*Biller*](/getting-started/common-topics/billers)*,* [*Cross Sales*](/getting-started/common-topics/cross-sales)
## Setting up at Aebill
Before you begin configuring Aebill, you must first sign up for an account with them. To do so, go to: [https://secure.aebill.com](https://secure.aebill.com/)
You can then log in to your Aebill account at
### Setting up sites with Aebill
Once you have signed up with Aebill, go to the website and click the "Site List" link at the top of the page to begin setting up the sites you wish to use with Aebill and NATS. On the next page, click the "Add New Site" button to add a new site.
On the following site form, you will have to fill out information about your site. This includes:
* Site Name: The name of the site that will be shown across multiple areas in this admin.
* Site URL: The URL of your site.
* Site Memberzone URL: The URL to your Members' area. There will be a link on successful sales to this page via an approval page.
* Transaction Callback URL: Make sure you use the following format -- ** -- where "link\_domain" is the server alias you set to use with NATS for this site. This can also be the domain of your NATS install.
* Decline URL: This URL is used to redirect failed sales in a cascade. For the Decline URL, you must use the following format: **
### Setting up join options with Aebill
To configure your NATS join options with Aebill, click the "Packages List" link at the top of the page. On the next page, click the "Add New Package" button to add a new package.
Select the site that this join option will be linked to from the available drop-down menu and fill out the provided form with your desired details. This form contains:
* Package Name: The name you want to display your Aebill package as
* Package Description: A brief summary of the package
* Price: The initial period and price of this package that will be charged in the selected currency
* Rebill Price: The period and price for a recurring membership (if applicable)
## Setting up Aebill in NATS
### Billers Admin
To begin setting up Aebill in NATS, go to the [Billers Admin](/nats-admin/billers). In the "Setup New Biller" drop-down menu, select "Adult Empire Billing " and click Add.
{% hint style="info" %}
**Please Note:** If you don't see Adult Empire Billing or Aebill, [put in a support ticket](http://clients.toomuchmedia.com/), as you may need an updated version of NATS.
{% endhint %}
Fill in your Owner ID and password that should have been provided when signing up at Aebill. If you were not gived this information, please contact Aebill.
### Sites Admin
Next, go to the [Sites Admin](/nats-admin/sites), create or edit a tour, and scroll down to the "Biller Details" section. Find the "AEBILL" settings and enter your site ID and Password Token (these details must be obtained directly from Aebill).
Once you have done that, scroll down to the "Join Options for this Tour" section. Here, you can create a new NAST [Join Option](/nats-admin/sites/site-management/site-overview/join-options) for your biller. Enter the Package ID and Currency type that you specified on the Aebill "Packages List" and click Add This Join Option.
Additionally, you must add rules in order for this join option to show on your join page. You can do so by using the "Rules" action icon, marked with purple arrows. This can be found next to the Option row.
### Cross Sales
In order to use Cross Sales with Aebill, you will need to have them attach the packages on the biller end. Please contact Aebill for assistance with this.
Once the packages are linked, you (or the person you are cross selling to) should see "Cross sale packages" when you edit a package. This is the information that will be entered on the incoming/outgoing cross sales admin in Nats.
To set up cross sales in NATS, go to the [Cross/Up Sales Admin](/nats-admin/cross-up-sales/cross-sales) and click Incoming or Outgoing cross sales from the navigation tabs at the top of the page (depending on whether you are receiving or sending the cross sale).
If you are sending a cross sale to another site, go to the "Outgoing Cross Sales" page. Add Adult Empire Billing from the "Biller" drop-down menu, and click Add New Option. On the next page, you will be prompted to fill in the Title, Description, and Disclaimer for your Cross Sale option.
You will then need to fill out the Biller Info for your Cross Sale, which should have been provided to you by Aebill. Fill in your Package ID and Ref Code here, and click Save Changes.
If you are receiving the Cross Sale, go to the "Incoming Cross Sales" page. Add Adult Empire Billing from the "Biller" drop-down menu and click Add New Option. When prompted, choose the site and program you want to associate with the cross sale.
Under "Details," fill in the title of your cross sale option, the initial membership fee and length, and the recurring membership fee and length. Finally, fill in your Package ID that you received from Aebill in the "Biller Info" section, and click Save Changes.
# Aconti Payment Service
*Article Topics:* [*Billers*](/getting-started/common-topics/billers)
## Signing up at Aconti
If you are interested in using Aconti as a third-party processor please contact them directly:\
URL: [https://www.aconti.net](http://www.aconti.net/)
You must give Aconti the following information:
* Postback URL:
Replace *linkdomain* in the above example with your linkdomain.
## Setting up in Nats
### Billers Admin
Go to the [Billers Admin](/nats-admin/billers), select Aconti Payment Service from the drop-down, and click Add. Enter your Client ID and Shared secret, which were provided by Aconti.
{% hint style="info" %}
**Please Note:** Aconti will need to be added to a cascade before it can be used. If you don't see Aconti, [put in a support ticket](https://clients.toomuchmedia.com/), as you may need an updated version of NATS.
{% endhint %}
When setting up Aconti in your cascades, you can choose the processing type to be used in the cascade step by selecting it from the drop-down menu. Aconti currently supports the following processing types:
* Credit Cards
### Sites Admin
Go to the [Sites Admin](/nats-admin/sites) and click the "Edit" button next to the default tour of the site you would like to configure. In the "Billers Details" section, you will find the following fields for Aconti:
* Language
Next, Edit (or create) the option(s) you want to use with Aconti. You will see the following list of available option fields (all preceded by Aconti id:#):
* Payment - The support payment type to identify this option (all, credit card or debit).
* Currency (optional) - the currency that this join option should be billed in.
This option setup may also require rules to be set up. You can do so with the purple arrows next to the option row.
### Editing Site Templates
Before you can begin processing NATS transactions for Aconti, you must also get their country information. Without retrieving the country that the surfer is located in, this biller transaction will fail for surfers.
To avoid facing this issue, you can insert code on your join page template in order to retrieve this information. This can be done through the [Sites Admin](/nats-admin/sites). Simply edit the site templates for the join page you wish to change, and edit the subsequent *join* template.
You can use the following code to retrieve country information from your surfers:
{% code overflow="wrap" %}
```
{if $vars.country}{assign var=country value=$vars.country}{else}{assign var=country value=$countrycode|default:'US'}{/if}
Country:
```
{% endcode %}
### Expire Padding
You can configure NATS to allow for extra time for rebills to come in for Aconti members.
Further details can be found on the "[Member Expire Pad](/nats-admin/members/further-reading/member-expire-pad)" page.
# Allopass
*Article Topics:* [*Billers*](/getting-started/common-topics/billers)
## Setting Up at Allopass
To set up a Site and its join options with Allopass, log into your Allopass account at [www.allopass.com](http://www.allopass.com) and click "My Products". Next, you can create a site with Allopass by clicking "Add a new site" or a new join option when you click "Add a new product". After filling out the URL and category for the site you will be brought back to the Site List where you can view your Site IDs that will be needed to be configured in the [Sites Admin](/nats-admin/sites). When you add a new product you will be prompted to enter the following fields:
* Product Name: The name of your product *(This does not need to be configured in NATS.)*
* Purchase URL: This field is not required but can be set to:
https\://\/signup/signup.php
*Note:* The remaining URL fields are required to be configured with Allopass in order for it to function properly with NATS.
* Product access URL:
https\://\/signup/returnurl\_allopass.php?ok=1
* Error URL:
https\://\/signup/returnurl\_allopass.php?ok=0
* Notification URL:
https\://\/signup/process\_allopass.php
***
*If you want to set up a Subscription type product with Allopass, you will need to configure the following field:*
* Acknowledgment URL: This the url to which Allopass will post for initial and rebill transactions for Subscription products and must be configured. The url will be the same as the Notification URL used for One-Time purchases:
https\://\/signup/process\_allopass.php
*\ should be set to the linkdomain of your site.*
## Setting Up Allopass in NATS
### Billers Admin
To add Allopass to NATS, select "Allopass" from the dropdown menu list of billers next to "Setup New Biller". Once selected, click "Add" on the right side of the page to finish adding Allopass.
{% hint style="info" %}
**Please Note:** If you don't see Allopass, [put in a support ticket](http://clients.toomuchmedia.com/), as you may need an updated version of NATS.
{% endhint %}
Once you have added the Biller you will be able to edit biller-specific account information by clicking the pencil icon next to Allopass labeled, "Edit Allopass Account Info".
* API KEY - (required) this is the api key needed to process transactions with Allopass.
* API Signature - *(optional)* This is the API signature provided by Allopass.
\
Note: This biller does not support return on denial for credit card payments, therefore cascades will not work with this biller for credit card processing. Additionally, Credit card processing only supports transactions with the Euro currency.
Note: This biller does not support cancellations, chargebacks, refunds or rebills.
### Sites Admin
In the Sites admin you can configure your Biller site-specific information by editing the default tour of one of your Sites. Next fill out the information for the following fields:
* ALLOPASS Site ID: The Site ID of your site as configured with Allopass
* ALLOPASS(id:59) Language: The Language to be used for this Site.
#### Join Options
Each Product you set up with Allopass will need to be configured as a join option in NATS. *NATS only supports the use of One-Time and Subscription based products.* You can either set up your Allopass join options as a normal or special join option by clicking on "Set Join Options" or "Set Special Join Options" respectively, next to the Site you wish to configure in the Sites Admin.
* ALLOPASS Pricepoint ID: The Pricepoint ID of your product as provided by Allopass.
* ALLOPASS Amount: The purchase amount of your join option.
* ALLOPASS Product NAME: This the name of the product as you have set it up with Allopass
* ALLOPASS Product ID: The Product ID of your join option as configured with Allopass. (You can view this in the "My Products" section of the Allopass admin.)
*Allopass will not send an expiration date for dialer transactions so you will need to set up one the following fields for Special Join Options*
* ALLOPASS Active Number: The amount of times the generated Allopass code can be used.
* ALLOPASS Active Period: The number of days the generated Allopass code will be active.
# AltoBilling
*Article Topics:* [*Billers*](/getting-started/common-topics/billers)
## Setting Up at AltoBilling
Before you can begin configuring AltoBilling in NATS, you must first sign up for an account with them. You can do this through their website at
When registering with AltoBilling, make sure to take down the Merchant ID and Password that they provide for you. This can be found by clicking the "List" link in the "Merchant" section on their site. Other useful information to take down includes your chosen Site Name, and your Terminal ID.
## Setting up AltoBilling in NATS
### Billers Admin
To begin setting up AltoBilling in NATS, go to the [Billers Admin](/nats-admin/billers). Scroll down to the "Setup New Biller" drop-down menu, choose AltoBilling, and click "Add New Option".
{% hint style="info" %}
**Please Note:** If you don't see Alto Billing, [put in a support ticket](http://clients.toomuchmedia.com/), as you may need an updated version of NATS.
{% endhint %}
Fill in the Merchant ID and Password that were provided to you by AltoBilling. If you were not provided with this information, please contact AltoBilling.
### Sites Admin
Next, go to the [Sites Admin](/nats-admin/sites), create or edit a tour, and scroll down to the "Biller Details" section. Find the "ALTO" settings, and enter your Site Name and Terminal ID. This information will be provided to you by AltoBilling.
Once you have done that, scroll down to the "Join Options for this Tour" section and create or edit a join option to add AltoBilling compatibility. Under "Biller Codes", choose the currency type that you want AltoBilling to record your transactions under. The default setting for this is USD.
Additionally, you must add rules in order for this join option to show on your join page. You can do so by using the "Rules" action icon, marked with purple arrows.
For more information on adding rules in NATS, please see our NATS Rules wiki article.
### Cross Sales
AltoBilling also supports Cross Sale transactions through NATS. In order to process cross sale transactions, you will first have to set them up with AltoBilling. Please contact AltoBilling for assistance with this.
To set up cross sales in NATS, go to the Upsells Admin and click incoming or outgoing cross sales from the navigation tabs (depending on whether you are sending or receiving the cross sale).
If you are sending the cross sale, go to the Outgoing Cross Sales section. Add AltoBilling from the Biller drop-down menu, and click Add New Option. On the next page, you will be prompted to fill in the Title, Description, and Disclaimer for your cross sale option.
You will then need to fill out the Biller Info for your cross sale, which will be provided by AltoBilling. Fill in your Merchant ID, Passcode, Terminal ID, Site Name, Initial Days, Initial Dollar, Recurring Days, Recurring Dollar, Ref Code, and Domain. You can also choose if you want to sent an HTTPS Post when a cross sale transaction occurs with AltoBilling. When you have finished configuring your option, click Save Changes.
If you are receiving the cross sale, go to the Incoming Cross sales section. Add AltoBilling from the Biller drop-down menu and click Add New Option. When prompted, choose the site and program you want to associate with this cross sale.
Under "Details," fill in the title of your cross sale option, the initial membership fee and length, and the recurring membership fee and length. Finally, fill in your Site Name in the "Biller Info" section and click Save Changes.
### Additional Support
If you have any further questions regarding the setup of AltoBilling in NATS, please [put in a support ticket](http://clients.toomuchmedia.com/).
# Argus
*Article Topics:* [*Billers*](/getting-started/common-topics/billers)*,* [*Cross Sales*](/getting-started/common-topics/cross-sales)*,* [*One Click Systems*](/getting-started/common-topics/one-click-systems)
## Signing up at Argus
If you are interested in using Argus as a third-party processor please contact them directly:\
URL:
## Setting up at Argus
When setting up at Argus, you will need to set up your postback urls to which Argus will post transactions:
*https\://\/signup/process\_argus.php*
You will need to replace \ with the linkdomain of your site.
```
Postback Version: 1
Data Format: JSON
```
## Setting up in Nats
### Billers Admin
Go to the [Billers Admin](/nats-admin/billers), select Argus Payments. from the drop-down, and click Add. Enter your Gateway Login and Gateway Password that was provided by Argus. Note: *Argus will need to be added to a cascade before it can be used.*
When setting up Argus in your cascades, you can choose the processing type to be used in the cascade step by selecting it from the drop-down menu. Argus currently supports the following processing types:
* Credit Cards
### Sites Admin
Go to the [Sites Admin](/nats-admin/sites) and the "Edit" button next to the default tour of the site you would like to configure. In the "Billers Details" section will find the following fields for Argus:
* Site ID (required)
* Merchant Account ID
* Client ID (required)
Next, Edit (or create) the option(s) you want to use with Argus. You will see the following list of available option fields (all preceded by Argus id:#):
* Product ID (required) - the Product ID provided to you by Argus to identify this option.
* Upgrade Product ID: - the Upgrade Product ID for this option, required if you would like this members to be able to upgrade with this option.
* Currency: - the currency that this join option should be billed in.
* Count - The number of items associated with this option.
* CVV Check - Enabling this option requires a CVV check to be made for processing transactions.
* AVS Check - Enabling this option requires a AVS check to be made for processing transactions.
* Dynamic Descriptor - This is the description that appears on the bank statement of the customer.
This option setup may also require rules to be setup. You can do so with the purple arrows next to the option row.
### Cross Sales
Go to the [Cross Sales Admin](/nats-admin/cross-up-sales/further-reading/cross-sale-supported-billers), click incoming or outgoing cross sales from the navigation tabs (depending on whether you are sending or receiving the cross sale).
For Incoming Cross Sales, go to the Incoming Cross sales section. Add Argus from the biller drop down. Fill in the the following options for the cross sale:
* Initial Days
* Initial Dollar
* Recurring Days
* Recurring Dollar
* Product ID (required)
* Count
* Currency
* Upgrade Product ID
You will also want to select the site and program that you want to associate with this cross sale once you have entered in the "Data" fields. Please note that incoming cross sales with Argus will be processed within 20 seconds of the primary sale and so they may not show up immediately in the Members Admin.
For Outgoing Cross Sales, go to the Outgoing Cross Sales section. Add Argus from the biller drop down. Also in this section you will fill in the following: Title , Description, and Disclaimer for this cross sale. In the Biller Info you will fill out the data for the receiving end (the person you are doing cross sales with will provide this information for you). Fill in Gateway Login, Gateway Password, Site ID, Merchant Account, Product ID, Ref Code, Domain and HTTPS Post.
There is also an option to choose 'Recalculate Ref Code'. This will cause NATS to attribute credit for the cross sell to the referring affiliate over the affiliate whose Ref Code was entered in the 'Ref Code' field. *In order for this to take effect, the referring affiliate must be enabled in a cross-sell program, which means that the cross sale must be coming from your own NATS installation.*
### Upgrade Plus
There is an additional account setting in Argus called "**client\_multi\_mbshp\_support**," which allows multiple concurrent memberships for a single member in their system. **To use Upgrade Plus with Argus, you will need to ensure that Argus has enabled this account setting.**
Alternatively, the setting can be disabled, but you must then do the following:
* Configure a new product ID in Argus for the full price point, then input the new price point's Product ID in the 'Upgrade Product ID' in your original NATS trial option.
### Expire Padding
You can configure NATS to allow for extra time for rebills to come in for Argus members.
Further details can be found on the "[Member Expire Pad](/nats-admin/members/further-reading/member-expire-pad)" page.
### Additional Support
If you have any further questions regarding the setup of in NATS v4, please put in a support ticket.
# Authorize
*Article Topics:* [*Billers*](/getting-started/common-topics/billers)
## Set up on Authorize.net Website
Before you can begin configuring Authorize.net as a biller in NATS, you must first register a merchant account with them. This can be done through their website at [https://www.authorize.net/](http://www.authorize.net/).
While registering with Authorize.net, please make sure that your account can work with both AIM (advanced integration method) and ARB (automated recurring billing).
You must setup the this silent post url in your authorize.net account:
Replace in the above example *linkdomain* with your [Link Domain](/using-nats/nats-admin-features/linkdomain). You also must setup your MD5 Hash value in your authorize.net account. Please ask authorize.net support for help with this.
## Set up Authorize in NATS
### Billers Admin
To begin setting up Authorize.net as a biller in NATS, go to the [Billers Admin](/nats-admin/billers). Scroll down to the "Biller" drop-down menu, select Authorize.net, and click "Add."
{% hint style="info" %}
**Please Note:** If you don't see Authorize.net as a biller in NATS, [put in a support ticket](https://clients.toomuchmedia.com/), as you may need an updated version of NATS.
{% endhint %}
When prompted, enter the Merchant Login ID, Transaction Key, and MD5 Hash Value that was provided to you by Authorize.net under the "Account Info" section. If you were not provided with this information, please contact your biller to receive it.
### Sites Admin
Next, go to the [Sites Admin](/nats-admin/sites), create or edit a tour, and scroll down to the "Join Options for this Tour" section and click the "Edit Option Details" for this tour" icon that corresponds to the join option you want to use.
In the "Biller Codes" section on the next page, locate your Authorize.net Order Description and the Amount of Time (in seconds) that Authorize.net will use for finding duplicate transactions (these steps are optional).
Once you have configured these steps, save your [join option](/nats-admin/sites/site-management/site-overview/join-options) details. Authorize.net will now be configured for basic use as a biller in NATS.
## Additional Notes
NATS is able to verify that the postback for a rebill indeed came from authorize.net using the MD5 hash value. Unfortunately, this verification is not possible for credit and void transactions. If you would like NATS to process credit and void transactions, please go to configuration -> billers in your NATS admin and turn on the PROCESS\_AUTHORIZEARB\_CREDIT\_VOID option. Please note that once you do this, anyone will be able to post credits and voids for authorize.net transactions.
Authorize.net is not able to send the reference transaction id for credit transactions to NATS (the transaction id of the transaction being credited). When entering credits in authorize.net admin please make sure to specify the transaction id being credited and nothing else in the description field for the credit transaction. Otherwise, NATS will not be able to process authorize.net credits. This is not an issue for void transactions.
.0 NATS will not be able to process authorize.net credits. This is not an issue for void transactions.
Authorize.net does not import chargeback transactions from banks. Because of it NATS is not able to process chargebacks resulting from authorize.net transactions.
# Bill1st Gateway
*Article Topics:* [*Billers*](/getting-started/common-topics/billers)*,* [*Cross Sales*](/getting-started/common-topics/cross-sales)*,* [*Up Sales*](/getting-started/common-topics/up-sales)
## Setting Up at Bill 1st
Before you can begin configuring Bill1st Gateway in NATS, you must first sign up for an account with them. To do so, go to their site at: [https://www.bill1st.com](http://www.bill1st.com/).
Record any essential information you receive during the signup process.
You must also set up the following Postback URLs with Bill1st:
* Initial Postback URL - https\://\/signup/process\_bill1st.php
* Event Postback URL - https\://\/signup/process\_bill1st.php
Replace \ with your NATS linkdomain or domain.
## Setting Up Bill 1st in NATS
### Billers Admin
To begin setting up Bill 1st in NATS, go to the [Billers Admin](/nats-admin/billers). Scroll down to the "Setup New Biller" drop-down menu and select "Bill1st Gateway" from your list of choices. Click Add.
{% hint style="warning" %}
**Please Note:** If you don't see Bill1st Gateway, [put in a support ticket](http://clients.toomuchmedia.com/), as you may need an updated version of NATS.
{% endhint %}
You will then be prompted for your Account ID, and Password. These will have been provided by Bill1st when signing up for an account. If you were not given this information, please contact Bill1st. You can also choose whether you want to use your Affiliate ID in NATS as your Bill1st Username-- this setting is optional. You must enter "Free Style Conversion ID" for instant upgrade to work. When you are done configuring these options, click Save.
### Sites Admin
Next, go to the [Sites Admin](/nats-admin/sites), create or edit a tour, and navigate to the "Join Options" Tab. Create a [join option ](/nats-admin/sites/site-management/site-overview/join-options)that you wish to enable Bill1st Gateway for, or select the join option name you wish to enable for Bill1st Gateway.
Select the Biller Details tab where you will find fields labeled under "BILL1ST". Fill in the requested Product Codes and Upgrade Codes; these must be obtained from Bill 1st.
Next, navigate back to the Site Details and select the Tour you wish to enable Bill1st Gateway on. Select the Billers Tab and insert your Site Product Code provided by Bill1st in the "Site product Code" field.
If you setup Dynamic Pricing at Bill1st, you will be provided a Product Code to identify the dynamic option. When NATS sends a dynamic option product code, Bill1st uses the Initial, Initial days, Rebill, and Rebill Days (Membership Site) or the Amount and number of Tokens (Token Site) from the NATS join option. But, you need to also tick the Dynamic option checkbox on the NATS Join option.
Additionally, you must add rules in order for this join option to be displayed on your join page. You can do so by using the "Rules" action icon, marked with purple arrows.
For more information on Rules in NATS, please see our "[NATS Rules](/using-nats/nats-admin-features/rules)" page
### Cross/Up Sales Admin
Bill1st Gateway also supports both Cross Sales and Up Sales in NATS. If you wish to use Bill1st Gateway to process Cross Sales and Up Sales, you must first configure them on the Bill1st website. Please contact Bill1st for assistance with this.
### **Cross Sales**
To configure outgoing cross sales in NATS, go to the [Cross Sales Admin ](/nats-admin/cross-up-sales/cross-sales)and click on the "Outgoing Cross Sells" tab. Add Bill1st from the Biller drop-down menu, and click Add New Option. On the next page, you will be prompted to fill in the Title, Description, and Disclaimer for your cross sell option.
You will then need to fill out the Biller Info for your cross sale, which will be provided by Bill1st. Fill in your Account ID, Product Code, Ref Code, and Domain. You can also choose if you want to send an HTTPS Post when a cross sale transaction occurs with Bill1st Gateway, or if you want to recalculate your ref code. When you have finished configuring your option, click Save Changes.
If you wish to configure an incoming cross sale in [NATS](https://tmmwiki.com/index.php/NATS4), go to the [Up Sales Admin](https://tmmwiki.com/index.php/Upsells_Admin) and click on the "Incoming Cross Sells" tab. Add Bill1st from the Biller drop-down menu, select the Site and Program you want your incoming Cross Sale to affect, and click "Add New Option".
You will then be prompted to input a title for your Cross Sale option, as well as the initial and recurring membership fees and lengths. Once you have filled these fields out, input the Product Code and Upgrade Code that you received from Bill1st, and click Save Changes.
Before you can process cross sales in NATS, you will need to allow the IP of the system sending the cross sale. You can do this in the [Configuration Admin](/nats-admin/configuration) in the "Billers" section. Scroll down to the Bill1st section, and add your desired IPs to the *XSELL\_BILL1ST\_SECURE\_IPS* configuration option.
### **Up Sales**
To configure outgoing upsells in NATS, go to the [Up Sales Admin](/nats-admin/cross-up-sales/up-sales) and click on the "Outgoing Upsells" tab. Add Bill1st from the Biller drop-down menu, and click Add New Option. On the next page, you will be prompted to fill in the Title, Description, and Disclaimer for your upsell option.
You will then need to fill out the Biller Info for your upsell, which will be provided by Bill1st. Fill in your Account ID, Product Code, Ref Code, and Domain. You can also choose if you want to send an HTTPS Post when an upsell transaction occurs with Bill1st Gateway, or if you want to recalculate your ref code. When you have finished configuring your option, click Save Changes.
If you wish to configure an incoming upsell in NATS, go to the [Up Sales Admin](/nats-admin/cross-up-sales/up-sales) and click on the "Incoming Upsells" tab. Add Bill1st from the Biller drop-down menu, select the Site and Program you want your incoming upsell to affect, and click "Add New Option".
You will then be prompted to input a title for your upsell option, as well as the initial and recurring membership fees and lengths. Once you have filled these fields out, input the Product Code and Upgrade Code that you received from Bill1st, and click Save Changes.
Before you can process upsells in NATS, you will need to allow the IP of the system sending the upsell. You can do this in the [Configuration Admin](/nats-admin/configuration) in the "Billers" section. Scroll down to the Bill1st section, and add your desired IPs to the *XSELL\_BILL1ST\_SECURE\_IPS* configuration option.
# BillAPay Gateway
*Article Topics:* [*Billers*](/nats-admin/billers)
## Setting Up at BillAPay Gateway
Before you can begin configuring BillAPay Gateway in NATS, you must first sign up for an account with them. To do so, go to their site at: [https://www.billapay.com](http://www.billapay.com/).
Record any essential information you receive during the signup process.
You must also set up the following Postback URLs with BillAPay:
* Initial Postback URL - https\://\/signup/process\_billapay.php
* Event Postback URL - https\://\/signup/process\_billapay.php
Replace \ with your NATS linkdomain or domain.
## Setting Up BillAPay Gateway in NATS
### Billers Admin
To begin setting up BillAPay Gateway in NATS, go to the [Billers Admin](/nats-admin/billers). Scroll down to the "Setup New Biller" drop-down menu and select "BillAPay Gateway" from your list of choices. Click Add.
{% hint style="info" %}
**Please Note:** If you don't see BillAPay Gateway, [put in a support ticket](http://clients.toomuchmedia.com/), as you may need an updated version of NATS.
{% endhint %}
You will then be prompted for your Account ID, and Password. These will have been provided by BillAPay when signing up for an account. If you were not given this information, please contact BillAPay. You can also choose whether you want to use your Affiliate ID in NATS as your BillAPay Username-- this setting is optional. You must enter "Free Style Conversion ID" for instant upgrade to work. When you are done configuring these options, click Save.
Optional fields for use with this biller:
* Merchant Code
* Global Product Code
* Client Affiliate ID as Username
* Global Dynamic option
### Sites Admin
Next, go to the [Sites Admin](/nats-admin/sites), create or edit a tour, and scroll down to the "Join Options for this Tour" section. Create a join option that you wish to enable BillAPay Gateway for, or click the "Edit Option Details for this tour" action icon next to an already existing join option.
On the next page, you will find various fields labeled "BillAPay" under the Biller Codes column. Fill in the requested Product Codes and Upgrade Codes; these must be obtained from BillAPay Gateway. Once you have filled in the required fields, click Save.
If you setup Dynamic Pricing at BillAPay, you will be provided a Product Code to identify the dynamic option. When NATS sends a dynamic option product code, BillAPay uses the Initial, Initial days, Rebill, and Rebill Days (Membership Site) or the Amount and number of Tokens (Token Site) from the NATS join option. But, you need to also tick the Dynamic option checkbox on the NATS Join option.
Additionally, you must add rules in order for this join option to be displayed on your join page. You can do so by using the "Rules" action icon, marked with purple arrows.
For more information on Rules in NATS, please see our "[NATS Rules](/using-nats/nats-admin-features/rules)" page.
Optional fields for use with this biller:
* Merchant Code
* Site Product Code
* Site Dynamic option
## Upsales Admin
BillAPay Gateway also supports Cross Sales and Up Sales in NATS. If you wish to use BillAPay Gateway to process Cross Sales and Up Sales, you must first configure them on the BillAPay website. Please contact BillAPay for assistance with this.
Optional fields for use with this biller:
* Merchant Code
### **Cross Sales**
To configure outgoing cross sales in NATS, go to the [Cross/Up Admin ](/nats-admin/cross-up-sales)and click on the "Outgoing Cross Sells" tab. Add BillAPay from the Biller drop-down menu, and click Add New Option. On the next page, you will be prompted to fill in the Title, Description, and Disclaimer for your Cross Sale option.
You will then need to fill out the Biller Info for your cross sale, which will be provided by BillAPay. Fill in your Account ID, Product Code, Ref Code, and Domain. You can also choose if you want to send an HTTPS Post when a cross sale transaction occurs with BillAPay Gateway, or if you want to recalculate your ref code. When you have finished configuring your option, click Save Changes.
If you wish to configure an incoming cross sale in NATS, go to the [Cross/Up Sales Admin](/nats-admin/cross-up-sales) and click on the "Incoming Cross Sells" tab. Add BillAPay from the Biller drop-down menu, select the Site and Program you want your incoming cross sale to affect, and click "Add New Option".
You will then be prompted to input a title for your cross sale option, as well as the initial and recurring membership fees and lengths. Once you have filled these fields out, input the Product Code and Upgrade Code that you received from BillAPay, and click Save Changes.
Before you can process cross sales in NATS, you will need to allow the IP of the system sending the cross sale. You can do this in the [Configuration Admin](/nats-admin/configuration) in the "Billers" section. Scroll down to the BillAPay section, and add your desired IPs to the *XSELL\_BILLAPAY\_SECURE\_IPS* configuration option.
### **Upsells**
To configure outgoing upsells in NATS, go to the [Cross/Up Sales Admin ](/nats-admin/cross-up-sales)and click on the "Outgoing Upsells" tab. Add BillAPay from the Biller drop-down menu, and click Add New Option. On the next page, you will be prompted to fill in the Title, Description, and Disclaimer for your upsell option.
You will then need to fill out the Biller Info for your upsell, which will be provided by BillAPay. Fill in your Account ID, Product Code, Ref Code, and Domain. You can also choose if you want to send an HTTPS Post when an upsell transaction occurs with BillAPay Gateway, or if you want to recalculate your ref code. When you have finished configuring your option, click Save Changes.
If you wish to configure an incoming upsell in NATS, go to the [Cross/Up Sales Admin ](/nats-admin/cross-up-sales)and click on the "Incoming Upsells" tab. Add BillAPay from the Biller drop-down menu, select the Site and Program you want your incoming upsell to affect, and click "Add New Option".
You will then be prompted to input a title for your upsell option, as well as the initial and recurring membership fees and lengths. Once you have filled these fields out, input the Product Code and Upgrade Code that you received from BillAPay, and click Save Changes.
Before you can process upsells in NATS, you will need to allow the IP of the system sending the upsell. You can do this in the [Configuration Admin](/nats-admin/configuration) in the "Billers" section. Scroll down to the BillAPay section, and add your desired IPs to the *XSELL\_BILLAPAY\_SECURE\_IPS* configuration option.
# Biller Revolution
*Article Topics:* [*Billers*](/getting-started/common-topics/billers)
## Setting Up at Billing Revolution
Before you can begin setting up Billing Revolution as a biller in NATS, you must first register for an account with them. You can do this through their website at [https://www.singleclickcheckout.com/pricing-sign-up.html](http://www.singleclickcheckout.com/pricing-sign-up.html)
When signing up, make sure you record information that is necessary for setup in NATS. This includes:
* Username
* Password
* Business ID
* Product Code
{% hint style="info" %}
**Please Note:** This biller does not support return on denial, therefore cascades will not work with this biller. This biller does not support [chargebacks ](/additional-resources/common-terms#chargeback)either, only refunds.
{% endhint %}
## Setting Up Billing Revolution in NATS
### Billers Admin
To begin configuring Billing Revolution in NAT, go to the [Billers Admin](/nats-admin/billers), select Billing Revolution from the available "Setup New Biller" drop-down menu, and click Add.
{% hint style="info" %}
**Please Note:** If you do not see Billing Revolution in your list of billers, you may need to update your version of NATS. If this is the case, [put in a support ticket](http://clients.toomuchmedia.com/) and we'll gladly help you.
{% endhint %}
When prompted, enter the Business ID, Username, and Password that you received while signing up with Billing Revolution. Click Save.
### Sites Admin
To continue setting up Billing Revolution in NATS, go to the [Sites Admin](/nats-admin/sites). Create a new tour, or edit a currently existing tour that you want Billing Revolution to handle transactions for.
Scroll down to the Join Options for this Tour section on the next page. For each recurring join option you have set up, click the "Edit Global Option Details" action icon. On the next page, locate the Biller Codes for Billing Revolution, and enter your Product Code. When you have entered the necessary information, click Save.
You must also edit/add additional Rules for this option to be shown on your join form. You can do so by clicking the "Set Display Rules" icon next to the corresponding join option and setting "SHOW" rule for this biller (or all billers).
# Billing United
*Article Topics:* [*Billers*](/getting-started/common-topics/billers)
## Setting up at Billing United
If you wish to become a merchant and accept Billing United as a payment processor, register at [https://billing-united.com/](http://billing-united.com/). They should provide you with an Client ID, Username, Password which is needed to setup Billing United with NATS.
You must setup the postback urls to which Billing United will post transactions to NATS (callback url):
*https\://\/signup/process\_billingunited.php*
You will also need to setup redirect url for Billing United to return member back to NATS:
*https\://\/signup/returnurl\_billingunited.php*
You will need to replace \ with the linkdomain of your site.
## Setting up Billing United in NATS
### Billers Admin
To begin setting up Billing United in NATS, go to the Billers Admin. Scroll down to the "Setup New Biller" drop-down menu, select Billing United, and click "Add".
{% hint style="info" %}
**Please Note:** If you don't see Billing United, [put in a support ticket](http://clients.toomuchmedia.com/), as you may need an updated version of NATS.
{% endhint %}
Fill in the *Client Id, Username, Password* given to you by Billing United when prompted, and click Save. If you were not provided with this information, please contact Billing United. When adding Billing United to a Cascade, you will have the choice of the following payment methods:
* Credit Card
* Transfer
* Pin Code
* ATM
* Cash
* Online Banking
* E-Wallet
### Sites Admin
NATS does not require any site specific details to be entered in on the tour level for Billing United. However, there are specific Biller Codes you must enter in the Sites Admin for each join option you create.
### Option Setup
Edit (or create) the option(s) you want to use with Billing United. You will see the following list of available option fields (all preceded by Billing United id:#):
* Button ID - The Button ID provided to you by Argus to identify this option.
* Currency - the currency that this join option should be billed in.
* Description - This is the description for this option.
{% hint style="info" %}
**Please Note:** This biller does not support the Rebill, Upgrade Plus, xsell and Up Sale features in NATS.
{% endhint %}
# Bit-Pay
*Article Topics:* [*Billers*](/getting-started/common-topics/billers)
{% hint style="info" %}
**Please Note:** Please don't test your biller setup with NATS Bit-Pay's test account - it won't work correctly.
{% endhint %}
## Billers Admin
To add Bit-Pay to NATS, select "Bit-Pay" from the dropdown menu list of billers next to "Setup New Biller" in the [Billers Admin](/nats-admin/billers). Once selected, click "Add" on the right side of the page to finish adding Bit-Pay.
Note: If you don't see Bit-Pay, [put in a support ticket](http://clients.toomuchmedia.com/), as you may need an updated version of NATS.
Once you have added the Biller you will be able to edit biller-specific account information by clicking the pencil icon next to Bit-Pay labeled, "Edit Bit-Pay Account Info". You will need to create an API Token in BitPay's admin which is described in the next section
* API Token - The API token generated in BitPay's admin
{% hint style="warning" %}
Important: Bit-Pay will not return the surfer to NATS on approval or denial, so Bit-Pay will not work with the NATS [cascade ](/additional-resources/common-terms#cascade)feature.
{% endhint %}
## Setting Up at Bit-Pay
You will need to generate an API Key ID to act as your API Token. To generate your API Token, log into the BitPay admin () and click on "Account". As of August 2017 BitPay has updated their admin and you will now find this under "Integration Resources" and "Legacy API Keys" This page allows you to generate an API Key ID. This Key is what will be your API token. To generate the token, simply click the "Add New API Key" button and it will generate the code for you. This entire code needs to be placed in the biller's admin for BitPay.
## Sites Admin
Bit-Pay requires no site-specific information to be modifed in your tour configuration. Instead, join options with Bit-Pay must be configured as a special join option by clicking "Set Special Payment Options" next to the site for which you would like to set up a Bit-Pay join option in the [Sites Admin](/nats-admin/sites).
* BITPAY Amount: The transaction amount of the join option.
* BITPAY Currency: This is the currency that will be used to calculate the transaction amount in bitcoins based on what is set for Amount.
* BITPAY Transaction Speed: (optional) - This is the speed at which the transaction will be processed. It is recommended that this be set to "high" for postbacks to occur instantly as other settings may take much longer for NATS to receive the postback from Bit-Pay.
## Additional Information
Bit-Pay does not postback information regarding the member's expire date so the following fields are required:
* BITPAY Active Number: This is the number of days, hours or minutes you would like to set to be the duration of the subscription.
* BITPAY Active Period: This is the unit of time for which you would like the Active Number to be active.
For example, a special join option with Active Number: 1 and Active Period: DAY will be a join option that expires after 1 day.
# BoaCompra
*Article Topics:* [*Billers*](/getting-started/common-topics/billers)
## Setting up at BOA COMPRA
If you wish to become a merchant and accept BOA COMPRA as a payment processor, go to .
BOA COMPRA will provide you with the following information for each site that you set up with them:
* Store ID
* Hash Key
Record this information, as you will need it to set up BOA COMPRA in NATS.
{% hint style="info" %}
**Please Note:** This biller does not support return on denial, therefore [cascades ](/additional-resources/common-terms#cascade)will not work with this biller. Additionally, this biller does not support [chargebacks](/additional-resources/common-terms#chargeback), [credits](/additional-resources/common-terms#credit), [refunds](/additional-resources/common-terms#refund) and [rebills](/additional-resources/common-terms#rebill).
{% endhint %}
## Setting up BOA COMPRA in NATS
### Billers Admin
To begin setting up BOA COMPRA in NATS, go to the Billers Admin. Scroll down to the "Setup New Biller" drop-down menu, select BOA COMPRA, and click "Add".
{% hint style="info" %}
**Please Note:** If you don't see BOA COMPRA, [put in a support ticket](http://clients.toomuchmedia.com/), as you may need an updated version of NATS.
{% endhint %}
Fill in the required information when prompted, and click Save. If you were not provided with the requested information, please contact BOA COMPRA.
### Sites Admin
Next, go to the [Sites Admin](/nats-admin/sites), create or edit a tour, and scroll down to the "Biller Details" section. Select the language you want to display for BOA COMPRA.
After selecting a language, scroll down to the section labeled "Add New Join Option" and add the join option you wish to use. In the "Biller Codes" section, locate the fields that start with "BOA". Here you will see an option to select the currency you wish to use with the join option for this biller.
After you have selected a currency, save your join option details. BOA COMPRA will now be configured for use as a biller in NATS.
# BrainTree
*Article Topics:* [*Billers*](/getting-started/common-topics/billers)
## Setting Up at BrainTree
Before you can begin configuring BrainTree as a biller in NATS, you must first register an account through BrainTree. You can find out more about this process at their website:
While signing up @ BrainTree, make sure that you take down the information provided by them; including your Merchant ID, Public Key, and Private Key.
In order to have NATS process post-initial transactions, you need to configure the BrainTree Webhooks (Settings -> Webhooks in BrainTree Admin) to post to <\>/signup/process\_braintree.php
## Setting Up BrainTree in NATS
### Billers Admin
If you wish to set up BrainTree to process transactions in NATS, go to the [Billers Admin](/nats-admin/billers). In the Billers Admin, scroll down to the "Setup New Biller" drop-down menu, select BrainTree, and click "Add New Option."
When prompted, enter your BrainTree Account Number, Store ID, and Store Password. If you were not provided with the required information, please contact BrainTree.
### Sites Admin
To continue setting up BrainTree in NATS, go to the [Sites Admin](/nats-admin/sites). On the main page, create a new tour or edit an already existing one, then scroll down to the "Biller Details" section. Choose if you want to set BrainTree to Test Mode to test your transactions-- this is an optional setting.
### Up Sales Admin
BrainTree also supports Cross Sale transactions in NATS. To begin configuring NATS to accept these transactions, go to the [Cross/Up Sales Admin](/nats-admin/cross-up-sales).
For more information on Cross Sales in NATS, please see our "[Cross Sales](/nats-admin/cross-up-sales/cross-sales)" page.
### **Outgoing Cross Sales**
In the [Cross/Up Sales Admin](/nats-admin/cross-up-sales), begin by configuring an Outgoing Cross Sale (if applicable). To do so, scroll down to the "Biller" drop-down menu and choose BrainTree from your list of options.
On the next page, you will be prompted for a variety of information. Fill out the title, description, and disclaimer for your cross sale option, and choose if you want cross sales enabled for all join options. Next, fill in your Account Number, Store ID, Store Password, the length and cost of your initial/recurring memberships, your Ref Code, and site Domain.
When you have finished filling out the required fields, click Save Changes.
### **Incoming Cross Sales**
To set up incoming cross sales to process transactions through BrainTree, go to the [Cross/Up Sales Admin](/nats-admin/cross-up-sales) and click the "Incoming Cross Sells" tab at the top of the page. Select BrainTree from the "Biller" drop-down menu, select the site and the program that you want to associate with this cross sale option, then click Add New Option.
When prompted, enter the title and fees/lengths of your join options. Under "Biller Info," enter your BrainTree account number, store ID, and store password. Click save changes when you have filled out the required fields, and your cross sale should now be configured in NATS.
# C2Bill
*Article Topics:* [*Billers*](/getting-started/common-topics/billers)
## Setting Up at C2Bill
Before you can begin configuring C2Bill as a biller in NATS, you must first sign up for a merchant account with them. You can do this through their website at .
When registering with C2Bill, make sure to take down the Merchant Account, Security Key, and Item Description that they provide for you. Without this information, you will not be able to set up C2Bill in NATS.
## Setting Up C2Bill in NATS
### Billers Admin
To begin setting up C2Bill in NATS, go to the [Billers Admin](/nats-admin/billers). Scroll down to the "Setup New Biller" drop-down menu, select C2Bill, and click "Add."
{% hint style="info" %}
**Please Note:** If you don't see C2Bill, [put in a support ticket](https://clients.toomuchmedia.com/), as you may need an updated version of NATS.
{% endhint %}
Fill in your Merchant Account and Security Key when prompted, and click Save. If you were not provided with the requested information, please contact C2Bill.
### Sites Admin
Next, go to the [Sites Admin](/nats-admin/sites), create or edit a tour, and scroll down to the section labeled "Join Options for this Tour" and click the "Edit Option Details for this tour" action icon corresponding to your desired join option. In the "Biller Codes" section, locate the fields that begin with "C2BILL" -- Item Description and Currency Type. Fill out the provided field, and select the desired currency you wish to process transactions with.
When you have completed these steps, save your join option details. C2Bill will now be configured for use as a biller in NATS.
### Cross Sales
C2Bill also supports Cross Sale transactions through NATS. In order to process these Cross Sale transactions, however, you will first have to set them up with C2Bill. Please contact C2Bill for assistance with this.
To set up cross sales in NATS, go to the [Cross/Up Sales Admin](/nats-admin/cross-up-sales) and click incoming or outgoing cross sales from the navigation tabs (depending on whether you are sending or receiving the cross sale).
If you are sending a cross sale to another site, go to the "Outgoing Cross Sales" section. Add C2Bill from the Biller drop-down menu, and click Add New Option. On the next page, you will be prompted to fill in the Title, Description, and Disclaimer for your Cross Sale option.
You will then need to fill out the Biller Info for your cross sale, which should have been provided to you by C2Bill. Fill in your Merchant Account, Security Key, Item Description, Currency Type, Initial Days/Dollar, Recurring Days/Dollar, your Ref Code, and your Domain. Once you have filled out the required fields, click "Save Changes."
If you are receiving a cross sale transaction, go to the "Incoming Cross Sales" section. Add C2Bill from the Biller drop-down menu and click Add New Option. When prompted, choose the site and program you want to associate with the cross sale.
Under "Details," fill in the title of your cross sale option, the initial membership fee and length, and the recurring membership fee and length. Finally, fill in your Item Description and choose a Currency Type in the "Biller Info" section and click Save Changes. Your cross sale option should now be configured for use with NATS.
# CardFlex
*Article Topics:* [*Billers*](/getting-started/common-topics/billers)
### Setting Up at CardFlex
Before you can begin configuring CardFlex as a biller in NATS, you must first register a merchant account with them. This can be done through their website at [https://www.cardflexpaymentsolutions.com/](http://www.cardflexpaymentsolutions.com/).
While registering with CardFlex, make sure to take down the Account ID, Password, Merchant Pin, and subid that they provide for you. This information will be necessary for setting up CardFlex in NATS.
{% hint style="info" %}
**Please Note:** CardFlex requires the PHP function, *ssh2*. For more information, please see the [official PHP manual](http://us.php.net/manual/en/ref.ssh2.php). The function names that must be used are 'ssh2\_connect', and 'ssh2\_sftp'.
{% endhint %}
This biller only supports credit card transactions.
## Setting Up CardFlex in NATS
### Billers Admin
To begin setting up CardFlex as a biller in NATS, go to the [Billers Admin](/nats-admin/billers). Scroll down to the "Biller" drop-down menu, select CardFlex, and click "Add."
{% hint style="info" %}
**Please Note:** If you don't see CardFlex as a biller in NATS, [put in a support ticket](https://clients.toomuchmedia.com/), as you may need an updated version of NATS.
{% endhint %}
When prompted, fill in the Account ID, Password, and Merchant Pin that were provided to you by CardFlex under the "Account Info" section. If you were not provided with this information, please contact your biller's support to receive it.
### Sites Admin
Next, go to the [Sites Admin](/nats-admin/sites), create or edit a tour, and scroll down to the "Biller Details" section. Locate the "CARDFLEX Merchant Sub ID" field here, and enter your CardFlex Merchant Sub ID for every join option you set up with CardFlex.
Additionally, you may wish to edit/add any additional rules to allow this option to show on your join page. You can do so with the purple arrows next to the Option row on the main Billers page (similar to the several other areas across NATS).
Once you have completed these steps, save your join option details. CardFlex will now be configured for basic use as a biller in NATS.
{% hint style="info" %}
**Please Note:** CardFlex only supports the following recurring days as an option for rebills:
* 7, 31, 30, 120, 180, 365, 14, 730, 28, 1, 60 days, or 0 days (no recurring option).
If the rebill day is set to a different value than above, NATS will skip CardFlex!
{% endhint %}
### Cross Sales
CardFlex also supports Cross Sales transactions through NATS. In order to process Cross Sale transactions, however, you will first have to set them up with your biller. Please contact CardFlex for assistance with this.
To set up cross sales in NATS, go to the [Cross/Up Sales Admin](/nats-admin/cross-up-sales) and click Incoming or Outgoing cross sales from the navigation tabs at the top of the page (depending on whether you are receiving or sending the cross sale).
If you are sending a cross sale to another site, go to the "Outgoing Cross Sales" page. Add CardFlex from the "Biller" drop-down menu, and click Add New Option. On the next page, you will be prompted to fill in the Title, Description, and Disclaimer for your cross sale option.
You will then need to fill out the Biller Info for your cross sale, which should have been provided to you by CardFlex. Fill in your Account ID, Merchant Pin, Merchant Sub ID, Ref Code, and Domain here. Once you have done that, fill in the initial membership fee and length for your option, as well as the recurring membership fee and length. Click Save Changes.
If you are receiving the cross sale, go to the "Incoming Cross Sales" page. Add CardFlex from the "Biller" drop-down menu and click Add New Option. When prompted, choose the site and program you want to associate with the cross sale.
Under "Details," fill in the title of your cross sale option, the initial membership fee and length, and the recurring membership fee and length. Finally, fill in your Merchant Sub ID number that you received from CardFlex in the "Biller Info" section, and click Save Changes.
### Up Sales
Up Sales can be configured similarly to cross sales in NATS. Like cross sales, you will first have to configure Up Sales with CardFlex before you can configure them in NATS.
To set up Up Sales in NATS, go to the [Cross/Up Sales Admin](/nats-admin/cross-up-sales) and click Incoming or Outgoing Upsells, depending on whether you are receiving or sending the upsell, from the navigation tabs at the top of the page.
If you are sending the Up Sales, go to the Outgoing Upsells section. Add CardFlex from the Biller drop-down menu, and click Add New Option. On the next page, you will be prompted to fill in the Title, Description, and Disclaimer for your Up Sale.
You will then need to fill out the Biller Info for your Up Sales, which should have been provided to you by CardFlex. Fill in your Ref Code and Domain, as well as whether you want to use an HTTPS Post, and click Save Changes.
If you are receiving the Up Sale, go to the "Incoming Upsells" section. Add CardFlex from the provided Biller drop-down menu and click Add New Option. When prompted, choose the site and program you want to associate with this Up Sale.
Under "Details," fill in the title of your Up Sales option, the initial membership fee and length, and the recurring membership fee and length. Finally, fill in your Merchant ID, Product ID, Upgrade Product Page ID, and Upgrade Product ID in the "Biller Info" section and click Save Changes. CardFlex will now be configured to process Up Sales and Cross Sell transactions through NATS.
Note: CardFlex requires the last four (4) credit card digits for the member that you are upgrading.
### UpgradePlus
CardFlex allows you to potentially shorten a Member's Trial by offering them incentives to upgrade in your Members Area. This can be done with the Upgrade Plus feature.
Place the following link in your Members Area to allow upgrade subscriptions with the UpgradePlus feature:
* http\://\/signup/upgradeplus.php?site=\\&username=\
Replace *\* with your linkdomain; replace *\* with your sites ID number; replace *\* with the user's username. You can get the current user's username with the following PHP code:
```
)
```
For more information on this feature, please see our "[Upgrade Plus" ](/using-nats/one-click-systems/upgrade-plus)page.
Note: CardFlex requires the last four (4) credit card digits for the member that you are upgrading.
### Additional Notes
CardFlex only supports the following recurring days as an option for rebills:
* 7, 31, 30, 120, 180, 365, 14, 730, 28, 1, 60 days, or 0 days (no recurring option).
If the rebill day is set to a different value than above, NATS will skip CardFlex!
CardFlex requires the PHP function, *ssh2*. For more information, please see the [official PHP manual](http://us.php.net/manual/en/ref.ssh2.php). The function names that must be used are 'ssh2\_connect', and 'ssh2\_sftp'.
# CCBill
*Article Topics:* [*Billers*](/getting-started/common-topics/billers)
{% hint style="danger" %}
**Please Note:** If you are a new CCBILL client, you will need to use CCBILL's FlexForm integration. Please see our [CCBill FlexForm](/getting-started/integrations/supported-billers/ccbill-flexform) page.
{% endhint %}
## Set up on CCBill's Website
[Register a CCBill account.](http://www.ccbill.com/)
To set up the site sub-account. login to the [CCBill Admin](http://webmin.ccbill.com/), click Tools, click Account Maintenance, and go to the Account Setup section. Follow the on-screen instructions to setup the the site basics. You don't need to download the index page.
After setting up a sub-account, click Tools and Account Maintenance again and select a site from the list of sub-accounts. Choose Basic Setup and enter the following Denial URL and Approval URL:
*
*
Next, choose Advanced Setup and enter the following URL in both the Denial and Approval Post URL fields:
*
In the above Denial and Approval URLs, replace *linkdomain* with your linkdomain.
Please ensure that "Traffic Manager" feature of CCBill is not turned on. This feature cascades surfers between different payment types within CCBill's system and can cause NATS cascading to not work properly.
Go to User Management. If your site needs user management, set the following options, but make sure they match the NATS settings.
* Username Type: USER DEFINED
* Collect Username/Password: Display Username and Password
* Min. Username Length: 6
* Max. Username Length: 16
* Min. Password Length: 6
* Max. Password Length: 16
Enter the option you want to sell with NATS in the CCBill's Pricing Admin. Record each option's SKU I.D. number.
### Set up Datalink
You need one or more sub-accounts to setup Datalink -- you don't need to use the second account. Before you start setting up Datalink, you also need your NATS server's IP address.
Contact CCBill customer support and ask them to setup Datalink or login to the CCBill Admin, go to Premium Features, go to Value Added Features, go to Data Link Services Suite, and enter a username and password. Give CCBill customer support your NATS IP address or enter it on the Data Link Services Suite page.\
**NOTE: Make sure that your Datalink account is set up to be for 'All sub accounts'**
## Set up CCBill in NATS
### Billers Admin
To begin setting up CCBill as a biller in NATS, go to the [Billers Admin](/nats-admin/billers). Scroll down to the "Biller" drop-down menu, select CCBill, and click "Add."
{% hint style="info" %}
**Please Note:** If you don't see CCBill as a biller in NATS, [put in a support ticket](https://clients.toomuchmedia.com/), as you may need an updated version of NATS.
{% endhint %}
When prompted, fill in the Account Number, Datalink Username, and Datalink Password that were provided to you by CCBill under the "Account Info" section. If you were not provided with this information, please contact your biller to receive it.
### Sites Admin
Next, go to the [Sites Admin](/nats-admin/sites), create or edit a tour, and scroll down to the "Biller Details" section. Enter your CCBill Sub-Account ID and Form IDs here, into the CCBILL fields. You may also optionally add a CC Form ID, Check Form ID, Web900 Form, Upgrade sub-account number, and/or SKU. You can also add different sub-accounts for each payment type if you want to use different values for a specific site, as opposed to other sites.
Once you have done this, scroll down to the section labeled "Join Options for this Tour" and click the "Edit Option Details for this tour" icon that corresponds to the [join option](/additional-resources/common-terms#join-option) you wish to use. In the "Biller Codes" section on the next page, locate the "CCBILL" options. Enter your CCBill Payment IDs (also known as Price IDs) for every payment method you wish to accept. Once you have done this, fill in your sub-account, form, and SKU I.D. information. Any option that contains "CCB900" or "CCBill Web900" applies to [CCBill Web900](/getting-started/integrations/supported-billers/ccbill-web900).
Click save when you have finished filling out the available fields. CCBill will now be configured to process basic transactions through NATS.
## Subscription Upgrade
Use CCBill's back-end post system by setting up an upgrade sub-account for each site in CCBill's admin. This is done by creating a new sub-account in the CCBill Web Admin and within the notes for adding the sub-account, note that this new account will be an upgrade account for one of your particular sites.
CCbill will in turn, mark the sub-account as an upgrade account and set up the necessary upgrade join options.
Once set up go to Sites Admin, edit a tour, and create or edit a join option.
Go to the biller details section and find the CCBill subsection. Enter the upgrade sub-account information in the provided field and click the Save Changes button. Repeat for each site.
Contact CCBill and inform them that you want to enable upgrades using the back-end posts. You must give CCBill your server's IP addresses for both the normal and upgrade sub-accounts. The IP addresses for the normal and upgrade sub-accounts must match or the upgrades will not work.
If you have any further questions in regards to the set up of the new sub account on CCbills end please contact CCBill support
On your CCBill account, go to advanced setup for the upgrade sub-account and enter the following URL in the Denial and Approval Post URL fields:
* https\://\/signup/process\_ccbill.php
Replace *\* with your site's [linkdomain](/additional-resources/common-terms#link-domain).
After CCBill upgrades are working, put the following link in your limited members area for user upgrades:
* https\://\/signup/upgradeplus.php?site=\\&username=\
Replace *\* with the linkdomain for your site. Replace *\* with your site's ID number. Replace *\* with the upgrading member's username.
## CCBill Random Usernames and Passwords
If you setup random username's on CCBill's website, you need to remove the Username and Password fields from your site's join form.
## CCBill Redirects to NATS redirect script
If you had CCBIll Affiliates promoting linkcodes for the master account (sub account 0000), the NATS redirect script will determine the NATS site via the HTML parameter of the CCBill affiliate linkcode.
To ensure that the HTML parameter is sent to the NATS redirect script, you must enable "append data on redirect" in the CCBill Admin; Legacy Affiliate -> Advanced Features
## Disable CCBill Multiple Redirects
If you have issues with affiliates receiving double payments for traffic they have referred, it may be due to the Multiple Redirects feature found in CCBill's settings. Turn off the Multiple Redirects feature on CCBill's side in order to prevent incorrect linkcodes from being used to record double traffic.
## Disable CCBill Decline Auto-Redirect
If CCBill automatically redirects to a "Signup with Bank Account" page regardless of what's in your [cascade](/additional-resources/common-terms#cascade), you probably have CCBill Decline Auto-Redirect enabled. Go to the CCBill website, log in, find the Forms or Traffic Flow page, and disable the feature to automatically redirect surfers on a decline.
## Invalid Request Error
The invalid request error appears when the biller isn't set up correctly in the [Billers Admin](/nats-admin/billers). Go to the Billers Admin and double-check your biller account info. Remember not to include the sub-account ID in the account ID. If this is not the problem, ensure the sub-account was enabled.
## CCBill Member and Password Management
You need to enable CCBill password management if you use text password files.
Instead of letting CCBill write to the NATS database, have CCBill Manage the database with scripts called from NATS [postbacks](/additional-resources/common-terms#postback).
If you have old sites that used flat password files and now use NATS, then you must keep the password management on and add the following line to your *.htaccess* file:
```
AuthMySQLAuthoritative Off
```
## Notes
Three settings in the CCBill Administration Interface affect cascading billing.
If a check signup form exists, denied transactions are sent there. To cascade, modify the traffic flow here in the CCBill Admin. Go to Tools, Account Maintenance, Account Admin, Form Admin, Choose Form, Traffic, and set the Traffic Flow to None. Now CCBill sends denied transactions to the denial URL immediately.
CCBill automatically redirects denied CC transactions. By default, the redirect takes 5 seconds, but you can change this to 3 seconds. Go to Tools, Account Maintenance, Account Admin, Basic, Denial Redirect Time. Note: activating the None option disables the automatic redirect.
By default, on a soft decline, CCBill lets the customer submit their purchase three times before sending them to the denial URL. CCBill can send customers to the denial URL after the first decline; ask them to disable the soft decline retries on your account.
### Common Datalink Errors
Note: it will be best to look at CCBill's documentation about the datalink errors [here](https://www.ccbill.com/cs/wiki/tiki-index.php?page=Datalink+Errors) as these failure codes may change:
* Error: Authentication failed. 01 Cause: Too many failed login attempts.
* Error: Authentication failed. 02 Cause: Invalid user name, incorrect user name, no user name provided, invalid password, incorrect password, no password provided, incorrect clientAccnum/clientSubacc, or user is setup for a different clientAccnum/clientSubacc than provided
* Error: Authentication failed. 03 Cause: Inactive login.
* Error: Authentication failed. 04 Cause: Incorrect/non-configured IP address.
* Error: Authentication Failed 693 Cause: Three or more failed logins within the last hour.
* Error: Authentication failed. 708 Cause: Invalid user name, incorrect user name, no user name provided, invalid password, incorrect password, no password provided, incorrect clientAccnum/clientSubacc, or user is setup for a different clientAccnum/clientSubacc than provided
* Error: Authentication failed. 722/723 Cause: Incorrect IP address.
## CCBill Adding Users Error E-Mail
If you use NATS to handle your password management (mod\_auth\_mysql or some other method using the NATS members table) then you can safely disregard this mail.
If you use standard flat password files, then you should talk to your host or tech and CCBill to resolve this issue with them. NATS does not handle flat password files and we cannot fix the problem.
If you use both NATS and flat password files, then you should still talk to your host or tech and CCBill to fix the password file issue -- even if members get access through NATS.
## CCBill Cross Sale special instructions
* If you are receiving a cross sale from a non-NATS source, you will need to pass your Ref Code into the CCBill purchase page as one of the following custom variables, "natsxsell", "natsxsell1", or "natsxsell2". If you have any questions about how to add a custom variable to your join links, or buttons, please contact CCBill for assistance.
# CCBill FlexForm
*Article Topics:* [*Billers*](/getting-started/common-topics/billers)*,* [*One Click Systems*](/getting-started/common-topics/one-click-systems)*,* [*Up Sales*](/getting-started/common-topics/up-sales)*,* [*Cross Sales*](/getting-started/common-topics/cross-sales)
{% hint style="info" %}
**Please Note:** Please don't test your biller setup with NATS4 CCBill Flexform's test account—it won't work correctly. CCBILLFF transactions using CCBill's Test Transaction System can be recorded by enabling the 'PROCESS\_CCBILLFF\_TEST\_TRANSACTIONS' setting available in your Configuration Admin on NATS versions 4.1.15.2 and above.
{% endhint %}
## Set up on CCBillFF's Website
[Register a CCBill account.](http://www.ccbill.com/)
To setup the site sub-account. login to the [CCBill Admin](http://webmin.ccbill.com/), click Tools, click Account Maintenance, and go to the Account Setup section. Follow the on-screen instructions to setup the the site basics. You don't need to download the index page.
After setting up a sub-account, click Tools and Account Maintenance again and select a site from the list of sub-accounts. Choose Basic Setup and enter the following Denial and Approval URLs:
* ?
*
\
From the Subaccount Admin, click the Webhooks link on the left side of the screen. Enter the following URL in the Webhook URL field:
*
* Webhook Format: URL ENCODED
* Select ALL postback/event types (NewSaleSuccess, Refund, Expiration, Chargeback, etc)
From Advanced Setup remove both the Denial and Approval Post URL fields for each site that will be using CCBill FlexForms.
Please ensure that "Traffic Manager" feature of CCBillFF is not turned on. This feature cascades surfers between different payment types within CCBillFF's system and can cause NATS cascading to not work properly.
Go to User Management. If your site needs user management, set the following options, but make sure they match the NATS settings.
* Username Type: USER DEFINED
* Collect Username/Password: Display Username and Password
* Min. Username Length: 6
* Max. Username Length: 16
* Min. Password Length: 6
* Max. Password Length: 16
## Set up CCBillFF in NATS
### Billers Admin
To begin setting up CCBillFF as a biller in NATS, go to the [Billers Admin](/nats-admin/billers). Scroll down to the "Biller" drop-down menu, select CCBillFF, and click "Add."
{% hint style="info" %}
**Please Note:** If you don't see CCBillFF as a biller in NATS, [put in a support ticket](https://clients.toomuchmedia.com/), as you may need an updated version of NATS.
{% endhint %}
When prompted, fill in the Account Number, Advanced Dynamic Upgrades, API Username and API Password that were provided to you by CCBillFF under the "Account Info" section. If you were not provided with this information, please contact your biller to receive it.
### Sites Admin
Next, go to the [Sites Admin](/nats-admin/sites), create or edit a tour, and scroll down to the "Biller Details" section. Enter your CCBillFF Sub-Account, into the CCBILLFF Sub Account field. You may also optionally add a Salt, which will be used for dynamic pricing, and allow for Advanced Dynamic Upgrades.
Once you have done this, scroll down to the section labeled "Join Options for this Tour" and click the "Edit Option Details for this tour" icon that corresponds to the [join option ](/additional-resources/common-terms#join-option)you wish to use. In the "Biller Codes" section on the next page, locate the "CCBILLFF" options. Enter your CCBILLFF Flex ID (also known as Price IDs) for every payment method you wish to accept. Optionally, you can also configure Enable Dynamic Pricing, a Currency, an alternative sub account (Alter-Sub), Prorate on upgrade, and/or Upgrade Type ID
If the FlexID is not unique to the site, you can configure an optional TypeId for the join option.
Click save when you have finished filling out the available fields. CCBillFF will now be configured to process basic transactions through NATS.
## Subscription Upgrade
Use CCBillFF's back-end post system by setting up an upgrade sub-account for each site in CCBillFF's admin. This is done by creating a new sub-account in the CCBillFF Web Admin and within the notes for adding the sub-account, note that this new account will be an upgrade account for one of your particular sites.
CCBillFF will in turn, mark the sub-account as an upgrade account and set up the necessary upgrade join options.
Once set up go to Sites Admin, edit a tour, and create or edit a join option.
Go to the biller details section and find the CCBillFF subsection. Enter the upgrade sub-account information in the provided field and click the Save Changes button. Repeat for each site.
Contact CCBill and inform them that you want to enable upgrades using the back-end posts. You must give CCBill your server's IP addresses for sub-account.
If you have any further questions in regards to the set up of the new sub account on CCbills end please contact CCBill support
On your CCBillFF account, go to advanced setup for the sub-account and enter the following URL in the Denial and Approval Post URL fields:
* https\://\/signup/process\_ccbillff.php
Replace *\* with your site's linkdomain.
After CCBillFF upgrades are working, put the following link in your limited members area for user upgrades:
* https\://\/signup/upgradeplus.php?site=\\&username=\
Replace *\* with the linkdomain for your site. Replace *\* with your site's ID number. Replace *\* with the upgrading member's username.
## CCBillFF Package Plus
CCBill Flexform contains package plus capabilities, where a member can upgrade their membership to a higher tier using CCBillFF. To set this up in NATS, you first need to create a package of join options in the desired site, each with the same Package ID. Also make sure that the "Package Upgrade Allowed" field is set to "Yes" or checked.
For more information on setting up a package, see our "[Package Plus](/using-nats/one-click-systems/package-plus)" page.
Under the "Configuration" section, go to the "Billers" configuration setting, locate the "Ccbillff" section, and change the "Ccbillff Allowed Ips" to include your IP. You may have to do so in your NATS by going to yor includes/config\_override.php file and adding the necessary IP addresses.
Under "Biller Details" in the [Join Option Overview](/nats-admin/sites/site-management/join-option-overview), locate your CCBILLFF biller and click the "+" button. Include your Flex ID and choose your "Prorate on upgrade" option.
After a member signs up under this join option and then wants to upgrade to a higher tier option, you can go to the link *yourdomain/signup/packageplus.php?username=X\&site=Y*, where there will be an upgrade option with another join option contained in the same package. NOTE: Replace "yourdomain" with your domain name, the username "X" to the username of the member, and the site "Y" to the site's ID number. Follow the instructions on the upgrade page and confirm your package upgrade.
### Cross Sales and Up Sales
CCBill Flex Forms supports Cross Sales. This setup is similar to other billers where you will need to create an incoming and outgoing cross sale for internal cross sales.
To learn how to set up a cross sale and/or up sale, see "[How to Add and Delete a Cross or Up Sale](/nats-admin/cross-up-sales/common-questions/how-to-add-and-delete-a-cross-or-up-sale)" page.
### CCBillFF Random Usernames and Passwords
If you setup random username's on CCBillFF's website, you need to remove the Username and Password fields from your site's join form.
### Disable CCBillFF Multiple Redirects
If you have issues with affiliates receiving double payments for traffic they have referred, it may be due to the Multiple Redirects feature found in CCBillFF's settings. Turn off the Multiple Redirects feature at CCBillFF's site in order to prevent incorrect [linkcodes ](/additional-resources/common-terms#linkcode)from being used to record double traffic.
### Disable CCBillFF Decline Auto-Redirect
If CCBillFF automatically redirects to a "Signup with Bank Account" page regardless of what's in your [cascade](/additional-resources/common-terms#cascade), you probably have CCBillFF Decline Auto-Redirect enabled. Go to the CCBill website, log in, find the Forms or Traffic Flow page, and disable the feature to automatically redirect surfers on a decline.
### Invalid Request Error
The invalid request error appears when the biller isn't set up correctly in the [Billers Admin](/nats-admin/billers). Go to the Billers Admin and double-check your biller account info. Remember not to include the sub-account ID in the account ID. If this is not the problem, ensure the sub-account was enabled.
### CCBillFF Member and Password Management
You need to enable CCBill password management if you use text password files. If you use NATS for authentication with [mod\_auth\_dnb](/setup/setup/server-setup/mod_auth_dbd), then you can turn password management off.
Instead of letting CCBill write to the NATS database, have CCBill Manage the database with scripts called from NATS [postbacks](/nats-admin/sites/further-reading/postbacks-and-post-urls).
If you have old sites that used flat password files and now use NATS, then you must keep the password management on and add the following line to your *.htaccess* file:
```
AuthMySQLAuthoritative Off
```
### Notes
Three settings in the CCBill Administration Interface affect cascading billing.
If a check signup form exists, denied transactions are sent there. To cascade, modify the traffic flow here in the CCBillFF Admin. Go to Tools, Account Maintenance, Account Admin, Form Admin, Choose Form, Traffic, and set the Traffic Flow to None. Now CCBillFF sends denied transactions to the denial URL immediately.
CCBillFF automatically redirects denied CC transactions. By default, the redirect takes 5 seconds, but you can changed this to 3 seconds. Go to Tools, Account Maintenance, Account Admin, Basic, Denial Redirect Time. Note: activating the None option disables the automatic redirect.
By default, on a soft decline, CCBillFF lets the customer submit their purchase three times before sending them to the denial URL. CCBillFF can be send customers to the denial URL after the first decline; ask them to disable the soft decline retries on your account.
### CCBillFF Adding Users Error E-Mail
If you use NATS to handle your password management (mod\_auth\_mysql or some other method using the NATS members table) then you can safely disregard this mail.
If you use standard flat password files, then you should talk to your host or tech and CCBill to resolve this issue with them. NATS does not handle flat password files and we cannot fix the problem.
If you use both NATS and flat password files, then you should still talk to your host or tech and CCBill to fix the password file issue -- even if members get access through NATS.
## Related Articles
{% content-ref url="/pages/AYNB2N2ytaMsb0XyOe5P" %}
[Package Plus](/using-nats/one-click-systems/package-plus)
{% endcontent-ref %}
{% content-ref url="/pages/sGGgcbZgam7MV6g8mB5P" %}
[Cross Sales](/nats-admin/cross-up-sales/cross-sales)
{% endcontent-ref %}
{% content-ref url="/pages/edg8f46PJbt7BUx5TdwN" %}
[Up Sales](/nats-admin/cross-up-sales/up-sales)
{% endcontent-ref %}
# CCBill Web900
*Article Topics:* [*Billers*](/getting-started/common-topics/billers)
{% hint style="info" %}
**Please Note:** Please don't test your biller setup with NATS CCBill Web900's test account—it won't work correctly.
{% endhint %}
## Setting Up on CCBill Web900's Website
Before you can begin configuring CCBill Web900 as a biller in NATS, you must first register a merchant account with them. This can be done through their website at [https://www.CCBill.com/](http://www.ccbill.com/).
Set up your Web900 sub-account with the following instructions.
* In the CCBill Admin, go to Account Setup via Tools -> Account Maintenance
* Follow the simple instructions to set up the basics of the site. Leave out anything you don't understand yet
* There is no need to download the Index Page
* In the CCBill Admin, go to Account Admin via Tools -> Account Maintenance. Select the Site from the list of sub-accounts displayed.
* Go to Basic setup (top link on the left)
* @FIXME In Denial URL enter the following:
* Go to Advanced setup
* In Approval Post URL and Denial Post URL enter the following:
* Go to User Management
* If your site needs User Management be sure to set the following options correctly:
* Username Type: USER DEFINED
* Collect Username/Password: Display Username and Password
* Min. Username Length: 6
* Max. Username Length: 16
* Min. Password Length: 6
* Max. Password Length: 16
* The Pricing Admin must list the same Pricing options you have setup in the NATS Sites Admin for this site!
After your account is approved, CCBill will send you an six-digit account number; save this number.
### Setting up Datalink
You can set this up by requesting a client support specialist add it or you can enable or modify your existing DataLink setups in the webmaster admin by going to Premium Features->Value Added Features->Data Link Services Suite. Both username and password will must be 6 to 8 alpha numeric characters.
NOTE: You will need at least two sub-accounts set up even if you do not use one.
## Setting Up CCBill in NATS
### Billers Admin
To begin setting up CCBill Web900 as a biller in NATS, go to the [Billers Admin](/nats-admin/billers). Scroll down to the "Biller" drop-down menu, select CCBill Web900, and click "Add."
{% hint style="info" %}
**Please Note:** If you don't see CCBill Web900 as a biller in NATS, [put in a support ticket](https://clients.toomuchmedia.com/), as you may need an updated version of NATS.
{% endhint %}
When prompted, fill in the Account Number that was provided to you by CCBill under the "Account Info" section. If you were not provided with this information, please contact your [biller](https://tmmwiki.com/index.php/Ct#Biller) to receive it.
### Sites Admin
Next, go to the [Sites Admin](/nats-admin/sites), create or edit a [tour](/nats-admin/sites/site-management/site-overview/site-tours), and scroll down to the "Biller Details" section. In the "CCBILL Web900 Form" field, enter the name of the Web900 form that CCBill should display to surfers (ends in *t9*). In the "CCBILL Web900 Sub Account" field, enter the four-digit number that CCBill gave you for additional sites. Click "Save Changes" once you have filled out the available CCBill Web900 fields on this page.
Once you have done this, scroll down to the section labeled "Join Options for this Tour" and click the "Edit Option Details for this tour" icon that corresponds to the join option you wish to use. In the "Biller Codes" section on the next page, locate the "CCBILL Web900 Payment ID" field and enter the Payment ID code that you set up for that join option.
# CashSend
*Article Topics:* [*Billers*](/getting-started/common-topics/billers)
## Setting up at CashSend
If you wish to become a merchant and accept CashSend as a payment processor, go to [https://cashsend.com/](http://cashsend.com/).
CashSend will provide you with the following information for each site that you set up with them:
* CO ID
* Outlet
* Username (Optional)
* Password (Optional)
* Secret Consistent Key
Record this information, as you will need it to set up CashSend in [NATS](https://tmmwiki.com/index.php/NATS).
## Setting up CashSend in NATS
### Billers Admin
To begin setting up CashSend in NATS, go to the [Billers Admin](/nats-admin/billers). Scroll down to the "Setup New Biller" drop-down menu, select Cashsend, and click "Add".
{% hint style="info" %}
**Please Note:** If you don't see CashSend, [put in a support ticket](http://clients.toomuchmedia.com/), as you may need an updated version of NATS.
{% endhint %}
Fill in the required information when prompted, and click Save. If you were not provided with the requested information, please contact CashSend.
### Option Setup
Edit (or create) the option(s) you want to use with CashSend. You will see the following list of available option fields (all preceded by CashSend id:#):
* Fraud Check - enable fraud check for the join option
### Additional Information
{% hint style="warning" %}
**Important:** This biller does not support the Rebill, Upgrade Plus, Cross Sale and Up Sale features in NATS.
{% endhint %}
# Centili
*Article Topics:* [*Billers*](/getting-started/common-topics/billers)*,* [*Join Options*](/getting-started/common-topics/join-options)
## Signing up at Centili
If you are interested in using Centili as a third-party processor within NATS, you will first need to have a Centili account. To learn more about their services, please visit:
After registering with Centili have them set up the postback URL to point to your NATS installation
* Postback URL: [https://linkdomain/signup/process\_centili.php](http://linkdomain/signup/process_centili.php)
\- In the above, replace linkdomain with your linkdomain
## Setting up in NATS
### Billers Admin
Go to the [Billers Admin](/nats-admin/billers). Near the bottom of the Current Billers table, you will find a section labeled Setup New Biller. Within this section, select Centili from the drop-down and click *Add*.
Next, Centili will need to be added to a cascade before it can be used. When setting up Centili in your cascades, you can choose the processing type to be used in the cascade step by selecting it from the drop-down menu. Centili currently supports the mobile processing type.
{% hint style="info" %}
**Please Note:** If you don't see Centili, [put in a support ticket](https://clients.toomuchmedia.com/), as you may need an updated version of NATS.
{% endhint %}
### Site Setup
From the Default Tour of each site, scroll down to the Biller Details section and provide the API KEY and REBILL API KEY that were provided by Centili. Once supplied, click the Save Changes button.
{% hint style="info" %}
**Please Note:** Without a REBILL API KEY, you will not be able to process recurring join options.
{% endhint %}
### **Join Option Setup**
Visit your [Sites Admin](/nats-admin/sites) to edit (or create) join option(s) that will use the Centili biller within a specific site. Once editing, you will see the list of fields for any billers in your system. Please ensure that you fill out any field with "Centili" in the label. This includes:
* CENTILI (id:#) Sign\_key: - Encryption key provided to you by Centili to encrypt option details
* CENTILI (id:#) Price ID: - Unique Numeric value to act as a one-time charge
When setting up join options, this biller will only accept rebill amounts that are the same as initial transaction amounts. For example, if the initial transaction is $29.95 for 30 days, the rebill must also be $29.95 for 30 days:
#### **Join Option Rules**
You may require that this join option has special rules on when it can be displayed on your join form. You can do so with the purple arrows next to the join option.
## Additional Information
* This biller *does not* support Upgrade Plus, Cross Sale or Up Sale features in NATS.
* Centili decides currency based on the country code supplied by the join form. If you want to offer options in different currencies, you may want to configure join options rules based on country. By default, NATS determines the country based on GEO IP. If GEO IP is not configured on your server, location-specific join options rules will not work. But, Centili will attempt to identify the correct country and therefore currency. However, it may not be the join option amount chosen via the NATS pre-join form. So if you are using Centili to process your NATS surfers, you want to ensure that GEO IP is working correctly on the server.
# Centrobill
*Article Topics:* [*Billers*](/getting-started/common-topics/billers)*,* [*One Click Systems*](/getting-started/common-topics/one-click-systems)*,* [*Up Sales*](/getting-started/common-topics/up-sales)*,* [*Cross Sales*](/nats-admin/cross-up-sales/cross-sales)
## Setting up at Centrobill
If you wish to become a merchant and accept CENTROBILL as a payment processor, register at [https://centrobill.com/](http://centrobill.com/). They should provide you with an Authorization Key which is needed to setup Centrobill with NATS.
Be sure to configure / have configured the following:
* Successful URL: [https://linkdomain/signup/returnurl\_centrobill.php](http://linkdomain/signup/returnurl_centrobill.php)
* Decline URL: [https://linkdomain/signup/returnurl\_centrobill.php](http://linkdomain/signup/returnurl_centrobill.php)
* IPN URL: [https://linkdomain/signup/process\_centrobill.php](http://linkdomain/signup/process_centrobill.php)
{% hint style="info" %}
**Please Note:** Centrobill supports the "quick sale" API method for upsellplus, packageplus and tokenplus, however you should not setup postback for "quick sale" method on Centrobill's side, otherwise you can run into race conditional issue where a sale can be record with incorrect information.
{% endhint %}
* Please ensure your server IP is whitelisted for access to Centrobill's ip\_list.php
## Setting up Centrobill in NATS
### Billers Admin
To begin setting up Centrobill in NATS, go to the Billers Admin. Scroll down to the "Setup New Biller" drop-down menu, select Centrobill, and click "Add".
{% hint style="info" %}
**Please Note**: If you don't see Centrobill, [put in a support ticket](http://clients.toomuchmedia.com/), as you may need an updated version of NATS.
{% endhint %}
Fill in the *Authorization Key* given to you by Centrobill when prompted, and click Save. If you were not provided with this information, please contact Centrobill. When adding Centrobill to a Cascade, you will have the choice of the following payment methods:
* Credit Card
* Sofort Banking
* SEPA
* iDEAL
* EPS
* Giropay
* Pay Safe Card
* CHECK
* Voucher
* Bancontact
* Poli
* Przelewy24
* crypto
* mobile
### Sites Admin
* There are specific Biller Codes you must enter in the Sites Admin for each join option you create.
* You can configure you Centrobill Biller codes in the Sites Admin by clicking on "Set Join Options", scroll down to the section labeled "Add New Join Option" and enter the appropriate values for the join option. In the "Biller Codes" section, locate the fields that start with "CENTROBILL". Centrobill will provide you with a Sku Name for each join option you set up with them. Enter this in the CENTROBILL Sku Name field and once you are finished entering all of the join option details, click "Add This Join Option".
### Up Sales and Cross Sales Admin
#### **Incoming Upsell**
To configure an Incoming Upsell with Centrobill, navigate to the Upsells Admin and click the "Incoming Upsells" tab. Select "Centrobill" from the drop-down list of Billers at the bottom of the page. Next, select the site for the upsell and the upsell program and click "Add New Option". You will be prompted to enter the option information for the upsell (initial days, initial amount, rebill days, rebill amount) and the name of the upsell. Fill in this information and the Sku Name provided by Centrobill and click "Save Changes".
#### **Outgoing Upsell**
To configure an Outgoing Upsell with Centrobill, navigate to the Upsells Admin and click the "Outgoing Upsells" tab. Select "Centrobill" from the drop-down list of Billers at the bottom of the page. Next, select the site for the cross sale and the cross sale program and click "Add New Option". In the Details section, enter the Title, Description, and Disclaimer. In the Biller Info section, enter the Sku Name provided by Centrobill. In order to have the Upsale recorded by another program, you need to place the referring code in the Ref Code field. This is required for upsales being recorded in another NATS install. If you are configuring an upsale for a NATS install, this code can be found at \/internal.php?page=xsells when logged in as an affiliate that is enabled in the cross sale program. If the incoming upsale is not being processed by your NATS, but another NATS install, provide the domain in the Domain field. Finally, click "Save Changes".
#### **Incoming Cross Sale**
To configure a Incoming Cross sale with Centrobill, navigate to the Upsells Admin and click the "Incoming Cross Sales" tab. Select "Centrobill" from the drop-down list of Billers at the bottom of the page. Next, select the site for the cross sale and the cross sale program and click "Add New Option". You will be prompted to enter the option information for the cross sale (initial days, initial amount, rebill days, rebill amount) and the name of the cross sale. Fill in this information and the Sku Name provided by Centrobill and click "Save Changes".
#### **Outgoing Cross Sale**
To configure an Outgoing Cross Sale with Centrobill, navigate to the Upsells Admin and click the "Outgoing Cross Sales" tab. Select "Centrobill" from the drop-down list of Billers at the bottom of the page. Next, select the site for the cross sale and the cross sale program and click "Add New Option". In the Details section, enter the Title, Description, and Disclaimer. In the Biller Info section, enter the Sku Name provided by Centrobill. In order to have the Cross sale recorded by another program, you need to place the referring code in the Ref Code field. This is required for cross sales being recorded in another NATS install. If you are configuring a cross sale for a NATS install, this code can be found at \/internal.php?page=xsells when logged in as an affiliate that is enabled in the cross sale program. Finally, click "Save Changes".
## Token Plus
Centrobill offers support for the Token Plus feature in NATS. This feature allows members of your Token Sites to purchase additional tokens for their account, without requiring them to re-input their payment information to do so. This allows your members to easily buy additional tokens without having to go through any extra steps.
Before you can begin configuring Centrobill to use the Token Plus feature, you must first enable it for the sites you want to offer it on in the Sites Admin. Go to the [Sites Admin](/nats-admin/sites), locate the Token Sites that you want to enable this feature on, and click the "Set Join Options" action icon. Edit the join options that you want to enable Token Plus for, then check the "Token Rebuy Allowed" setting here.
For more information on this process, please see our "[Token Plus](/using-nats/one-click-systems/token-plus)" page.
# Clearcard
*Article Topics:* [*Billers*](/getting-started/common-topics/billers)
## Set up on ClearCard's Website
Before you can begin configuring ClearCard as a biller in NATS, you must first register a merchant account with them. This can be done through their website at [https://stats.clearcard.com/solutions/Application/](http://stats.clearcard.com/solutions/Application/).
While registering with ClearCard, make sure to take down the Username, Site ID, and Merchant ID that are provided to you by your biller. This information will be necessary for setting up ClearCard in NATS.
You must give ClearCard this URL after your account approval:
Replace *linkdomain* above with your [Link Domain](/using-nats/nats-admin-features/linkdomain).
## Set up ClearCard in NATS
#### Billers Admin
To begin setting up ClearCard as a biller in NATS, go to the [Billers Admin](/nats-admin/billers). Scroll down to the "Biller" drop-down menu, select ClearCard, and click "Add."
{% hint style="info" %}
**Please Note:** If you don't see ClearCard as a biller in NATS, [put in a support ticket](https://clients.toomuchmedia.com/), as you may need an updated version of NATS.
{% endhint %}
When prompted, fill in the Username (optional) that was provided to you by ClearCard under the "Account Info" section. If you were not provided with this information, please get in touch with your biller to receive it.
#### Sites Admin
Next, go to the [Sites Admin ](/nats-admin/sites)and create or edit a tour you want ClearCard active for. Find ClearCard under the "Biller Details" section, and enter your Site ID. ClearCard assigns each site a unique ID, which must be obtained from their website. You can find your Site ID on your ClearCard "My Account -- My Websites" page, listed under Options on ClearCard's site. Fill in your Site ID and click Save.
Once you have done this, edit or create a new join option to apply ClearCard to. Under "Biller Codes," enter your ClearCard Merchant ID. ClearCard assigns each pricing option a unique Merchant ID, which again must be obtained from their website. You can find this on your ClearCard "My Account -- Membership Plans" page. Fill in your Biller Code in the provided field.
Once you have completed these steps, save your join option details. ClearCard will now be configured to process transactions through NATS.
## Additional Information
* [Notes from ClearCard](https://stats.clearcard.com/templates/solutions/developers_resources/cpniManual.pdf)
# Clearcard IDV
*Article Topics:* [*Billers*](/getting-started/common-topics/billers)
## What is IDV?
**IDV System** is a new form of payment offered by ClearCard, which can be used as an alternate method to process a transaction if a surfer's credit card is declined by the biller. A surfer processing a transaction using IDVsystem can receive a loan for the purchase price of a membership, allowing them to register as a member even if their credit card is not accepted.
When processing transactions through IDVsystem, the program owner for that site gets paid for the surfer's initial click to IDVsystem, then receives the rest of the membership cost when the surfer repays the loan.
In order for the surfer to receive the loan, however, they must first get authenticated by IDVsystem's database. This can be done by providing extra information fields on the join form that are required for the surfer to fill out.
These additional required fields are *firstname, lastname, email, address1, address2, zip, city, country*, and *state*. Make sure that these fields are required on your site's join form, otherwise surfers will not be able to be authenticated by ClearCard.
## Setting Up on ClearCard's Website
Before you can begin setting up ClearCard IDV as one of your billers, you must first sign up for a merchant account with them. You can do this through their website at [https://stats.clearcard.com/solutions/Application](http://stats.clearcard.com/solutions/Application). On ClearCard's signup form, select *IDVSystem* from the "Start Accepting" choices and fill in the rest of your required information.
When registering with ClearCard, make sure to take down the username, site IDs, and merchant IDs that they provide for you. Without this information, you will not be able to set up ClearCard in NATS.
## Setting Up ClearCard IDV in NATS
### Billers Admin
To begin setting up ClearCard IDV in NATS, go to the [Billers Admin](/nats-admin/billers). Scroll down to the "Setup New Biller" drop-down menu, select ClearCard IDV, and click "Add."
{% hint style="info" %}
**Please Note:** If you don't see ClearCard IDV, [put in a support ticket](https://clients.toomuchmedia.com/), as you may need an updated version of NATS.
{% endhint %}
Fill in your ClearCard IDV username when prompted, and click Save (this step is optional). If you were not provided with the requested information, please contact your biller.
### Sites Admin
Next, go to the [Sites Admin](/nats-admin/sites), create or edit a tour, and scroll down to the "Biller Details" section. Enter your ClearCard IDV Site ID(s) here -- ClearCard assigns each site that you added its own unique ID, which must be obtained from their website. You can find your Site ID on your ClearCard "My Account -- My Websites" page, listed under Options on ClearCard's site. Fill in your Site ID(s) and click Save.
Once you have done this, scroll down to the section labeled "Join Options for this Tour," and click the "Edit Option Details for this tour" section that corresponds to the join option you wish to use. In the "Biller Codes" section, locate the ClearCard IDV Merchant ID fields. ClearCard assigns each pricing option that you set up a unique Merchant ID, which again must be obtained from their website. You can find this on your ClearCard "My Account -- Membership Plans" page. Fill in your Biller Code, and click Save.
### Instant Upgrades
ClearCard IDV also supports the usage of Instant Upgrades to upgrade the status of a member in NATS. Before you can begin add instant upgrade functionality to NATS, however, you must first set it up with your biller.
Once you have set up instant upgrade functionality with ClearCard IDV, create a link in [NATS](https://tmmwiki.com/index.php/NATS) as follows:
* https\://\/signup/upgradeplus.php?site=\\&username=\
Replace *\* in the above example with the [linkdomain ](/using-nats/nats-admin-features/linkdomain)for your site. Replace *\* with your chosen site's ID number. Replace *\* with the upgrading member's username. Once you have configured instant upgrade functionality in NATS, members will be automatically upgraded when clicking that link.
### Discount Memberships (Cancel Offers)
ClearCard IDV supports Discount Memberships, which provides members with discounted price offers when they attempt to cancel their membership. This feature must be configured with your biller -- for more information about offering Discount Memberships for your site(s), please contact ClearCard.
### Flat Amount Sales
If you wish to create a separate join option that allows you to offer a flat rate charge for members through ClearCard IDV, go to the [Billers Admin](/nats-admin/billers), edit the site you want to offer the flat amount sale for, and create a new join option.
Do not fill in the ClearCard IDV Merchant ID under "Biller Codes" if you want to offer Flat Amount Sales through this join option. Save your new join option, and your members will be able to choose your flat amount sale option when registering for your site.
# Click and Buy
*Article Topics:* [*Billers*](/getting-started/common-topics/billers)
## Setting Up Click and Buy
Before you can begin configuring Click and Buy as a biller in NATS, you must first register an account through their website at [https://www.clickandbuy.com/WW\_en/payment/index.html](http://www.clickandbuy.com/WW_en/payment/index.html)
When going through the registration process, make sure you take down the account information that is provided to you by Click and Buy, including Seller ID, Transaction Manager Password, EMS Domain, and Link IDs/URLs. This information is necessary for setting up Click and Buy in NATS.
Under the "Event Messaging Service" section, set the EMS Type to PULL. If you do not do this, your poll will not work, and no recurring transactions will be recorded.
Next, add a new domain under "Offer Administration" that corresponds to the domain of the site you are setting up.
## Setting Up Click and Buy in NATS
### Billers Admin
To begin setting up Click and Buy in NATS, go to the [Billers Admin](/nats-admin/billers). Scroll down to the "Setup New Biller" drop-down menu, select Click And Buy, and click "Add New Option."
You will then be prompted for your Seller ID, Trans Manager Password, and EMS Domain. This information must be obtained directly from Click and Buy. If you did not receive this information, please contact your biller. When you have filled in the required information, click Save.
### Sites Admin
Next go to the [Sites Admin](/nats-admin/sites), create or edit a tour, and scroll down to the section marked "Join Options for this Tour." Click the "Edit Option Details" action icon for the join option(s) you want to offer Click and Buy support for.
On the next page, scroll down to the fields labeled "CLICKANDBUY." Fill in your CLICKANDBUY Link ID, Link URL, Upgrade Link ID, Upgrade Link URL, and Currency. You must fill in the CLICKANDBUY Currency field, otherwise Click and Buy will not be able determine the default currency used for transactions made in NATS.
# CoinGate
*Article Topics:* [*Billers*](/getting-started/common-topics/billers)
{% hint style="info" %}
**Please Note:** Please don't test your biller setup with NATS CoinGate's test account—it won't work correctly.
{% endhint %}
## Billers Admin
To add CoinGate to NATS, select "CoinGate" from the dropdown menu list of billers next to "Setup New Biller" in the [Billers Admin](/nats-admin/billers). Once selected, click "Add" on the right side of the page to finish adding CoinGate.
{% hint style="info" %}
**Please Note:** If you don't see CoinGate, [put in a support ticket](http://clients.toomuchmedia.com/), as you may need an updated version of NATS.
{% endhint %}
Once you have added the Biller you will be able to edit biller-specific account information by clicking the pencil icon next to CoinGate labeled, "Edit CoinGate Account Info". You will need to get the API Token from CoinGate.
For information on how to create an api\_key (access token) please check out the following url:
[https://support.coingate.com/hc/en-us/articles/4402498918546-How-can-I-create-CoinGate-API-credentials](https://support.coingate.com/hc/en-us/articles/4402498918546-How-can-I-create-CoinGate-API-credentials-)
{% hint style="info" %}
**Please Note:** CoinGate returns the surfer to NATS only when they are approved and the surfer clicks on the 'Back to Merchant' button. Because of this, CoinGate does not support the NATS cascade feature. CoinGate also does not require you to configure a postback URL.
{% endhint %}
## Sites Admin
CoinGate requires no site-specific information to be modified in your tour configuration. Instead, join options with CoinGate must be configured as a special join option by clicking "Set Special Payment Options" next to the site for which you would like to set up a CoinGate join option in the [Sites Admin](/nats-admin/sites).
* CoinGate Amount: The transaction amount of the join option.
* CoinGate Currency: This is the currency that will be used to calculate the transaction amount in cryptocurrency based on what is set for the Amount field.
* CoinGate Recieve Currency: - This is the currency you will receive your transaction payouts from CoinGate system in.
* CoinGate offers the following currencies:
* Euro (EUR)
* US Dollar (USD)
* Bitcoin (BTC)
* Litecoin (LTC)
* Etherium (ETH)
* Bitcoin Cash (BCH)
* DO\_NOT\_CONVERT which is used to keep both Bitcoin (BTC) and Litecoin (LTC) payments
## Additional Information
Because expirationCoinGate does not postback information regarding the member's expire date, the following fields are required:
* CoinGate Active Number: This is the number of days, hours or minutes you would like to set for the duration of the subscription.
* CoinGate Active Period: This is the unit of time for which you would like the Active Number to be active
For example, a special join option with Active Number: 1 and Active Period: DAY will be a join option that expires after 1 day.
# CoinPayments
*Article Topics:* [*Billers*](/getting-started/common-topics/billers)
## Billers Admin
To add CoinPayments to NATS, select "CoinPayments" from the dropdown menu list of billers next to "Setup New Biller" in the [Billers Admin](/nats-admin/billers). Once selected, click "Add" on the right side of the page to finish adding CoinPayments.
{% hint style="info" %}
**Please Note:** If you don't see CoinPayments, [put in a support ticket](http://clients.toomuchmedia.com/), as you may need an updated version of NATS.
{% endhint %}
Once you have added the Biller you will be able to edit biller-specific account information by clicking the pencil icon next to CoinPayments labeled, "Edit CoinPayments Account Info". You will need to get the following information from your CoinPayments account:
* Merchant ID
* Located in CoinPayments 'Account Settings' page under the 'Basic Settings' Tab: "Your Merchant ID"
* IPN Key
*
* Check Amount for Active Period
* PRORATE -- default setting. when the postback amount does not match, NATS will reconfigure the active period based on the amount member paid.
* OFF -- NATS will base the active period on the NATS join option
* ON -- NATS will expire the membership right away if amount does not match in NATS
{% hint style="info" %}
**Please Note:** CoinPayments returns the surfer to NATS only when they are approved and the surfer clicks on the 'Continue to seller's store' link. Because of this, CoinPayments does not support the NATS cascade feature. CoinPayments also does not require you to configure a postback URL.
{% endhint %}
## Sites Admin
CoinPayments requires no site-specific information to be modified in your tour configuration. Instead, join options with CoinPayments must be configured as a special join option by clicking "Set Special Payment Options" next to the site for which you would like to set up a CoinPayments join option in the [Sites Admin](/nats-admin/sites).
* CoinPayments Amount: The transaction amount of the join option.
* CoinPayments Currency: This is the currency that will be used to calculate the transaction amount in cryptocurrency based on what is set for the Amount field.
* CoinPayments Use Shipping Fields on Biller Join Form: Enable this option to record buyer's shipping information on CoinPayments
CoinPayments does not postback information regarding the member's expire date so the following fields are required:
* CoinPayments Active Number: This is the number of days, hours or minutes you would like to set for the duration of the subscription.
* CoinPayments Active Period: This is the unit of time for which you would like the Active Number to be active.
For example, a special join option with Active Number: 1 and Active Period: DAY will be a join option that expires after 1 day.
## Configuration Admin
By default, NATS will generate a random username & password for special join options. To allow surfers to set their own username & password, enable the configuration 'DISPLAY\_COINPAYMENTS\_PREJOIN\_PAGE' under the 'Billers' configuration page.
to learn more about the Configurations see the "[Configuration Admin](/nats-admin/configuration)" page.
### Additional Setup Information
If you want like to setup a direct link for COINPAYMENTS, you will use the below example:
https\://\/signup/signup.php?step=special\&special\[123]=1\&nats=XXXXXXX\&signup\[username]=member\_username\&signup\[email]=member\_email\&signup\[password]=member\_password
* replace \ in the above example with your site link domain
* replace 123 with your join option ID
* replace XXXXXX with your promo NATS code (optional, if not pass then it will become type-in traffic)
* replace member\_username with join member username (optional)
* replace member\_password with join member password (optional)
* replace member\_email with join member email (optional)
In Configuration Admin Biller section, there is a config setting called "DISPLAY\_COINPAYMENTS\_PREJOIN\_PAGE", It allows you to enable/disable a join page for COINPAYMENTS during the signup process.
# CommerceGate
*Article Topics:* [*Billers*](/getting-started/common-topics/billers)*,* [*Cross Sales*](/getting-started/common-topics/cross-sales)
{% hint style="info" %}
**Please Note:** Please don't test your biller setup with NATS Commerce Gate's test account—it won't work correctly.
{% endhint %}
### Set up on Commerce Gate's Website
[Register at CommerceGate.](http://www.commercegate.com/)
Use the New Site link on the left side to configure your sites in Commerce Gate's system. Next, go to the My Websites link on the left and click on one of your sites. For each site, enter the following information;
* Callback URL:
* Callback Type: string
Replace "linkdomain" in the above Callback URL example with your Link Domain. Next, tell them the site will push the member's username and password to the payment page, and ask them to accept the push.
## Set up Commerce Gate in NATS
### Billers Admin
To begin setting up Commerce Gate as a biller in NATS, go to the [Billers Admin](/nats-admin/billers). Scroll down to the "Biller" drop-down menu, select Commerce Gate, and click "Add."
{% hint style="info" %}
**Please Note:** If you don't see Commerce Gate as a biller in NATS, [put in a support ticket](https://clients.toomuchmedia/), as you may need an updated version of NATS.
{% endhint %}
When prompted, fill in the Customer ID number that was provided to you by CommerceGate under the "Account Info" section. If you were not provided with this information, please contact your biller to receive it.
### Sites Admin
Next, go to the [Sites Admin](/nats-admin/sites), create or edit a tour, and scroll down to the "Biller Details" section. Enter your Commerce Gate Website ID in the CGATE Website-ID field. You can get your Website ID from the CommerceGate configuration interface-- click on the row for a site and look for the field labeled *Website ID*. You can enable token value feature by enable "Use token value".
Once you have done this, scroll down to the section labeled "Join Option for this Tour" and click the "Edit Option Details for this tour" icon that corresponds to the join option you wish to use. In the "Biller Code" section on the next page, enter your CGATE Offer-ID and CGATE Package-ID. These can be obtained by going to the "My Website" link on the left side of the Commerce Gate admin. Simply click the row for a site, and the next page will contain a section labeled "Website Offers"; each row in this table will contain a field labeled "Offer ID."
Once you have completed these steps, save your join option details. Commerce Gate will now be configured for basic use as a biller in NATS.
CommerceGate now support token value feature and dynamic pricing (only work for 1 time), you can enable the feature by checking the checkbox "Use token value" and "Enable Dynamic Pricing". If you used the dynamic pricing feature you must select the currency drop down with the currency you wish to used for dynamic pricing.
### Cross Sales
Commerce Gate also supports Cross Sale transactions through NATS. In order to process cross sale transactions, however, you will first have to set them up with Commerce Gate. Please contact Commerce Gate for assistance with this.
To set up cross sales in NATS, go to the [Cross/Up Sales Admin](/nats-admin/cross-up-sales) and click incoming or outgoing cross sales from the navigation tabs (depending on whether you are sending or receiving the cross sale).
If you are sending a cross sale to another site, go to the "Outgoing Cross Sales" section. Add CGate from the Biller drop-down menu, and click Add New Option. On the next page, you will be prompted to fill in the Title, Description, and Disclaimer for your cross sell option.
You will then need to fill out the Biller Info for your cross sale, which should be provided to you by Commerce Gate. Fill in your Offer-ID, Package-ID, and Ref Code here, and click Save Changes.
If you are receiving the cross sale, go to the "Incoming Cross Sales" section. Add CGate from the Biller drop-down menu and click Add New Option. When prompted, choose the site and program you want to associate with the cross sale.
Under "Details," fill in the title of your cross sale option, the intial membership fee and length, and the recurring membership fee and length. Finally, fill in your Website-ID and Offer-ID in the "Biller Info" section of this page and click Save Changes.
## Additional Notes
* When entering your Customer-ID, Offer-IDs, and Website-IDs, remove any leading zeros. So if your Offer-ID is *00300*, just enter *300* into NATS.
* If you do not collect usernames and passwords on your NATS pre-join forms, you need to tell Commerce Gate about this.
* If the domain name of your pre-join form is different then the public domain of the actual site, you need Commerce Gate to authorize your site domain.
* If you would like to used the new paytech url for Commerce Gate, please enable the config setting "CGATE\_NEW\_PAYTECH\_URL" under the configuration admin billers section.
* Commerce Gate now support TEST mode, if you would like to record the test transaction in NATS, please enable config setting "PROCESS\_CGATE\_TEST\_TRANSACTIONS" under the configuration admin billers section.
# ConnectBilling
*Article Topics:* [*Billers*](/getting-started/common-topics/billers)*,* [*Cross Sales*](/getting-started/common-topics/cross-sales)
## Setting Up at ConnectBilling
Before you can begin configuring ConnectBilling as a biller in NATS, you must first register an account through ConnectBilling themselves. You can find out more about this process at their website:
While signing up for ConnectBilling, make sure that you take down the information provided by them, including your Transaction Key, Product Code
## Setting Up ConnectBilling in NATS
### Billers Admin
If you wish to set up ConnectBilling to process transactions in NATS, go to the [Billers Admin](/nats-admin/billers). In the Billers Admin, scroll down to the "Setup New Biller" drop-down menu, select ConnectBilling, and click "Add New Option."
When prompted, enter your ConnectBilling Transaction Key. If you were not provided with the required information, please contact ConnectBilling.
### Sites Admin
To continue setting up ConnectBilling in NATS, go to the [Sites Admin](/nats-admin/sites). On the main page, create a new tour or edit an already existing one, then scroll down to the "Biller Details" section. Enter the Product Code and choose if you want to set ConnectBilling to Use Hosted Forms or uncheck to Use Gateway Join Forms-- this is an optional setting. Under Join option section, Enter Option Code for each join options.
Additionally, you must add rules in order for this join option to be displayed on your join page. You can do so by using the "Rules" action icon, marked with purple arrows.
For more information on Rules in NATS, please see our "[Rules](/using-nats/nats-admin-features/rules)" article.
### Cross/Up Sales Admin
ConnectBilling also supports cross sale transactions in NATS. To begin configuring NATS to accept these transactions, go to the [Cross/Up Sales Admin](/nats-admin/cross-up-sales).
For more information on Cross Sales in NATS, please see our "[Cross Sales](/nats-admin/cross-up-sales/cross-sales)" article.
#### **Incoming Cross Sales**
To set up incoming cross sales to process transactions through ConnectBilling, go to the [Cross/Up Sales Admin](/nats-admin/cross-up-sales) and click the "Incoming Cross Sells" tab at the top of the page. Select ConnectBilling from the "Biller" drop-down menu, select the site and the program that you want to associate with this cross sale option, then click Add New Option.
When prompted, enter the title and fees/lengths of your join options. Under "Biller Info," enter your ConnectBilling option code, initial cost, initial days, recurring cost and recurring days. Click save changes when you have filled out the required fields, and your cross sale should now be configured in NATS.
#### **Outgoing Cross Sales**
In the [Cross/Up Sales Admin](/nats-admin/cross-up-sales), begin by configuring an Outgoing Cross Sale (if applicable). To do so, scroll down to the "Biller" drop-down menu and choose ConnectBilling from your list of options.
On the next page, you will be prompted for a variety of information. Fill out the title, description, and disclaimer for your cross sale option, and choose if you want cross sales enabled for all join options. Next, fill in your Transaction Key, Product Code, Option Code, Processor and the length and cost of your initial/recurring memberships, your Ref Code, and site Domain.
When you have finished filling out the required fields, click Save Changes.
### Additional information
ConectBilling support 3DS for both the hosted form and the gateway integrations. If you are using the gateway integration, you have an option to auto fail all transactions that require 3DS by disabling the ALLOW\_CBILLING\_TO\_INITIATE\_3DS config setting.
In order to send values needed for the device fingerprinting for 3DS for the gateway integration, you will need to use the [nextra](/nats-admin/billers/further-reading/extra-biller-fields) feature and add the following to your join or the gateway\_join template.
```
```
# CurePay
*Article Topics:* [*Billers*](/getting-started/common-topics/billers)*,* [*Cross Sales*](/getting-started/common-topics/cross-sales)
{% hint style="info" %}
**Please Note:** Please don't test your biller setup with CurePay NATS's test account—it won't work correctly.
{% endhint %}
## Set up at CurePay
To begin setting up CurePay, register a [CurePay Account](http://curepay.com/). Make sure that you record the Account I.D., Username, Password, and Plan they send you after registering.
You will need to set a process URL for each of your sites on CurePay's website. Keep in mind that CurePay uses the name "products" for what NATS labels "sites." Click the "Manage" button, select Products, and click List All Products. Click a Product I.D. to go to its management page. In the Postback and Configuration fields, enter the following URL.
```
https://linkdomain/signup/process_curepay.php
```
Replace *linkdomain* in the above example with your [linkdomain](/using-nats/nats-admin-features/linkdomain).
You will only need to fill in the Recurring URL, [Chargeback](/additional-resources/common-terms#chargeback) URL, Refund URL, and Reversal URL fields. Filling in any of the other fields will not affect NATS.
While setting up your CurePay products, record each product's I.D. number and each price point -- you'll need this later.
Please make sure that price point subscription reactivation is totally disabled.
## Set up CurePay in NATS
### Billers Admin
To continue setting up CurePay, go to the [Billers Admin](/nats-admin/billers), select CurePay from the "Setup New Biller" drop-down menu, and click Add.
{% hint style="info" %}
**Please Note:** If you do not see CurePay in your list of billers, you may need to update your version of NATS. If this is the case, [put in a support ticket](http://clients.toomuchmedia.com/) and we'll gladly help you.
{% endhint %}
When prompted, enter the account I.D., username and password you recorded earlier. Click Save.
### Sites Admin
In the [Sites Admin](/nats-admin/sites), create or edit a tour, and scroll down to the "Biller Details" section. Find the CurePay settings, and fill in your Plan, as well as the Product ID that you received from the CurePay website. The Product ID number is only necessary if you are doing recurring sales (this will include rebills, credits, and chargebacks). If you are only processing one-time sales, you do not need to fill in the Product ID. When you are done filling these fields, click Save Changes.
Next, scroll down to Join Options for this Tour. For each recurring join option that you have set up, click the "Edit Global Option Details" icon, fill in your "CurePay Price Point ID," and click Save.
You must also edit/add additional Rules for this option to be shown on your join form. You can do so by clicking the "Set Display Rules" icon next to the corresponding join option and setting "SHOW" rule for this biller (or all billers).
### Cross Sales
If you wish to process Cross Sales with CurePay, you must configure first configure it in the Corss/Up Sales Admin section. In the Corss/Up Sales Admin, select CurePay from the Biller drop-down menu, and click Add New Option. Enter any necessary details (Account ID, Username, Password, Plan, Product ID, Price Point ID, Ref Code, Domain) and click Save Changes.
CurePay allows you to process both Outgoing Cross Sells and Incoming Cross Sells. Simply fill in your Biller Info, and configure the rest as you would a normal Cross Sale.
For more information on setting up a Cross Sale, please see our "[Cross Sales](/nats-admin/cross-up-sales/cross-sales)" page.
# DHD
*Article Topics:* [*Billers*](/getting-started/common-topics/billers)*,* [*Cross Sales*](/getting-started/common-topics/cross-sales)*,* [*Up Sales*](/getting-started/common-topics/up-sales)*,* [*One Click Systems*](/getting-started/common-topics/one-click-systems)
{% hint style="info" %}
**Please Note:** Please don't test your biller setup with NATS DHD's test account—it won't work correctly.
{% endhint %}
## Setting up at DHD
Register an account with [DHD Media](http://www.dhdmedia.com/).
You must give DHD the following two URLs so they can communicate with your NATS.
* Soap Server:
* WSDL:
Replace *linkdomain* with your [linkdomain](https://tmmwiki.com/index.php/Link_Domain).
DHD should provide you with a Domain, Merchant ID, Web Service Username, Web Service Password, and Web Service Role -- record these, you'll need them later. DHD may also setup a website name, multiple currencies, and quick pay for return customers -- if they setup any of these, make a record of them too.
When you setup your products with DHD, you need to record each option's I.D.; if you setup purchase pages, record the purchase page I.D. numbers too.
## Setting up DHD in NATS
### Billers Admin
To begin setting up DHD as a biller in NATS, go to the [Billers Admin](/nats-admin/billers). Scroll down to the "Biller" drop-down menu, select "DHDMedia", and click Add.
### Sites Admin
Next, go to the [Sites Admin](/nats-admin/sites), create or edit a tour, and scroll down to the "Biller Details" section. Enter your Domain, Merchant ID, Web Service Username, Web Service Password, and Web Service Role into the provided fields.
Once you have done this, scroll down to the section labeled "Join Options for this Tour" and click the "Edit Option Details for this tour" icon that corresponds to the join option you wish to use. In the "Biller Codes" section on the next page, locate the "DHD" options and enter the various Purchase Page IDs and Product IDs that you recorded earlier for those join options.
Once you have completed these steps, save your join option details. DHD will now be configured for basic use as a biller in NATS.
### Cross Sales
{% hint style="info" %}
**Please Note:** This feature is available as of NATS. If you are on a version of NATS and would like to process cross sales, please [submit an upgrade ticket](https://clients.toomuchmedia.com/) to upgrade your NATS installation.
{% endhint %}
DHD also supports Cross Sale transactions through NATS. In order to process cross sale transactions, however, you will first have to set them up with DHD. Please contact DHD for assistance with this.
To set up cross sales in NATS, go to the [Cross/Up Sales Admin ](/nats-admin/cross-up-sales)and click incoming or outgoing cross sales from the navigation tabs (depending on whether you are sending or receiving the cross sale).
If you are sending a cross sale to another site, go to the "Outgoing Cross Sales" section. Add DHD from the Biller drop-down menu, and click Add New Option. On the next page, you will be prompted to fill in the Title, Description, and Disclaimer for your cross sale option.
You will then need to fill out the Biller Info for your cross sale, which should be provided to you by DHD. Fill in your Merchant ID, Product ID, and Ref Code here, and click Save Changes.
If you are receiving the cross sale, go to the "Incoming Cross Sales" section. Add DHD from the Biller drop-down menu and click Add New Option. When prompted, choose the site and program you want to associate with the cross sale.
Under "Details," fill in the title of your cross sale option, the initial membership fee and length, and the recurring membership fee and length. Finally, fill in your Merchant ID, Product ID, Upgrade Product Page ID, and Upgrade Product ID in the "Biller Info" section and click Save Changes.
### Up Sales
{% hint style="info" %}
**Please Note:** This feature is available as of NATS. If you are on a version of NATS and would like to process up sales, please [submit an upgrade ticket](https://clients.toomuchmedia.com/) to upgrade your NATS installation.
{% endhint %}
Up Sales can be configured similarly to cross sales in NATS. Like cross sales, you will have to set up up sales first with DHD.
To set up up sales in NATS, go to the [Cross/Up Sales Admin ](/nats-admin/cross-up-sales)and click incoming or outgoing upsells from the navigation tabs (depending on whether you are sending or receiving the upsell).
If you are sending the up sale, go to the Outgoing Upsells section. Add DHD from the Biller drop-down menu, and click Add New Option. On the next page, you will be prompted to fill in the Title, Description, and Disclaimer for your upsell.
You will then need to fill out the Biller Info for your upsell, which should be provided to you by DHD. Fill in your Product ID, Ref Code, Domain, whether you want to use HTTPS Post, whether this is the Master Merchant Account, and the Initial Amount of your upsell here, and click Save Changes.
If you are receiving the up sales, go to the "Incoming Upsells" section. Add DHD from the Biller drop-down menu and click Add New Option. When prompted, choose the site and program you want to associate with the upsell.
Under "Details," fill in the title of your upsell option, the initial membership fee and length, and the recurring membership fee and length. Finally, fill in your Merchant ID, Product ID, Upgrade Product Page ID, and Upgrade Product ID in the "Biller Info" section and click Save Changes.
### Using Quick pay with DHD
[NATS](https://tmmwiki.com/index.php/NATS4) offers a new feature to set up Quick pay options only for returning customers through DHD. To do so, navigate to the [Sites Admin](/nats-admin/sites) and click Edit Tour Details. On this page, check the "Quick Pay For Return Customers" option for DHD to set up the option for that particular tour. Once this is done, you will have to manually pass the member's username and token hash (if the payment method is through NATS tokens).
When this is configured, the Quick pay option set for the tour will automatically be used if the member has a prior DHD transaction in their record. If they have no prior records (new members), the Quick pay option will not be available for DHD.
### Package Plus
The Package Plus feature is available after NATS for the DHD integration. This feature allows you to offer your members incentives to upgrade their memberships to a higher tier in your Members Area.
For more information on Package Plus, visit our "[Package Plus](/using-nats/one-click-systems/package-plus)" page.
### Upgrade Plus
UpgradePlus lets you shorten a Member's Trial by offering them incentives to upgrade to a full member. Most users do this by offering them two separate Members Areas: One only for members in their Trial Phase (showing a limited amount of content) and a separate area that gives access to the full content for members that paid for the full month.
DHD requires an Upgrade Product ID on the join options for this to work. The upgrade ID is the product ID of the new product.
For more information, see our "[Upgrade Plus](/using-nats/one-click-systems/upgrade-plus)" page.
---
[Next Page](/llms-full.txt/1)