> For the complete documentation index, see [llms.txt](https://docs.toomuchmedia.com/llms.txt). Markdown versions of documentation pages are available by appending `.md` to page URLs; this page is available as [Markdown](https://docs.toomuchmedia.com/nats-admin/third-party/common-question/adding-a-third-party-partner.md).
# Adding a Third Party Partner
*Article Topics:* [*Third Party Partner*](/getting-started/common-topics/third-party-partner.md)*,* [*Sites*](/getting-started/common-topics/sites.md)*,* [*Programs*](/getting-started/common-topics/programs.md)
Setting up a new third-party partner is a process that involves setting up in the Third Party Admin, the Sites Admin, and the Programs Admin. This page will detail all the necessary steps to configure your new Third Party Partner.
## Adding a New Third Party
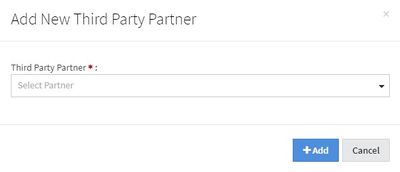
To add a new third party partner, go to the [Third Party ](/nats-admin/third-party.md)Admin and click the "Add A Partner" button in the top-right corner of the page. A widget will appear that will allow you to select a third party partner from a drop-down list.
Once you have selected your partner, click the "Add" button.
Next, go to that new third party's overview, and under "Account Details", fill in the necessary account information by either clicking on each field or clicking the "Edit Details" button, then click "Save." This information will and must be obtained from your third party provider. Then, you can set up deduction and transaction fees under the "Fees" tab in the overview. Specific information on these fields can be found in the [Third Party Partner Overview](/nats-admin/third-party/third-party-overview.md).
## Setting up a Third Party Site
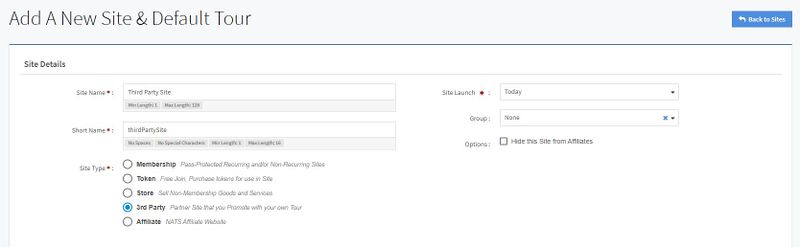
The next step in configuring your new third party involves the Sites section. Navigate to the Sites section on the main navigation menu and click "Site Management" to access the [Site Management area](/nats-admin/sites/site-management.md). There, you will see a button "Add a Site" at the top-right corner of the page. Click on that, and you will be redirected to the [Adding a Site](/nats-admin/sites/common-questions/creating-a-new-site-in-nats.md) page.
On the "Adding a Site" page, under Site Type, click "3rd Party".
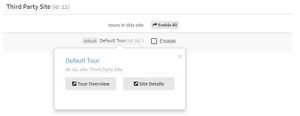
Once the site has been added, you will be redirected to the [Site Overview](/nats-admin/sites/site-management/site-overview.md). There, click on the "Tours" tab and click on the "Default Tour". Then, click on the "Billers" tab and click the "+" sign under the newly created third party. You will have to fill in the necessary fields, including entering your third party URL. Once the fields are configured, click the blue check button, and your third party site and tour will be configured.
## Setting up a Third Party Program
The final step in configuring your new third party involves the Programs section. Navigate to the [Programs](/nats-admin/programs.md) Admin on the main navigation menu. There, click the "Create New Program" button at the top-right corner of the page and create a new program that is set up with a manual affiliate enrollment.
{% hint style="info" %}
**Please Note:** You can also create a program with automatic enrollment, but we recommend you create a program with manual enrollment, as new affiliates will not be automatically enrolled in the program. When you're ready for your affiliates to send traffic through this program, you can enable it to automatically enroll all affiliates in the program.
{% endhint %}
Fill in the program name, short name, and choose "Standard Program" from the program type drop-down menu. Once you have filled all the information, click "Add Program". You will then be redirected to that [program's overview](/nats-admin/programs/program-overview.md). Under the Details tab, click the "Edit Details" button next to "Program Options" and fill in all of the options you would like active, such as Deduct Credits, Deduct Chargebacks, Hide Rebills, etc.
Next, click on the "Sites" tab and locate your third party site and tour. Once you have found it, click on the "Enable" checkbox next to the site so that the site and tour are enabled with the third party program.
Configure the Third Party Tour under the Program
\
Finally, click on the "Payouts" tab and click the "Edit Details" button next to the Default Program Payouts. Configure how much you want to pay out for certain events, such as raw hits, member joins, etc., and click "Save" to finish configuring your new third party program.
## Type-in Traffic
{% hint style="warning" %}
**Very Important:** If you don't complete this step, NATS will not be able to track the Third Party Partner type-in traffic.
{% endhint %}
After you have finished configuring your site and program, you will be able to get an affiliate link code for your type-in/in-house affiliate account.
Please see our "[NATS Code](/using-nats/nats-admin-features/linkcodes/nats-code.md)" article for help obtaining the affiliate NATS Code.
Once you have gotten the NATS code from that link code, go back to the Third Party Admin, edit AdultFriendFinder, and paste the affiliate's NATS code into the default NATS code field. This affiliate will then receive credit for all type-in traffic sent to the Third Party Partner
## Related Articles
{% content-ref url="/pages/P9UkOgbMlrhVFiyBXSNJ" %}
[List of Supported Third Party Partners](/nats-admin/third-party/list-of-supported-third-party-partners.md)
{% endcontent-ref %}